
With the release of the new PolyList widget, building lists in LiveCode just got a whole lot more powerful. PolyList is a LiveCode widget designed to allow you to build the style of list you want. This could be anything from a simple single column text list to a full blown image gallery list. (You can learn more about PolyList itself here.) This article is a hands on follow along tutorial to show you how to build one specific list style.
Why Airbnb?
I recently set out to build a list that is found on one of the most popular web apps around. I figured if users are going to use PolyList to build web apps then it should be capable of building the best lists on the web. I’m talking about AirBnb, it’s a thing of beauty and I am going to show you exactly how I built it. (If you couldn’t care less about how I built it but still want it, I can relate to that! The example stack is included with the PolyList download via the Extensions Store. Just grab it and use it.)
Studying the template
Ok let’s get started. First let’s take a peek at what it is we are actually trying to recreate. AirBnb, if you don’t already know, is a web app that allows people with homes and apartments to list them for rental and for people looking for places to stay to book them. One of the key things to the success of a listing is incredibly good photos. Here is a look at the original:
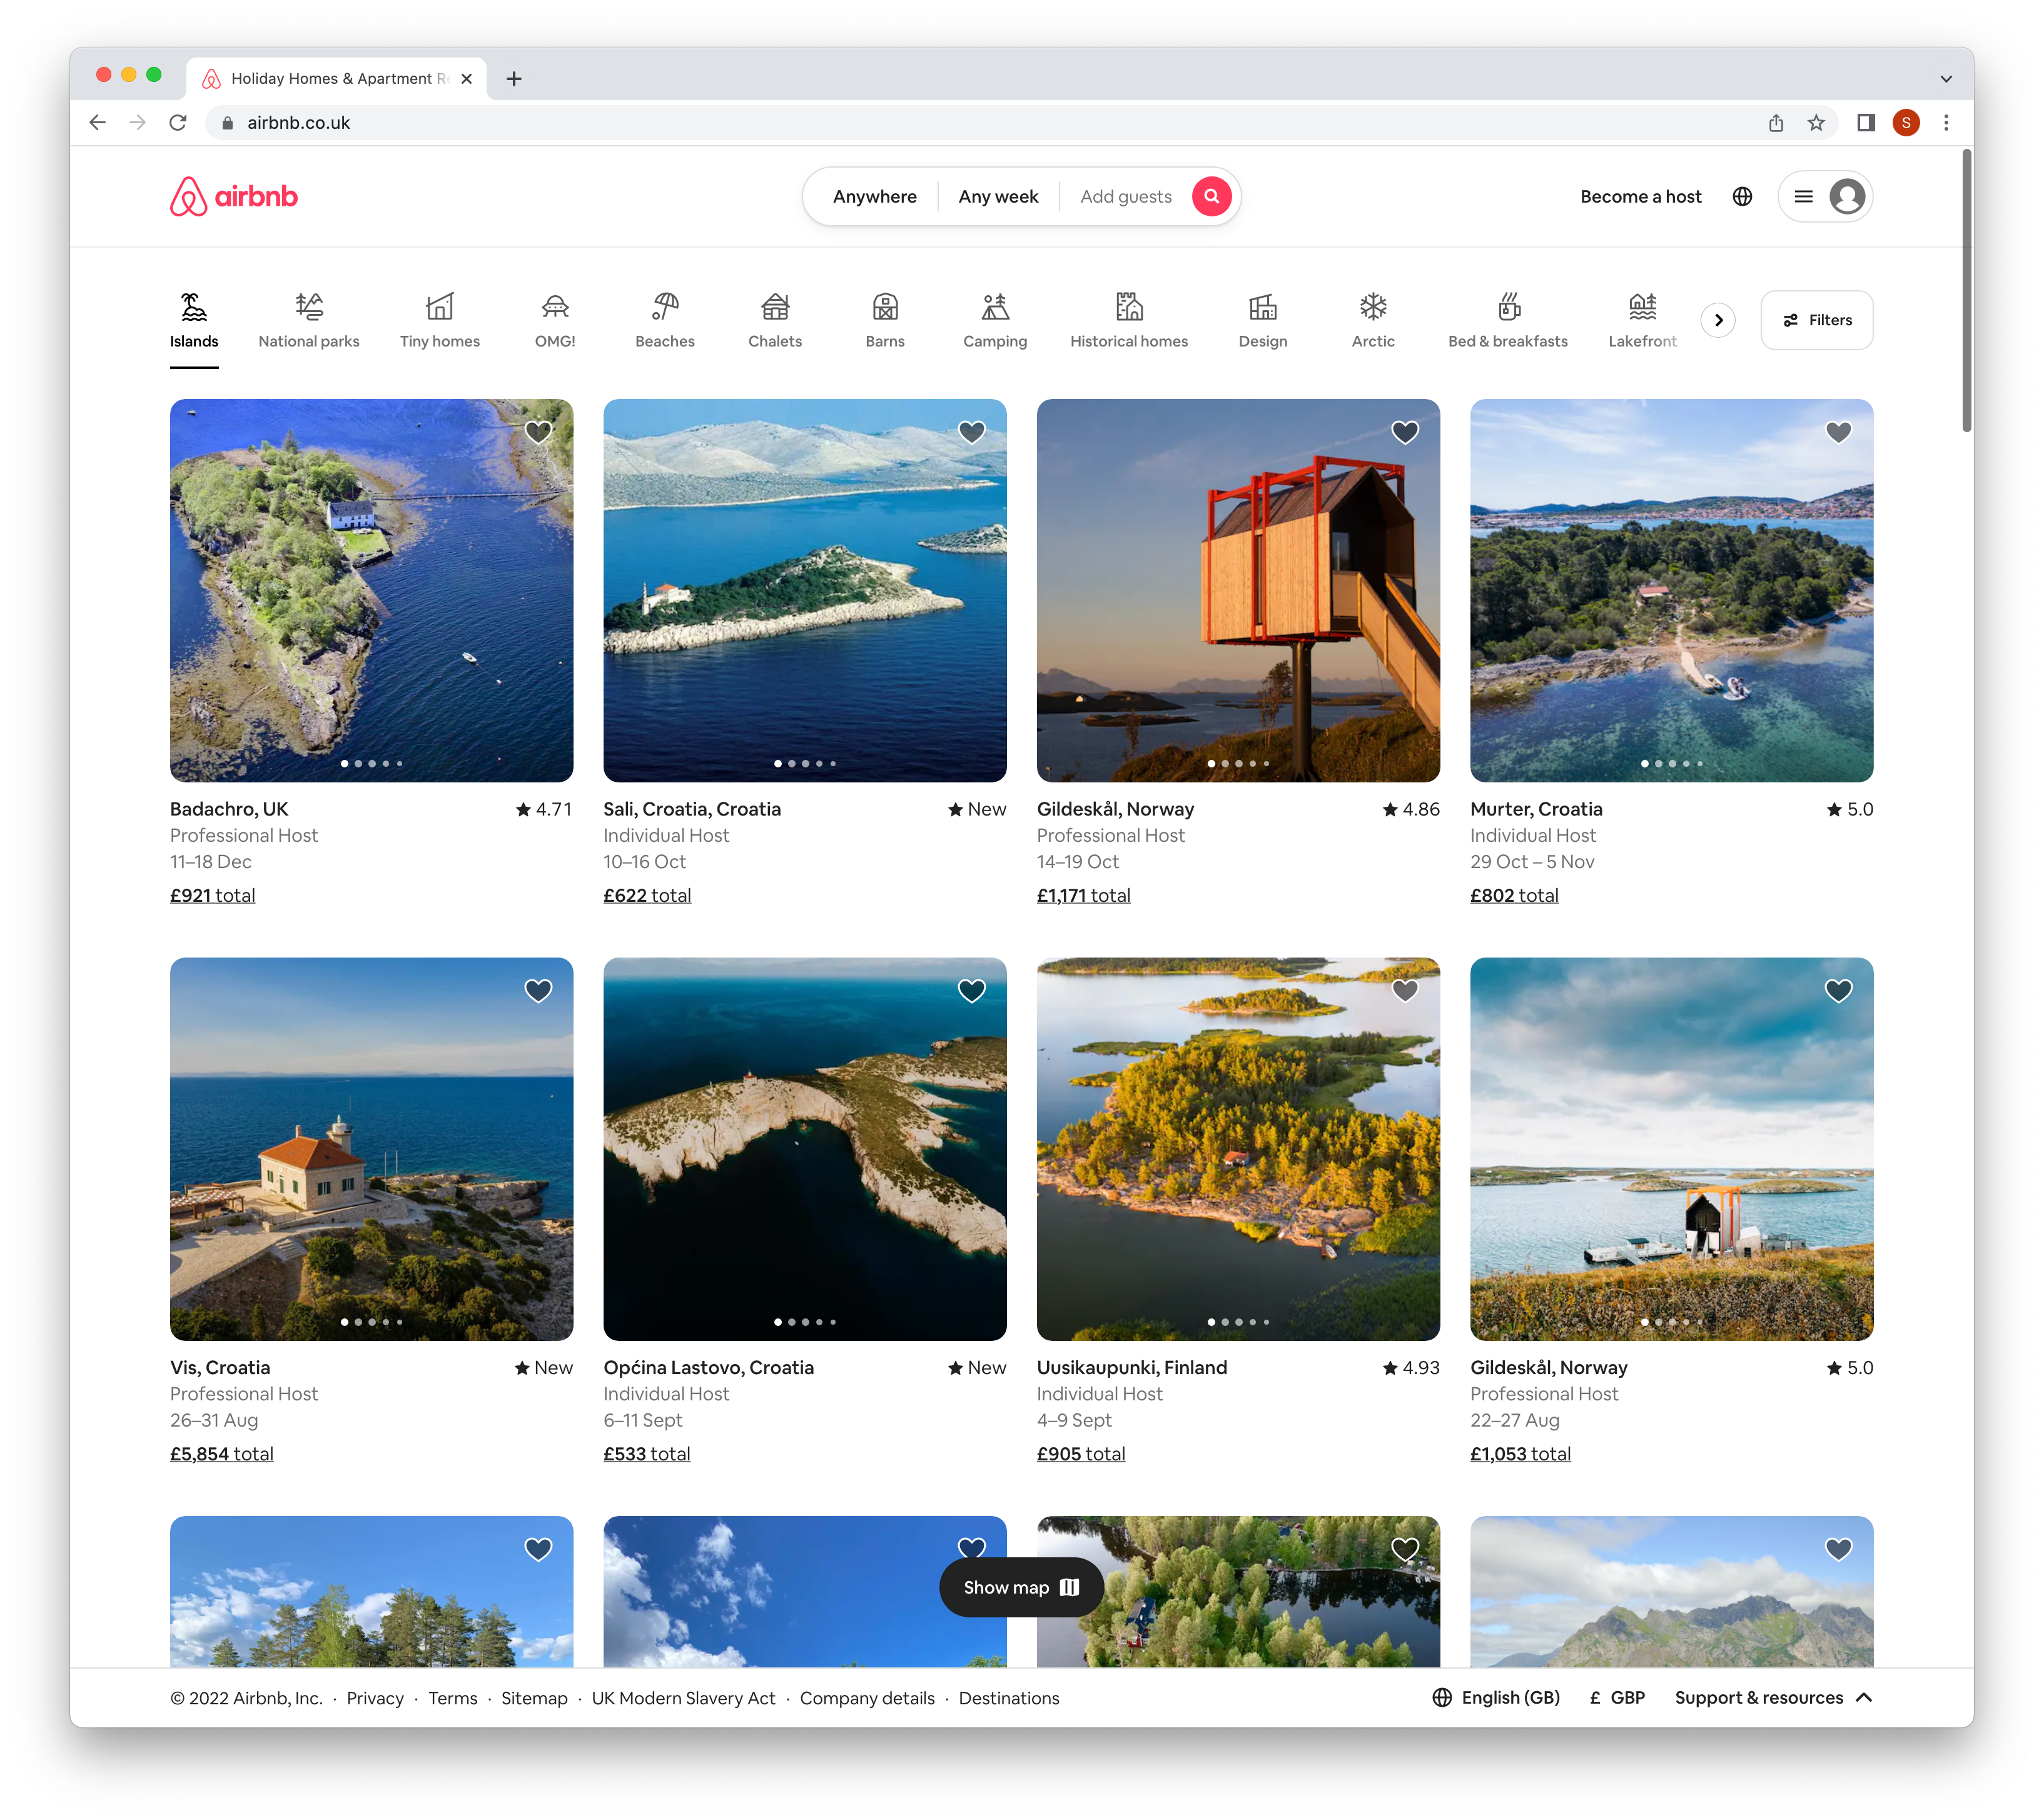
We’ve got a few things going on here… A beautiful photo of the listing, a title with a description of the lister, a price, a star icon with a rating, a heart icon over the image to indicate if you love that property or not. In the screenshot above it’s 4 columns wide but as you resize the browser width up and down that changes up to 5 columns wide or down to 1 column wide. I know what you are thinking… “Can I really do all that in LiveCode? It sounds complicated.” Yes you can, no it’s not! Let me show you how…
Getting set up
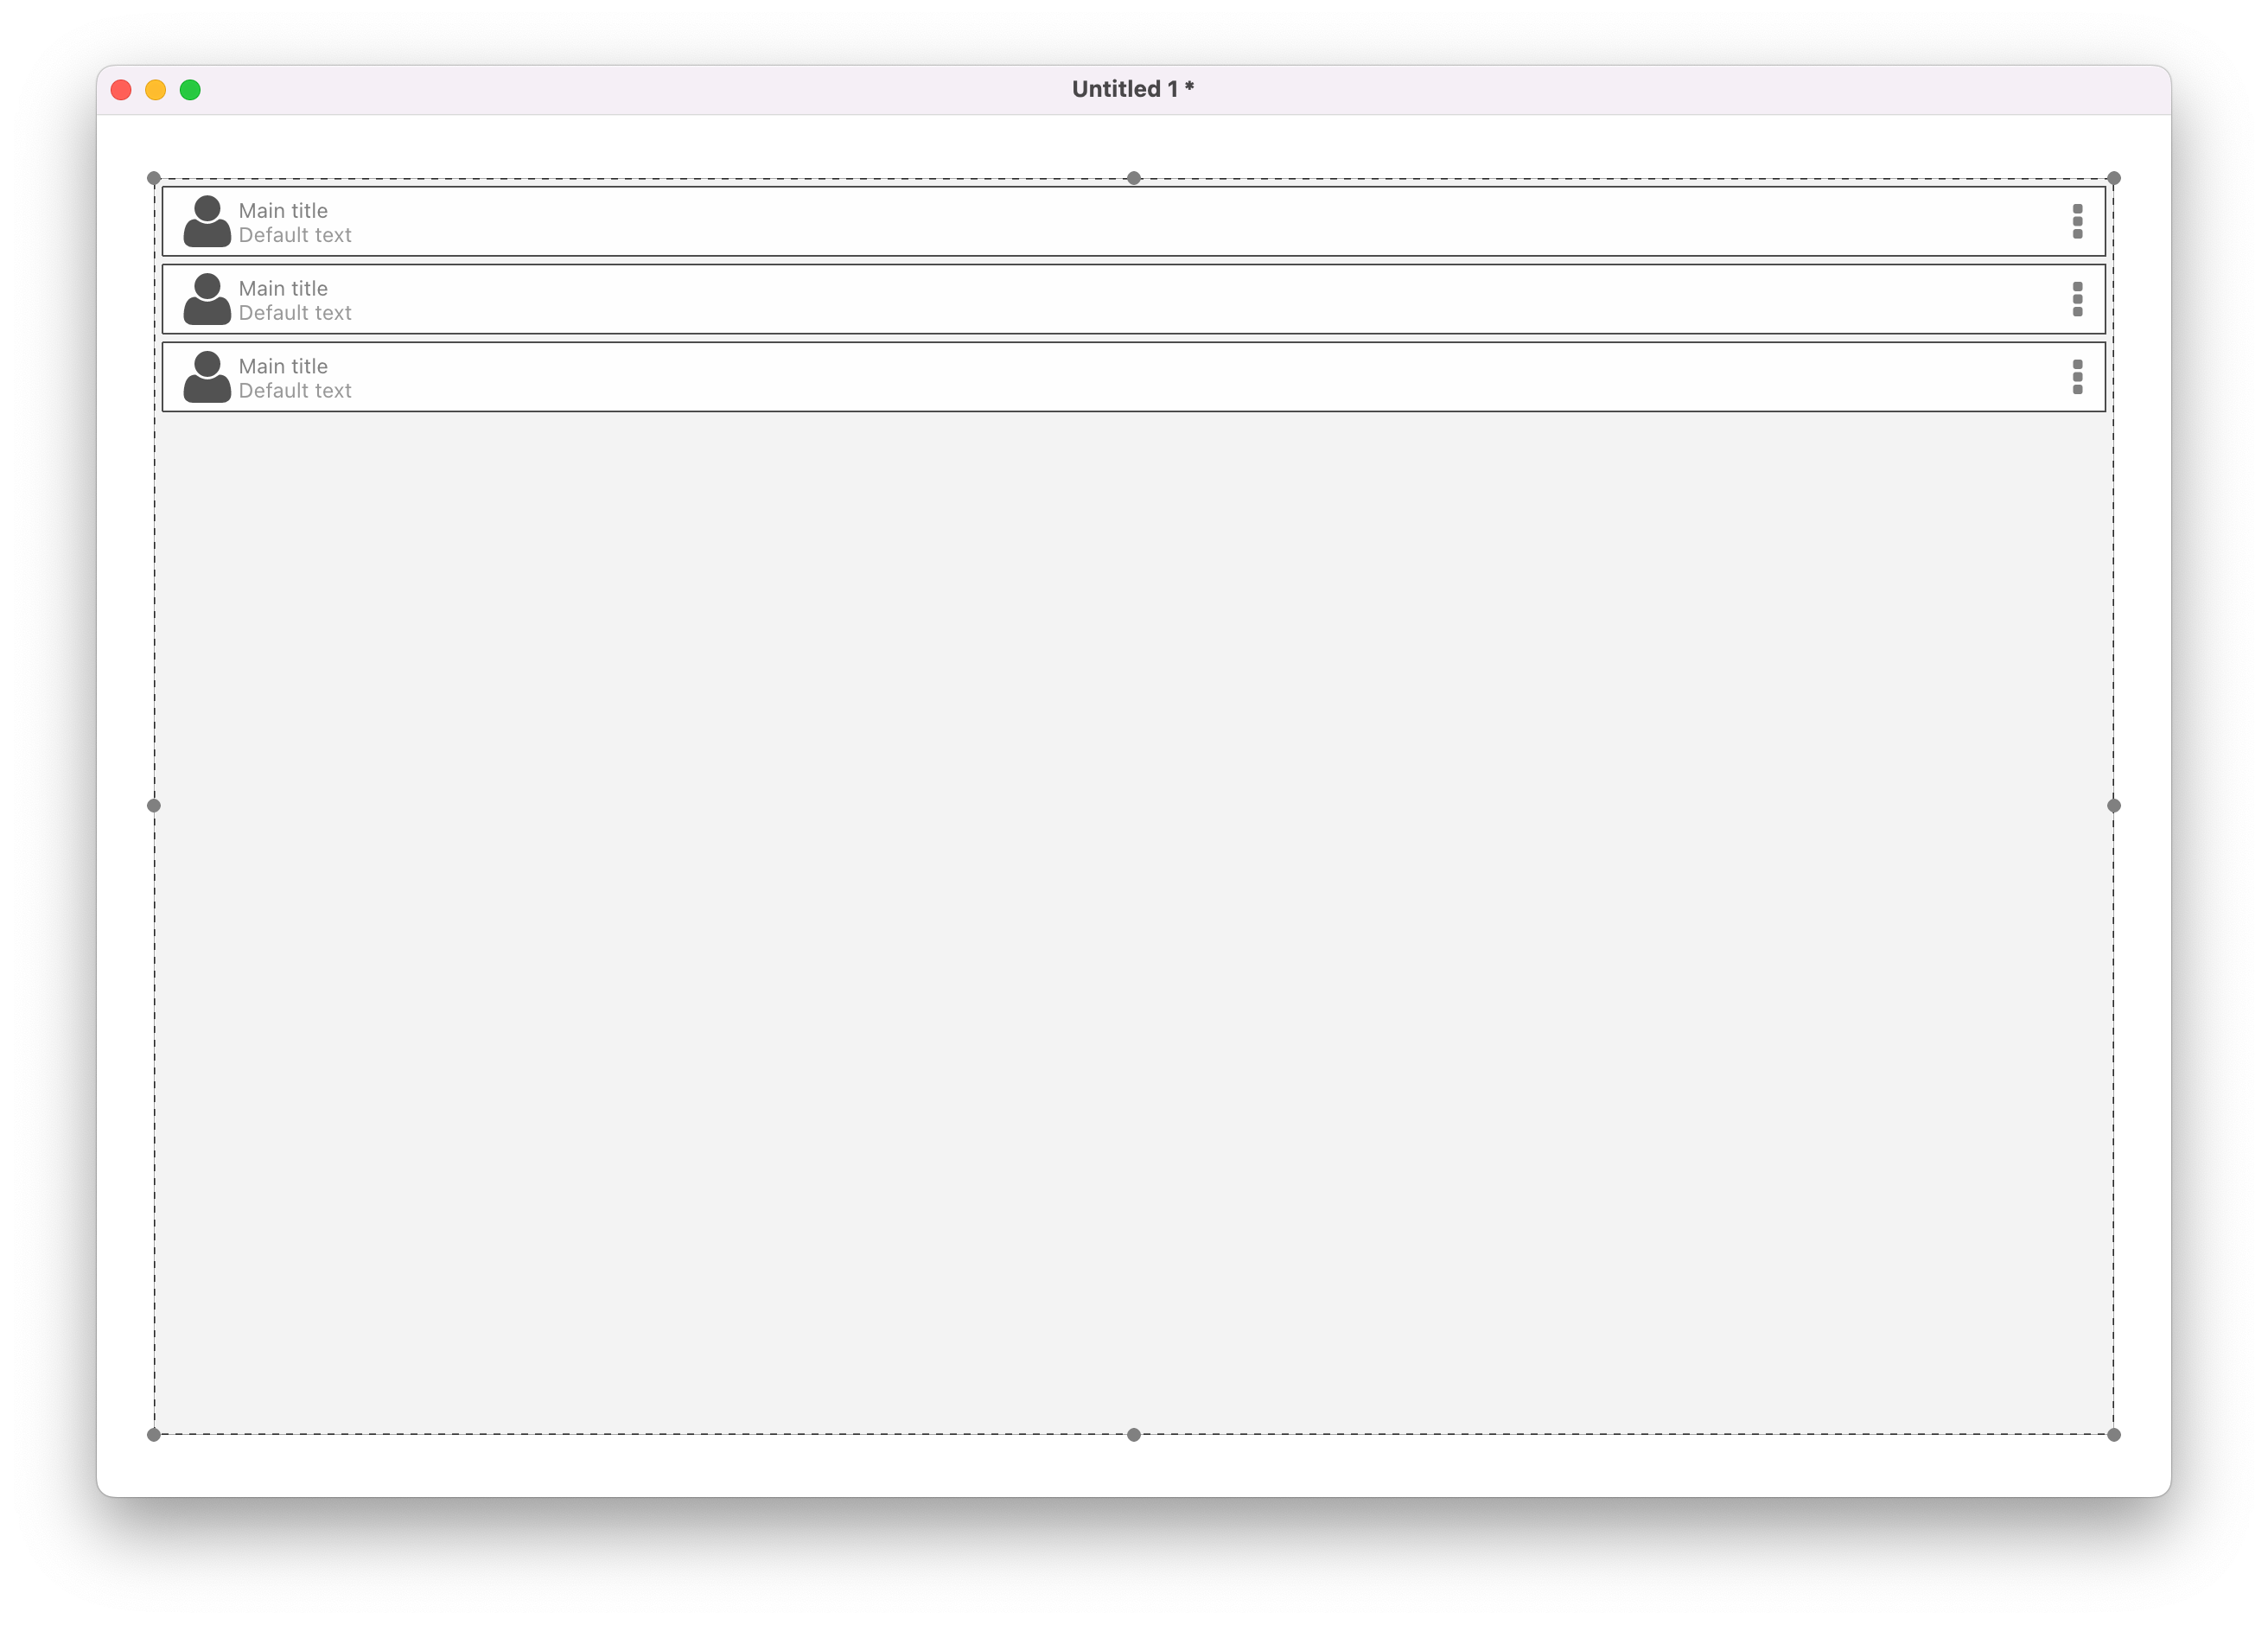
The first thing to do here is to setup our project. Create a folder on your Computer and call it LCBnB. Inside that folder create another folder called images. Open up LiveCode, making sure you have the latest version of PolyList installed (available in the LiveCode Enhancements download in your my account area under third party. If you don’t have that you can get it by purchasing the MegaBundle). Make a nice big stack, mine is 1200 x 800 and drag the PolyList onto it. Resize it until you have something that resembles the below screenshot:
Save this stack into your LCBnB folder – if you want to follow me to the letter you can call it lcbnb.livecode. Whilst we are doing the housekeeping you will also want to populate your images folder. You will want to optimize the images you are using to give a good experience to the users of your list. What I mean by that is, if you are serving the user a list with images of 300px wide don’t have 5000px wide photos that are big both in pixels and MBs. If you want to use the images that I have used in this example you can find them in the examples section of your enhancements download or you can grab them here. Put them in your images folder.
Remove Sample Data
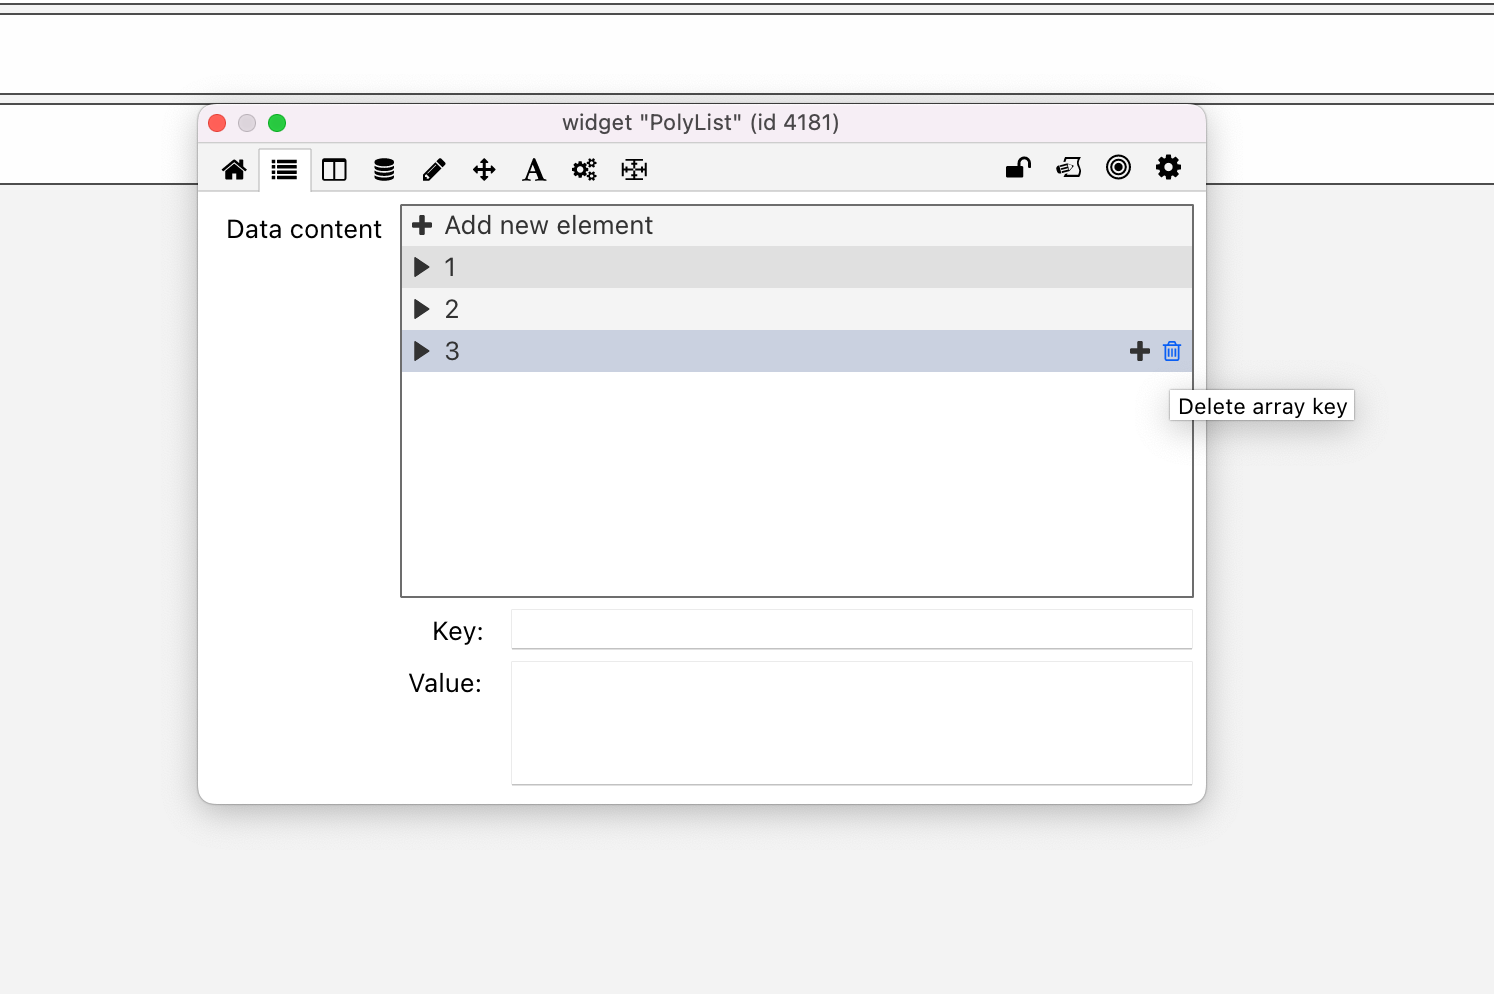
PolyList loads with a sample layout and some sample data which is useful to give you an idea of how it all comes together but for this example we don’t need any of that. So let’s get rid of it. Open up the Property Inspector and head to the 2nd tab, which is the Data Content tab, in the latest version of PolyList. Now delete the 3 items from the Tree View. This gets rid of the sample data. Here is a screenshot of that:
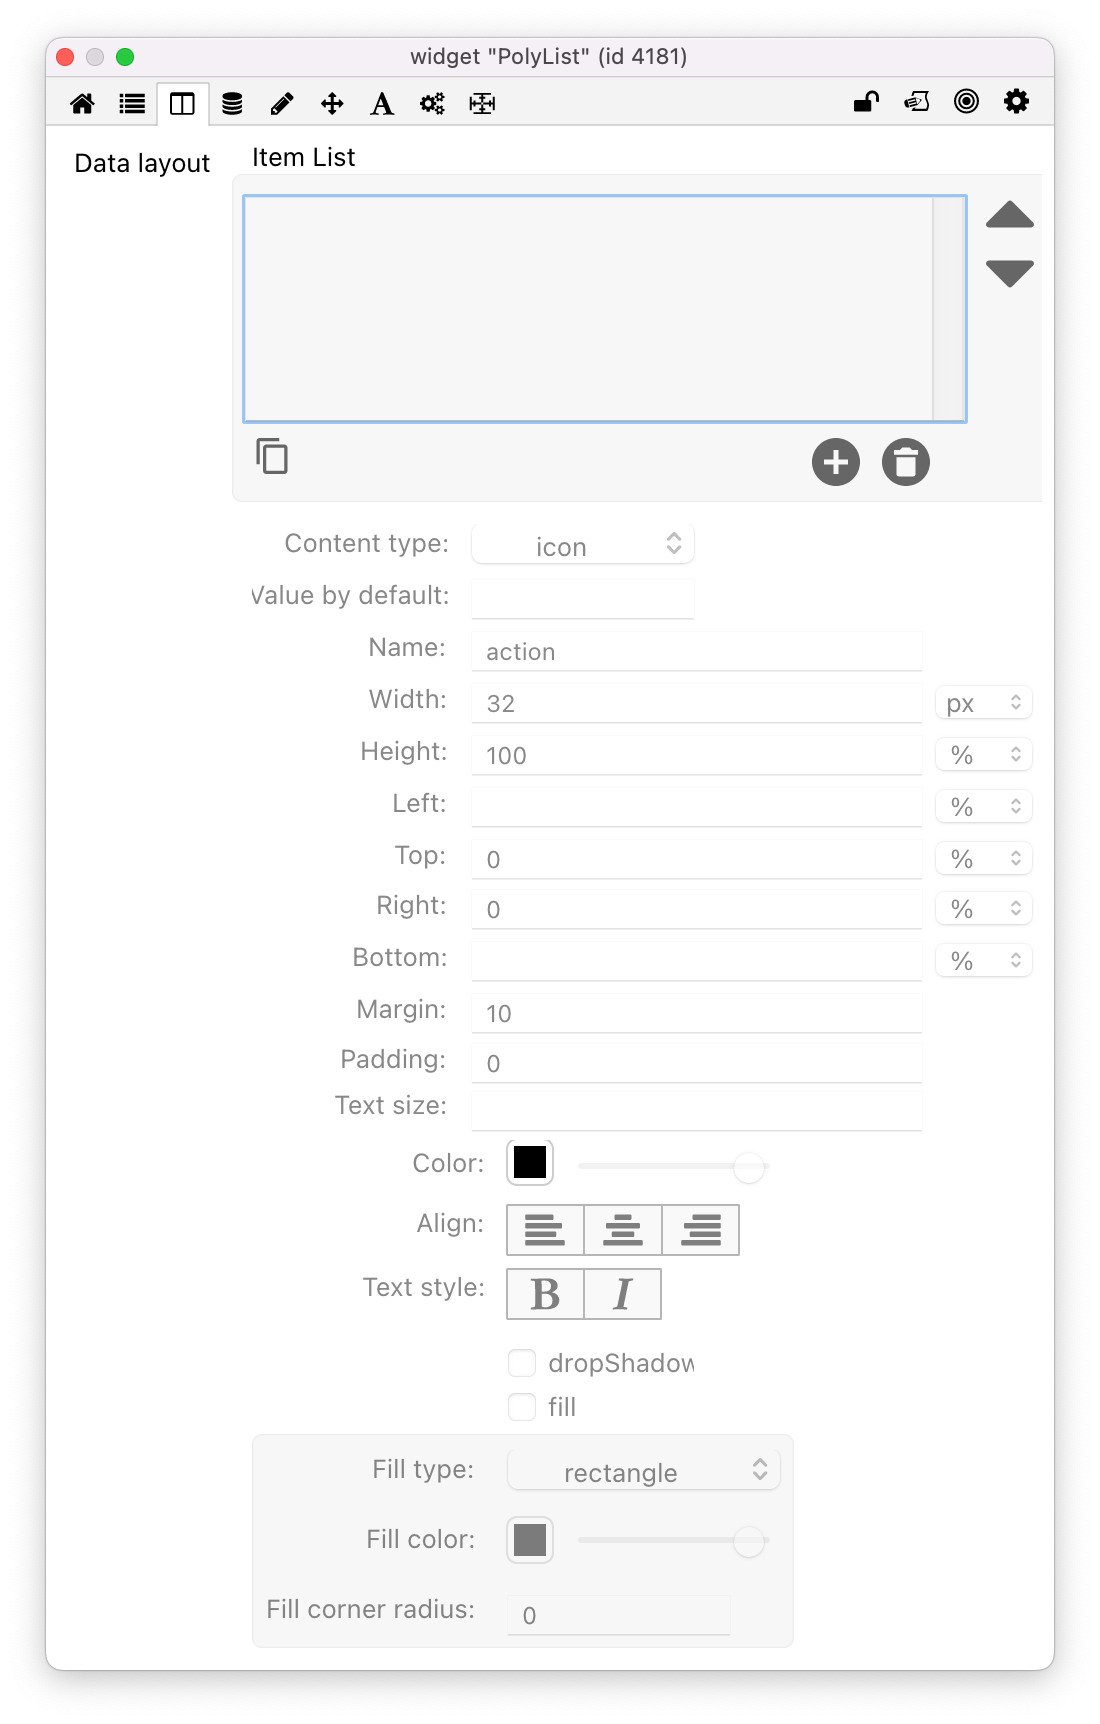
This will leave you with a blank grey box. If it doesn’t you probably haven’t deleted all 3 of the array keys in the screenshot above. Next up head over to the next tab which is our Data Layout tab, this is where we style each item in our list. You will want to go ahead and delete all the items in here so you end up with an empty list like the screenshot below:
Getting to work
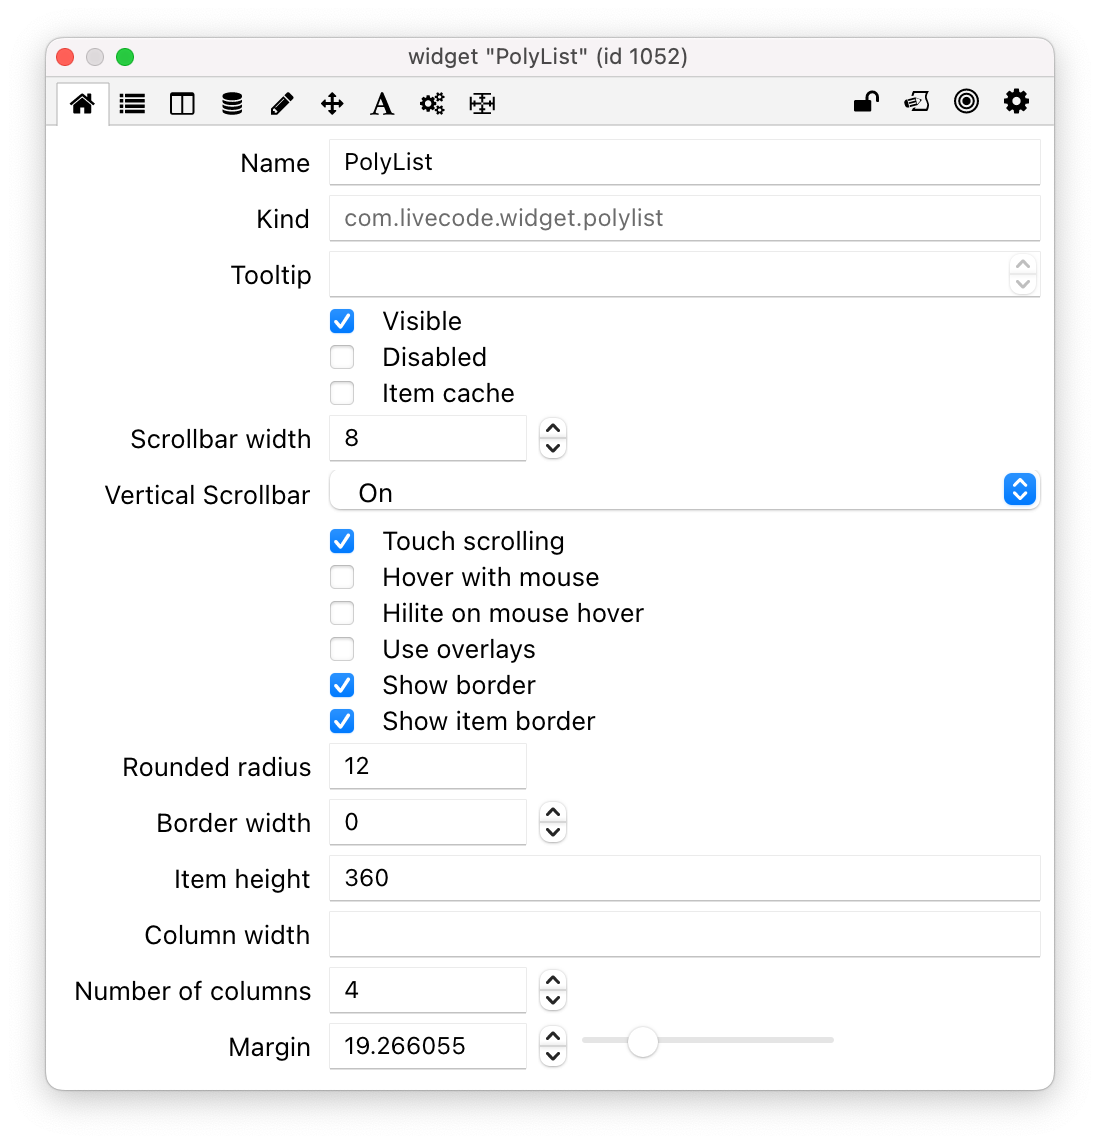
Now we have a blank canvas – let’s get to work with painting our masterpiece. Head back over to the home tab in the property inspector, this is where we can make some decisions about our list layout and general look and feel. The main objective here is to make some decisions on how many columns wide our list will be, the width / height of each column and what the margin should be between each column. We can also set some properties for the display of the scrollbar. Here is a screenshot of how it should look to achieve our AirBnB list:
Lets go ahead and construct our Data Layout. First lets list all the things we need to achieve the AirBnB style list.
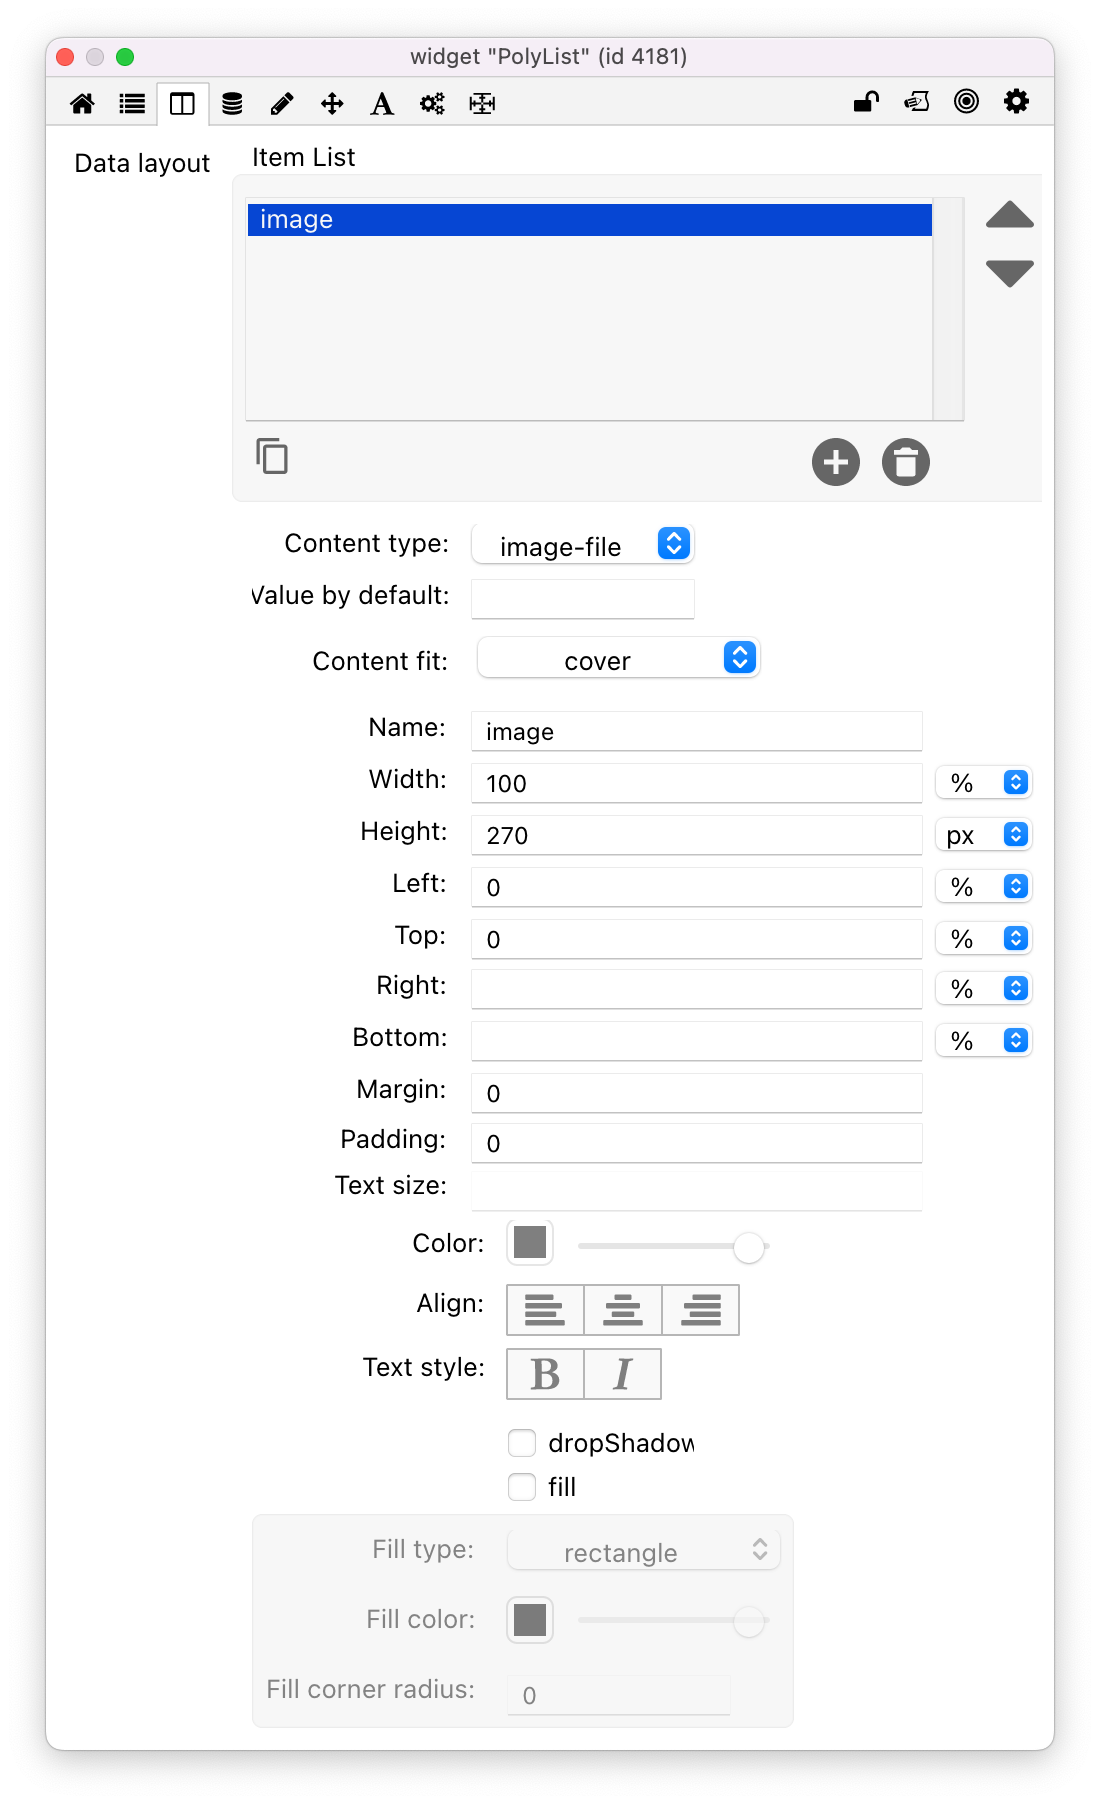
- Our image, we will call this “image” and it will have a content type of “image-file”
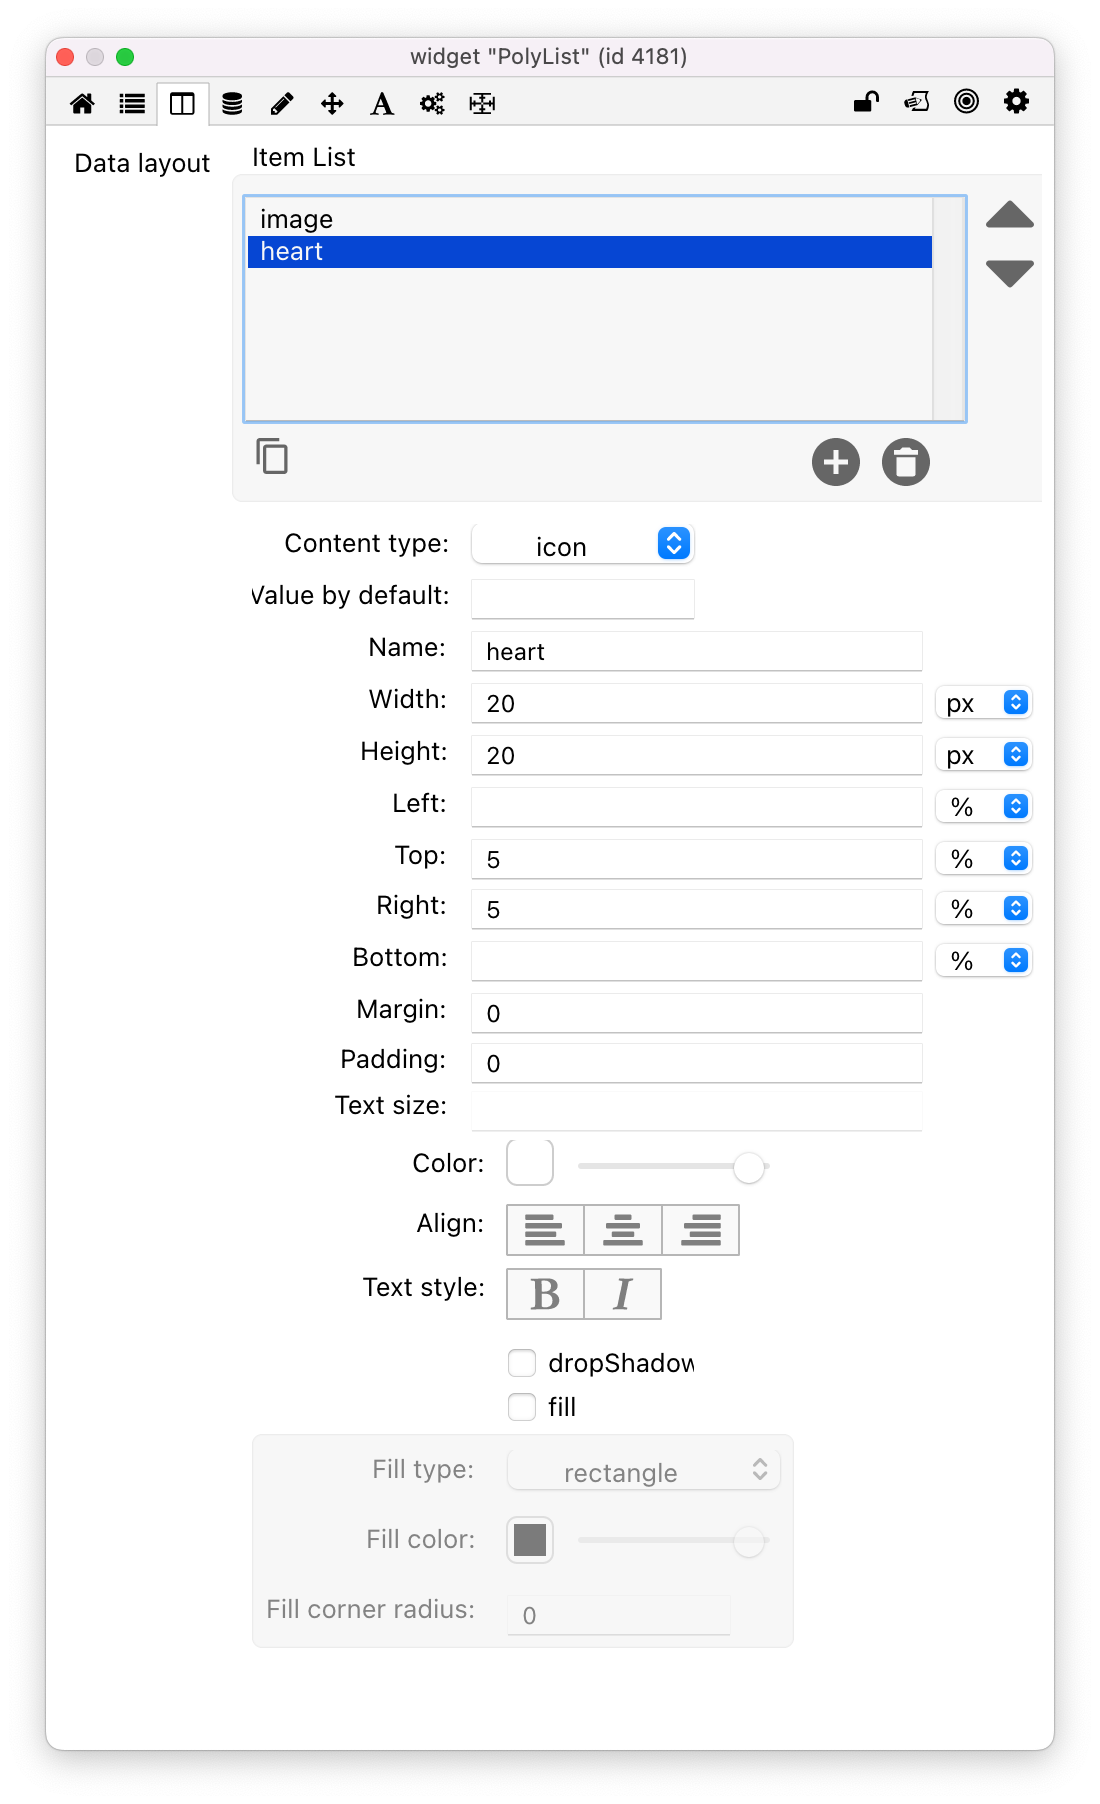
- Our heart icon, we will call this “heart” and it will have a content type of “icon”
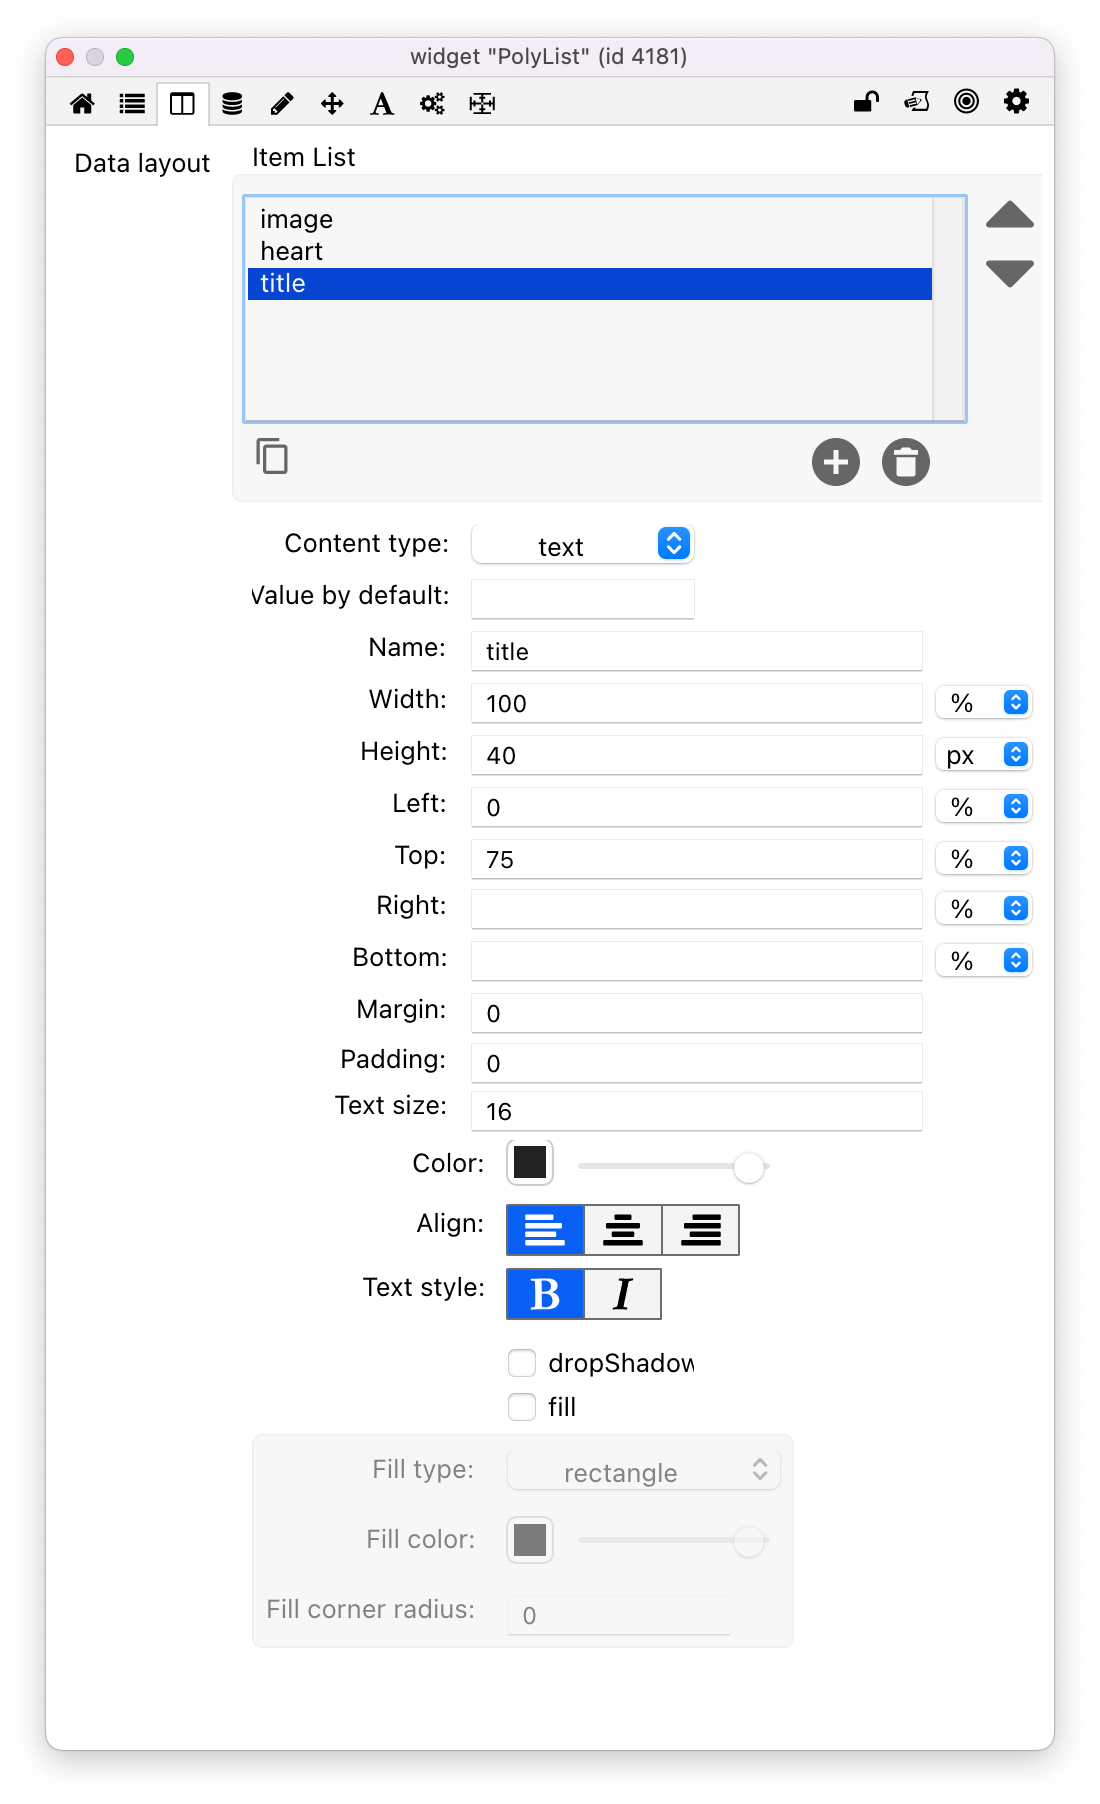
- Our title, we will call this “title” and it will have a content type of “text”
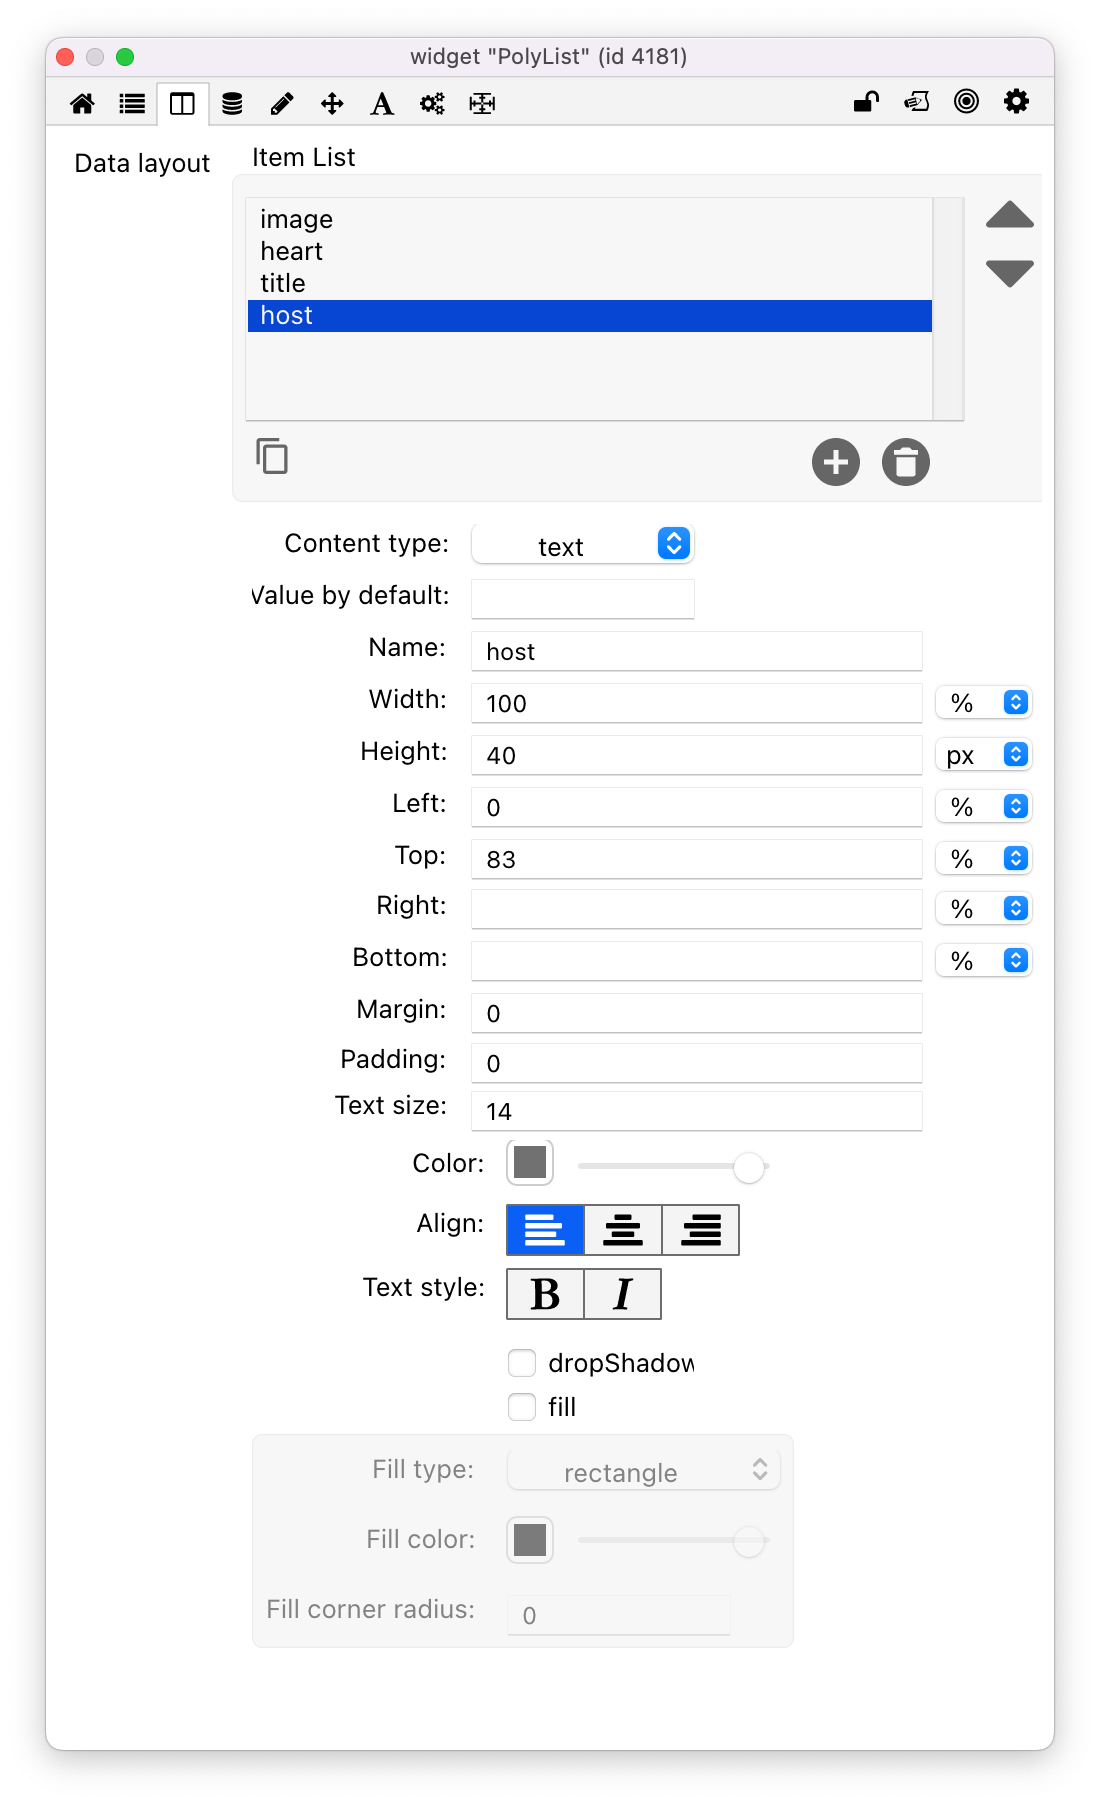
- Our host description, we will call this “host” and it will have a content type of “text”
- Our price, we will call this “price” and it will have a content type of “text”
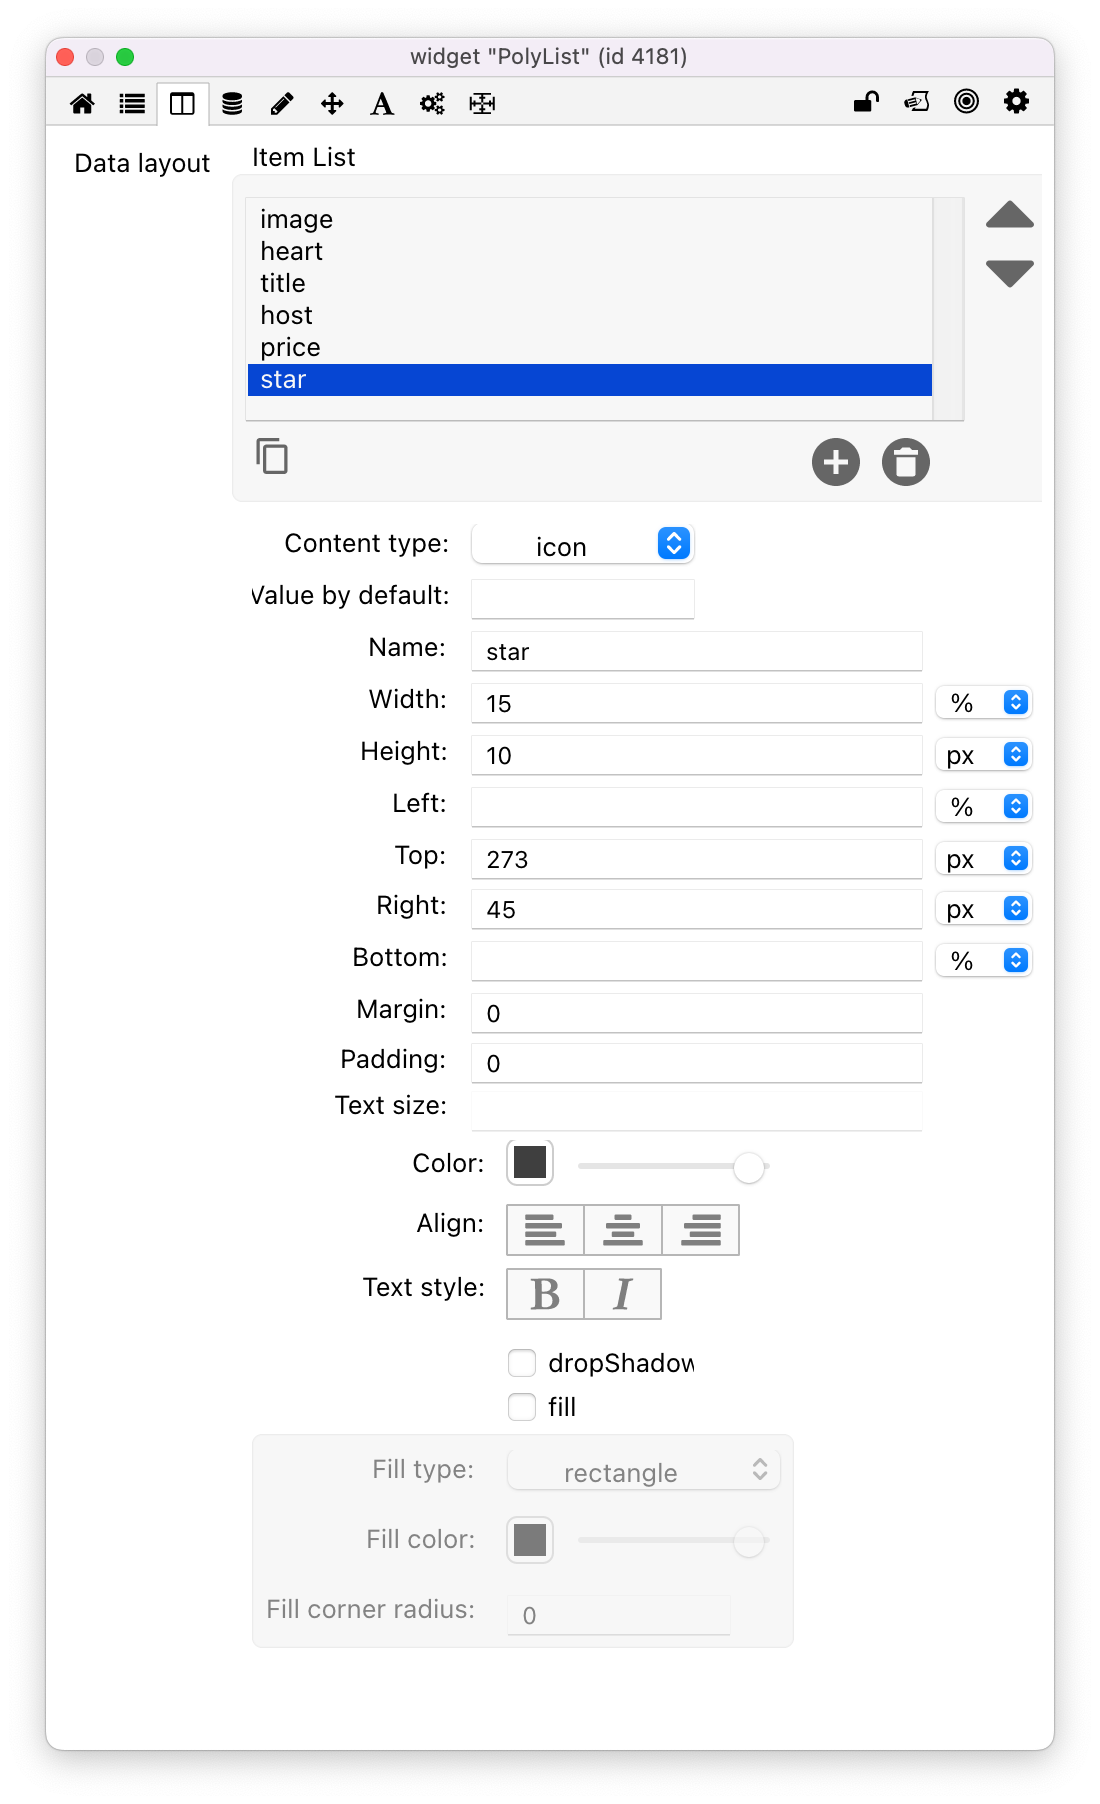
- Our star icon, we will call it “star” and it will have a content type of “icon”
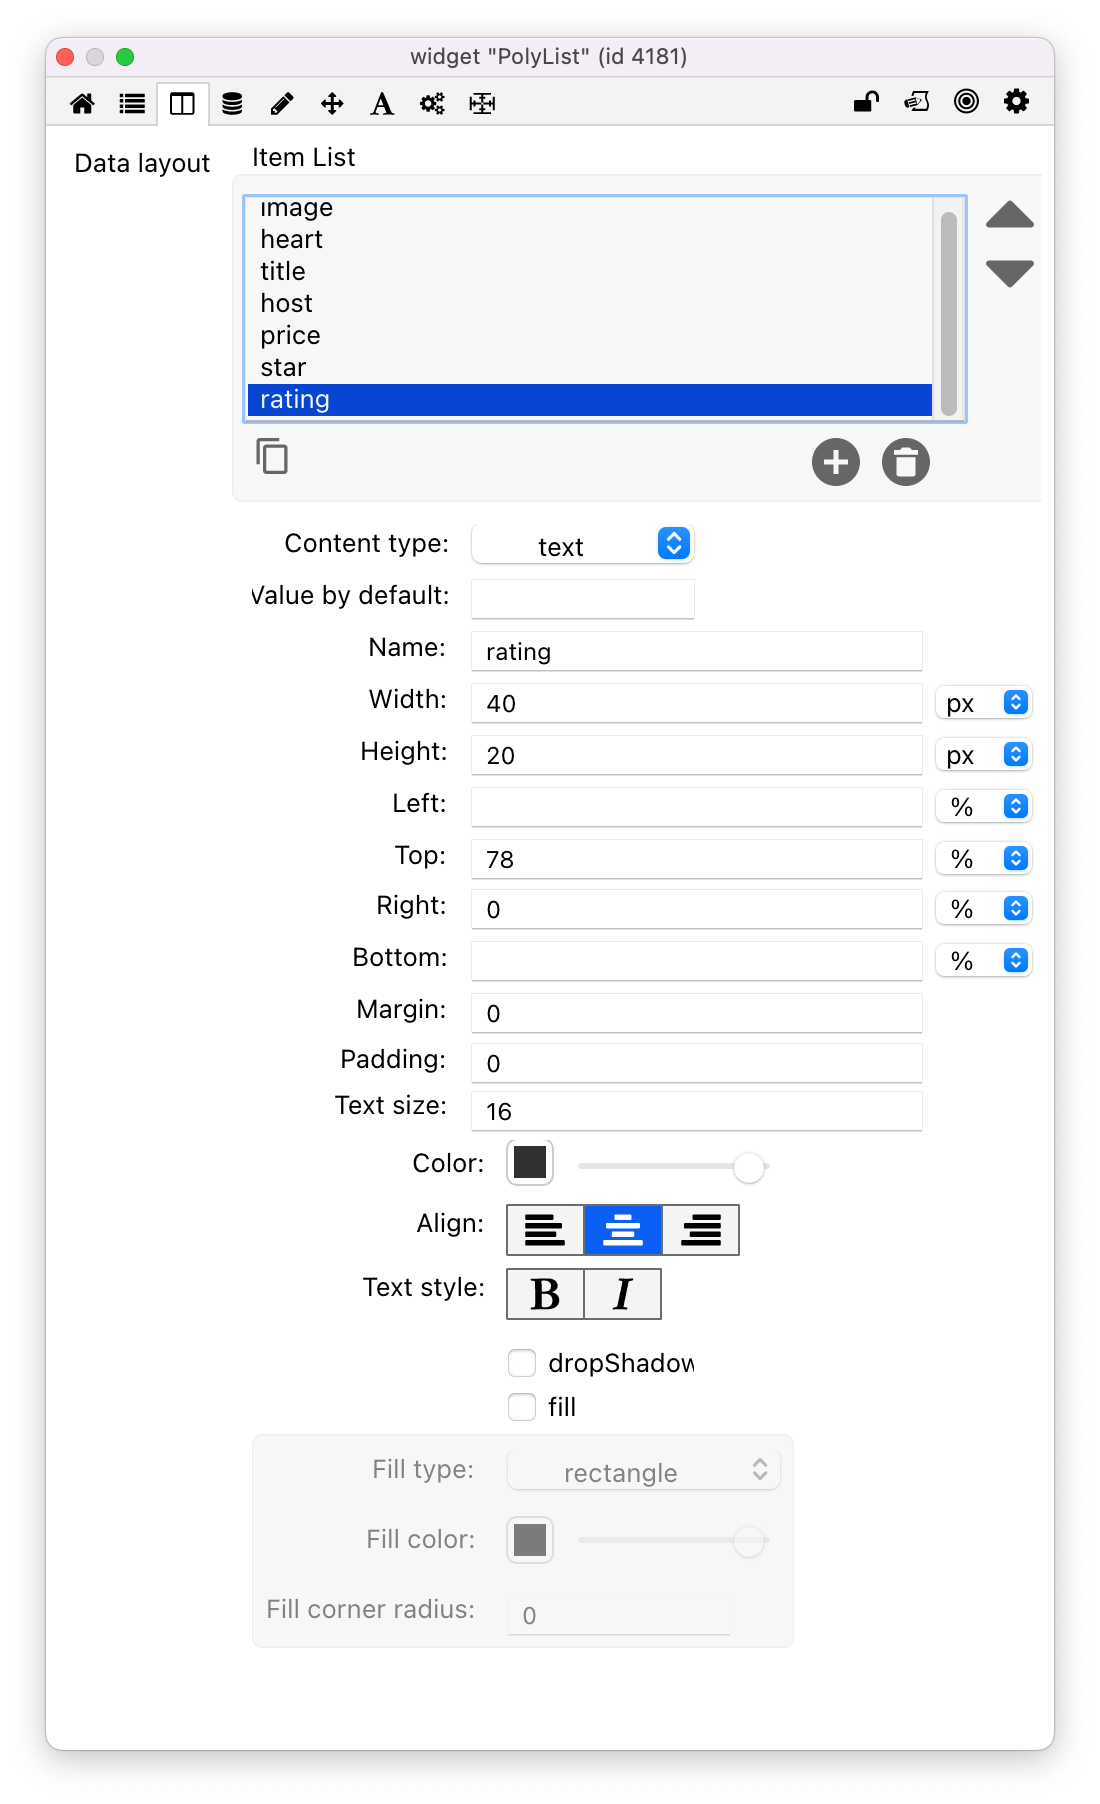
- Our rating, we will call it “rating” and it will have a content type of “text”
An important point to mention here is the name that you give and the content-type that you set matter when adding our Data Content later. When adding the Data Content the key we give must match the name and the value must be what is expected for that content-type. For example image-file will expect a path to the image location and icon will expect the name of the SVG icon, which I will explain a bit further in a moment.
Head over to the Data Layout tab (3rd tab in latest version) in the Property Inspector and lets start to build the elements our list requires. I will screenshot each below with a small explanation on what its doing.
All pretty straightforward so far? Let’s keep constructing our beauty of a list.

Adding the data
Now it’s the moment of truth. Let’s add some data and see if it looks how we expect it to look. It’s fine if it’s slightly off or even completely off as we can tweak our Data Layout even after content has been added. As set out in a prior blog post there are multiple ways to add your data, for this first line let’s do it manually. Head on over to the 2nd tab in the Property Inspector where we will add to the treeview.

Following the above screenshot add data to the treeview to match exactly this. For each “Key” enter the name of the object you defined in the Data Layout tab, and then for the “Value” add the values shown above for each key.
Let’s have a look at what this is doing. The text content types that we added are all pretty self explanatory so I won’t dig into them. Our image as I mentioned earlier requires a path to the image, you will remember we placed images in our images folder right at the beginning and we have entered a value which is a path to that image. We are using two icons in our list and you can see in the screenshot we have values of heart empty and star. These values match up to the name of the SVG icon inside LiveCode. The easiest way to find out the name of the icons is to pull out the SVG widget, browse through the list to find the icon you want to use and take note of that name, this is what you would put here. If you have any questions on any of this so far please ask away in the comments section.
As you can see from the screenshot above, we are getting close but we have to tweak a few things to get it just right. I would like to say I have done this on purpose to add to jeopardy of this blog post, actually yes let’s say that is exactly what I have done.
Our star is in the wrong place, the background colour is not correct and it looks a little squished. Let’s address these one at a time…
The background colour, thats an easy one. Open up the property inspector for the PolyList widget and head over to the 5th tab which is the colors tab. In here change the background color to #ffffff (white). You will also see in here we have hilited and hover colors, you can play around with these as you desire but I don’t want any hilited colors so I will either set this to transparent or to the same as my background color. Thats the background color fixed and it’s starting to look better.
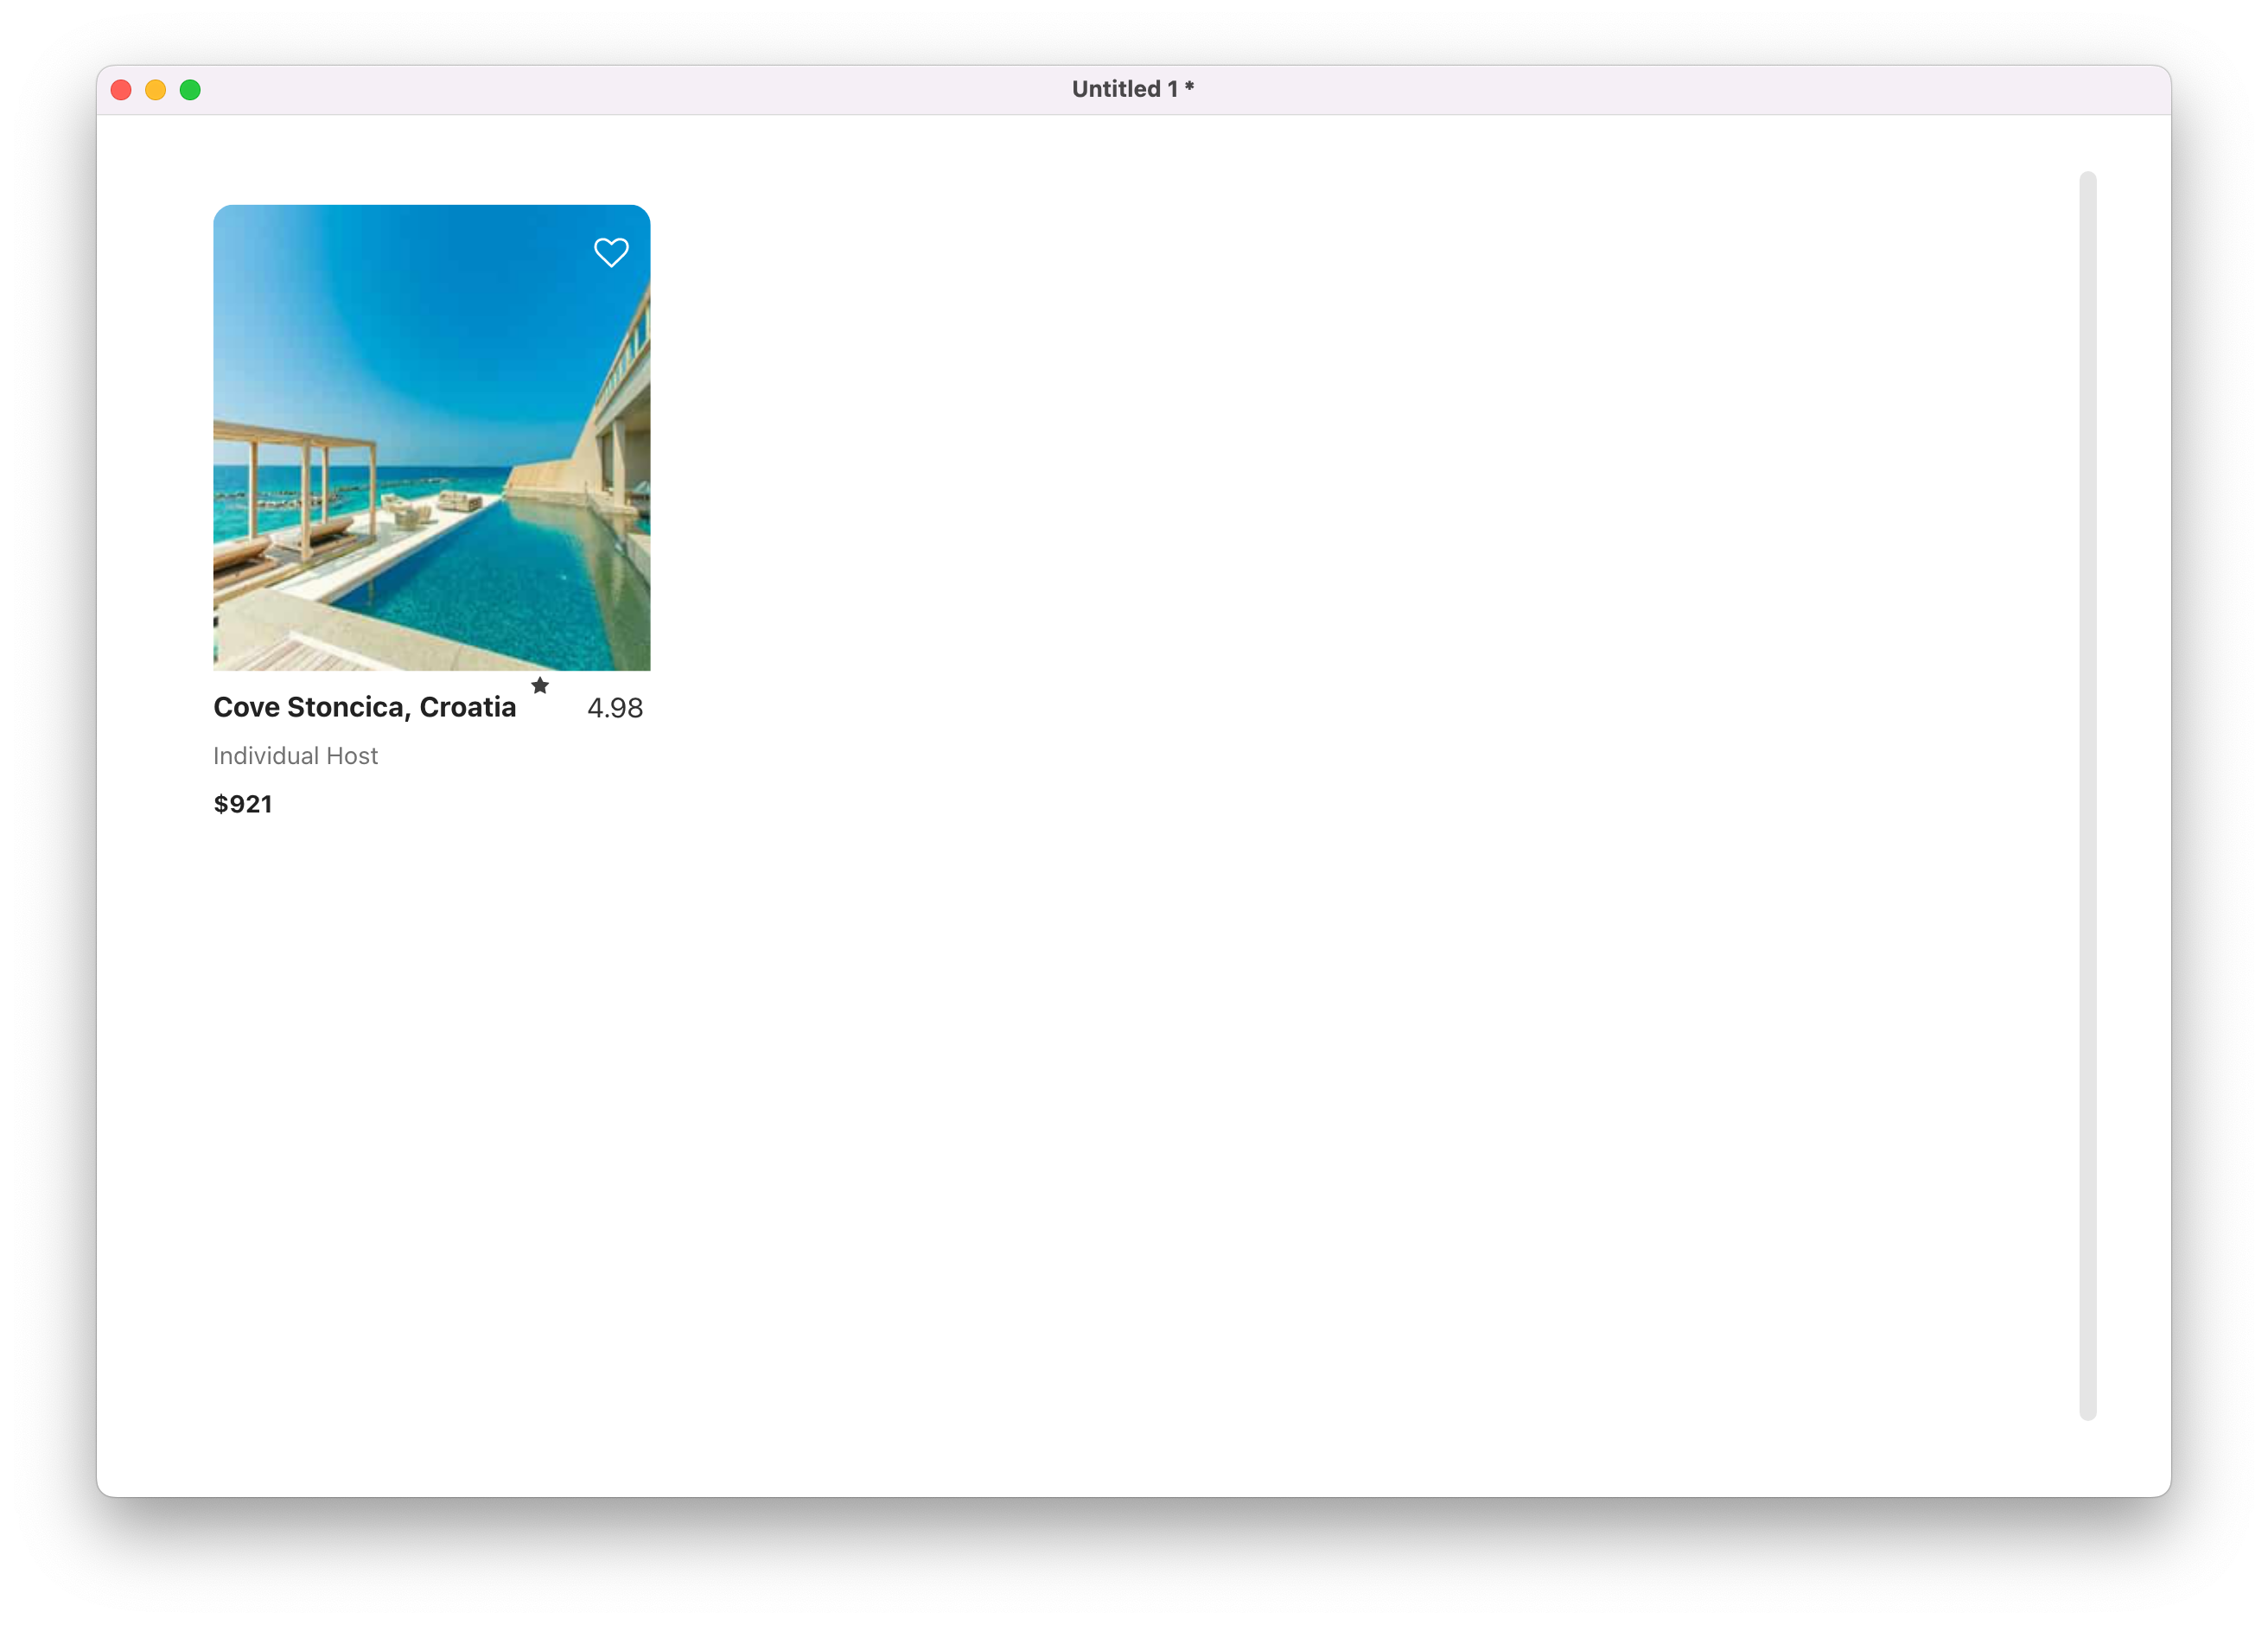
The squished issue. This is an issue we will actually address a little later with a bit of responsive code, but for the moment the reason it looks like this is because that is the space it has to play with if you want to show 4 columns in the width that it has to work with. In reality at this width you would probably want to display 3 columns wide. You can go ahead and do that now in the first tab of the property inspector, or just hang tight for the responsive code coming up.
The star issue that I cleverly did on purpose to represent the reality when building a list from scratch 😉. If we look in the Data Layout tab you will notice that we have the width set to 15% and the height set to 10px. You can play around with this to try and get it right yourself or you can change it to width – 15px and height 10%. Now we are starting to get there…
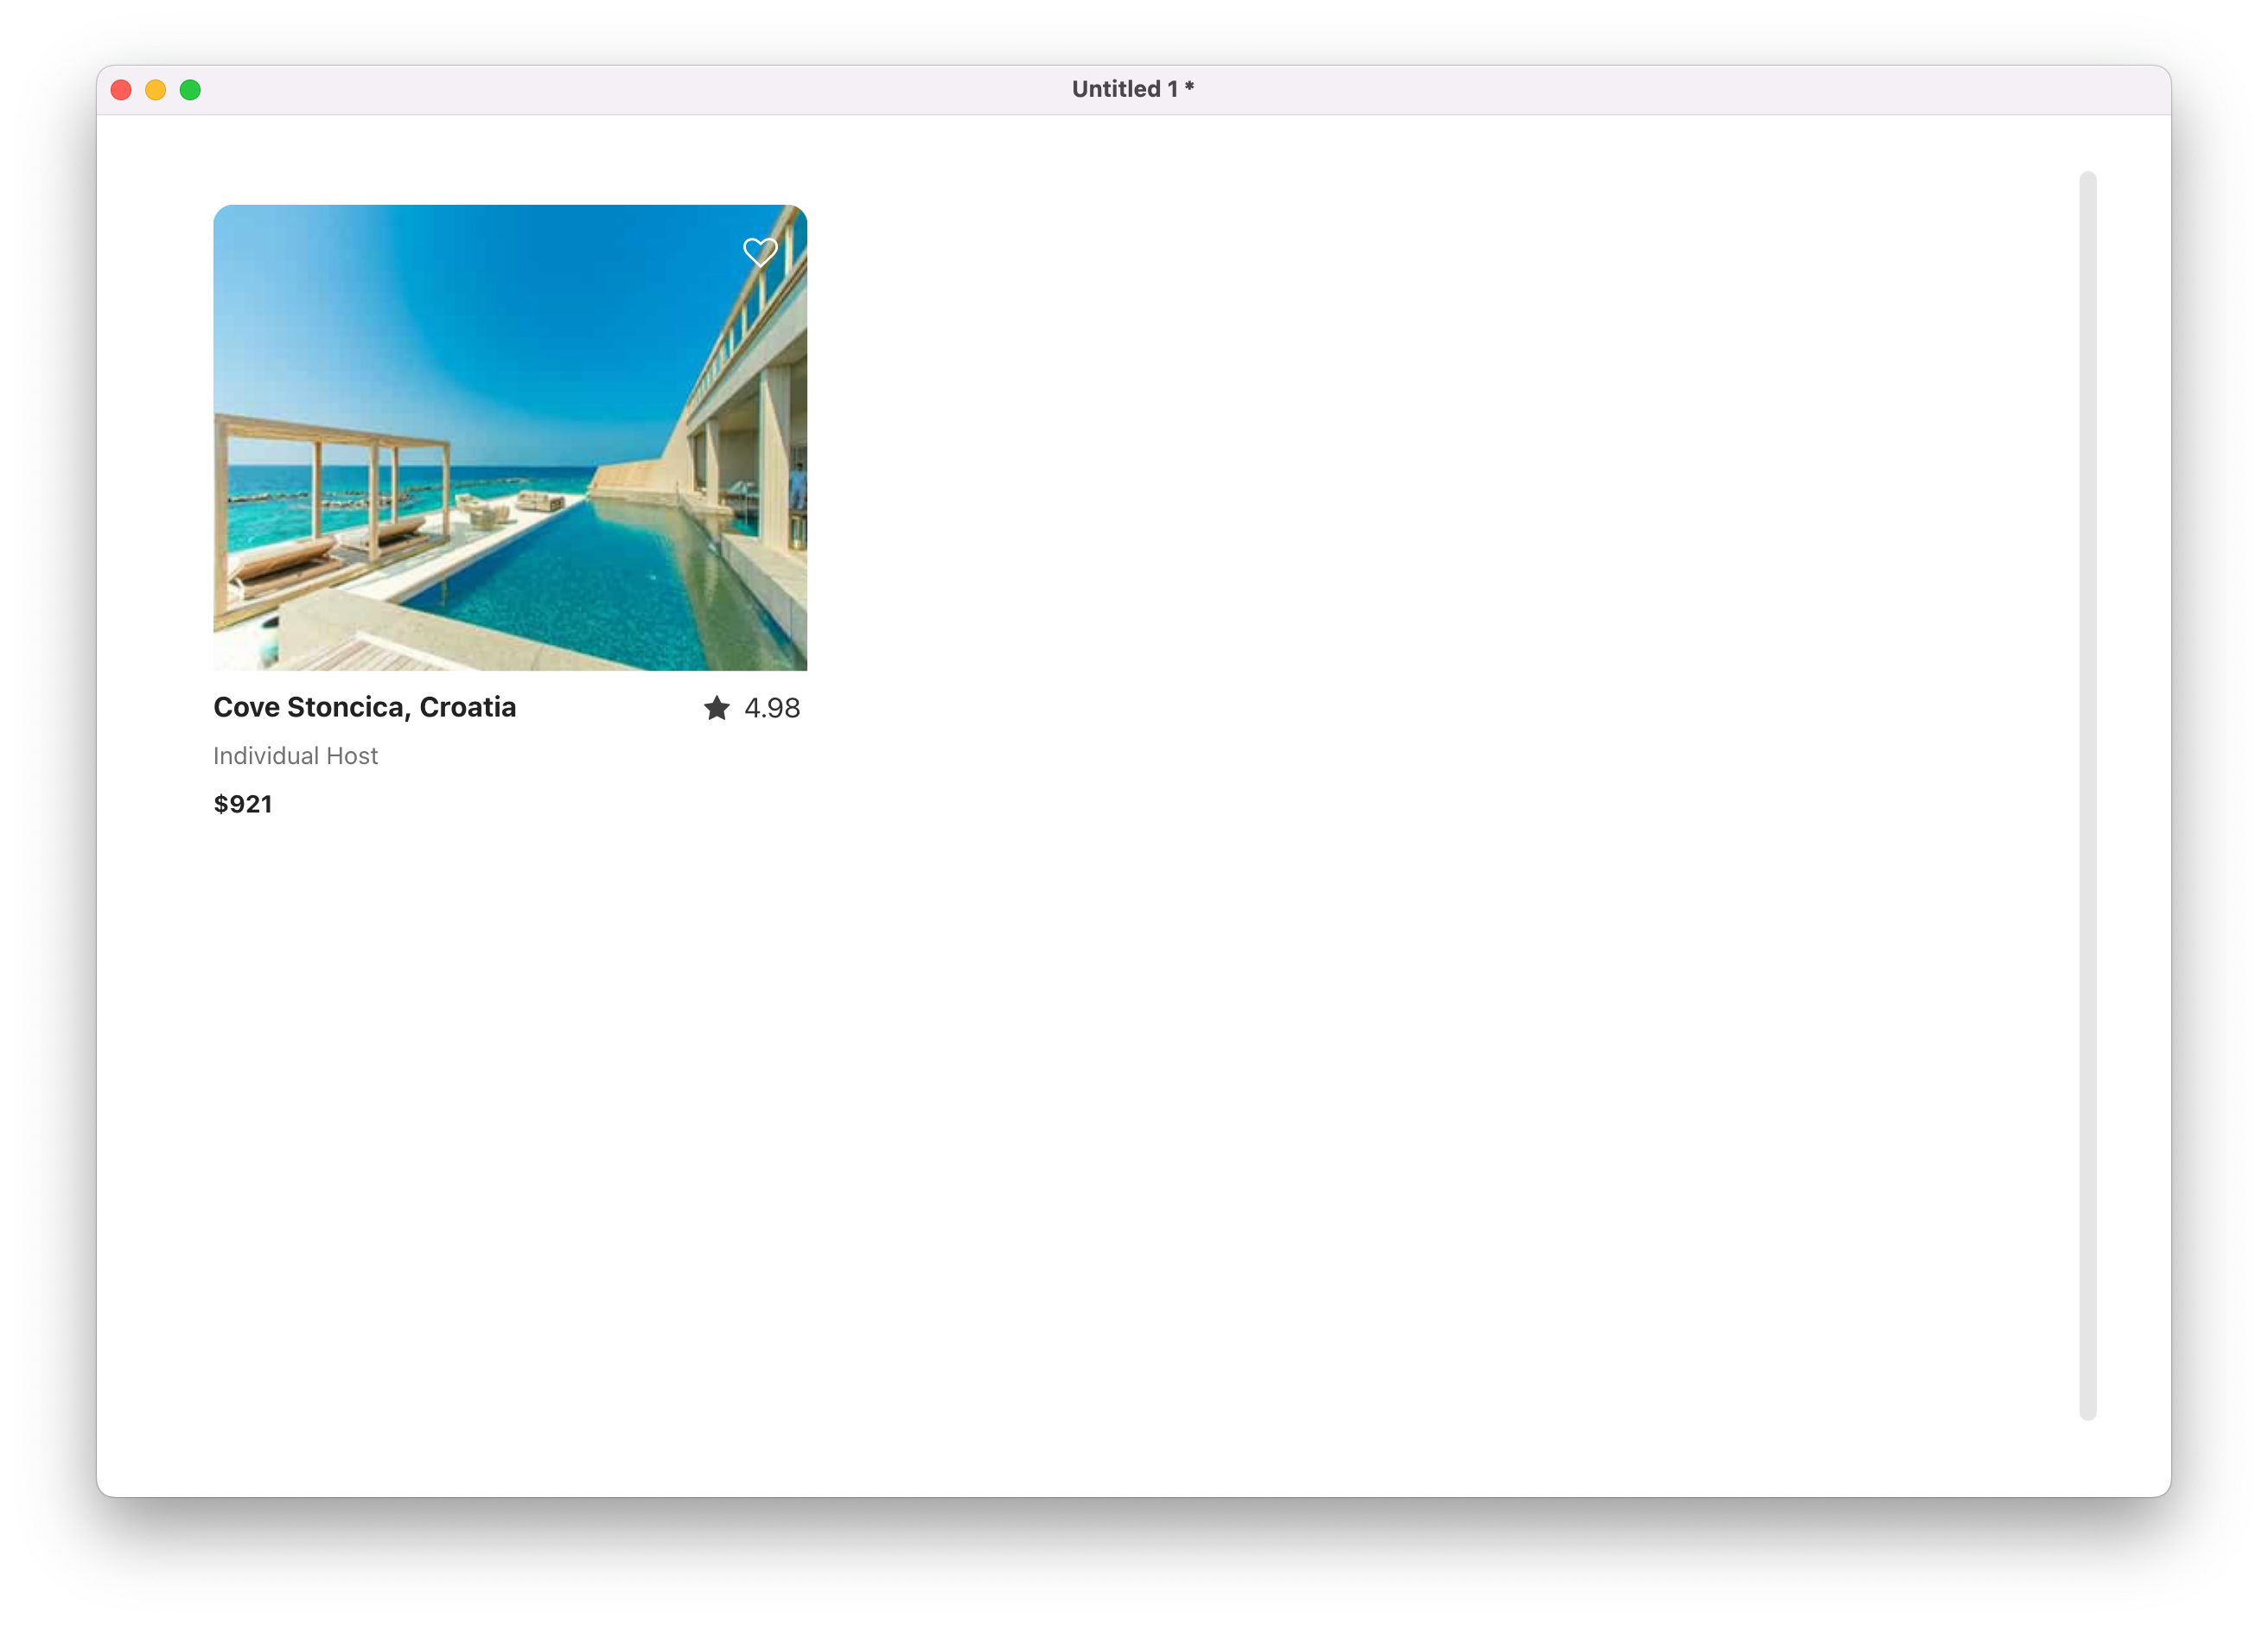
Lets now look at populating the list with all our data. You can go ahead and keep entering all your data manually, be sure to give me a shout in 6 months when you are finished with that. It’s not really a realistic approach when dealing with a large amount of data. For this example I had my data in a Google Sheet which you can view here.
I exported this as a TSV file, I then opened that TSV file in my text editor. Which produced something like this
image	title	host	price	heart	star	rating
images/1.jpg	Cove Stoncica, Croatia	Individual Host	$921	heart empty	star	4.98
images/2.jpg	Vaxholm, Sweden	Professional Host	$637	heart empty	star	4.62
images/3.jpg	Port Medway, Canada	Individual Host	$968	heart empty	star	5
images/4.jpg	Gildeskål, Norway	Professional Host	$1,134	heart empty	star	3.82
images/5.jpg	Addison, Maine, US	Professional Host	$790	heart empty	star	4
images/6.jpg	Badachro, UK	Individual Host	$2,340	heart empty	star	5
images/7.jpg	Zavala, Croatia	Professional Host	$418	heart empty	star	4
images/8.jpg	Grand Manan, Canada	Professional Host	$1,631	heart empty	star	4.3
images/9.jpg	Camon, France	Individual Host	$938	heart empty	star	5
images/10.jpg	Osea Island, UK	Professional Host	$1,183	heart empty	star	4.34
images/11.jpg	Nala Veli, Maldives	Professional Host	$2,796	heart empty	star	4.12
images/12.jpg	Bastimento, Panama	Professional Host	$1,310	heart empty	star	5
images/13.jpg	Mahone Bay, Canada	Individual Host	$568	heart empty	star	4
images/14.jpg	Isla Grande Columbia	Individual Host	$465	heart empty	star	3.89
images/15.jpg	Belize City, Belize	Professional Host	$809	heart empty	star	4.14
images/16.jpg	Wesley, Dominica	Professional Host	$2,021	heart empty	star	4.62
images/17.jpg	Roatan, Honduras	Individual Host	$266	heart empty	star	5
images/18.jpg	MV, Maldives	Professional Host	$1,300	heart empty	star	4.32
images/19.jpg	San Miguel, Mexico	Professional Host	$1,531	heart empty	star	5
images/20.jpg	Little Darby, Bahamas	Professional Host	$2,382	heart empty	star	3.96
images/21.jpg	Tampico Alto, Mexico	Professional Host	$1,379	heart empty	star	4.72
images/22.jpg	Beja, Portugal	Individual Host	$548	heart empty	star	5
images/23.jpg	Maafushi, Maldives	Professional Host	$1,170	heart empty	star	4.81
images/24.jpg	Puno, Peru	Individual Host	$920	heart empty	star	4.91
images/25.jpg	Antisranana, Madagascar	Individual Host	$1,281	heart empty	star	5
I created a field on my card, named it tsv and pasted the above into the contents tab of the Property Inspector for that field. I then added a button to my stack. Go ahead and do the same, then open up the Script editor for the button itself. You can do this by right clicking on the button and clicking edit script. Enter the following script, then hit Apply on the script editor
on mouseup
     set the tsvData of widget "PolyList" to field "tsv"
end mouseup
Remember this relies on you having your images folder inside the same folder where your stack is saved and having images in that folder that are named the same as the ones I made available for download earlier in this post. You can now either make your field and button invisible or just delete them. This then gives us something that looks like this.
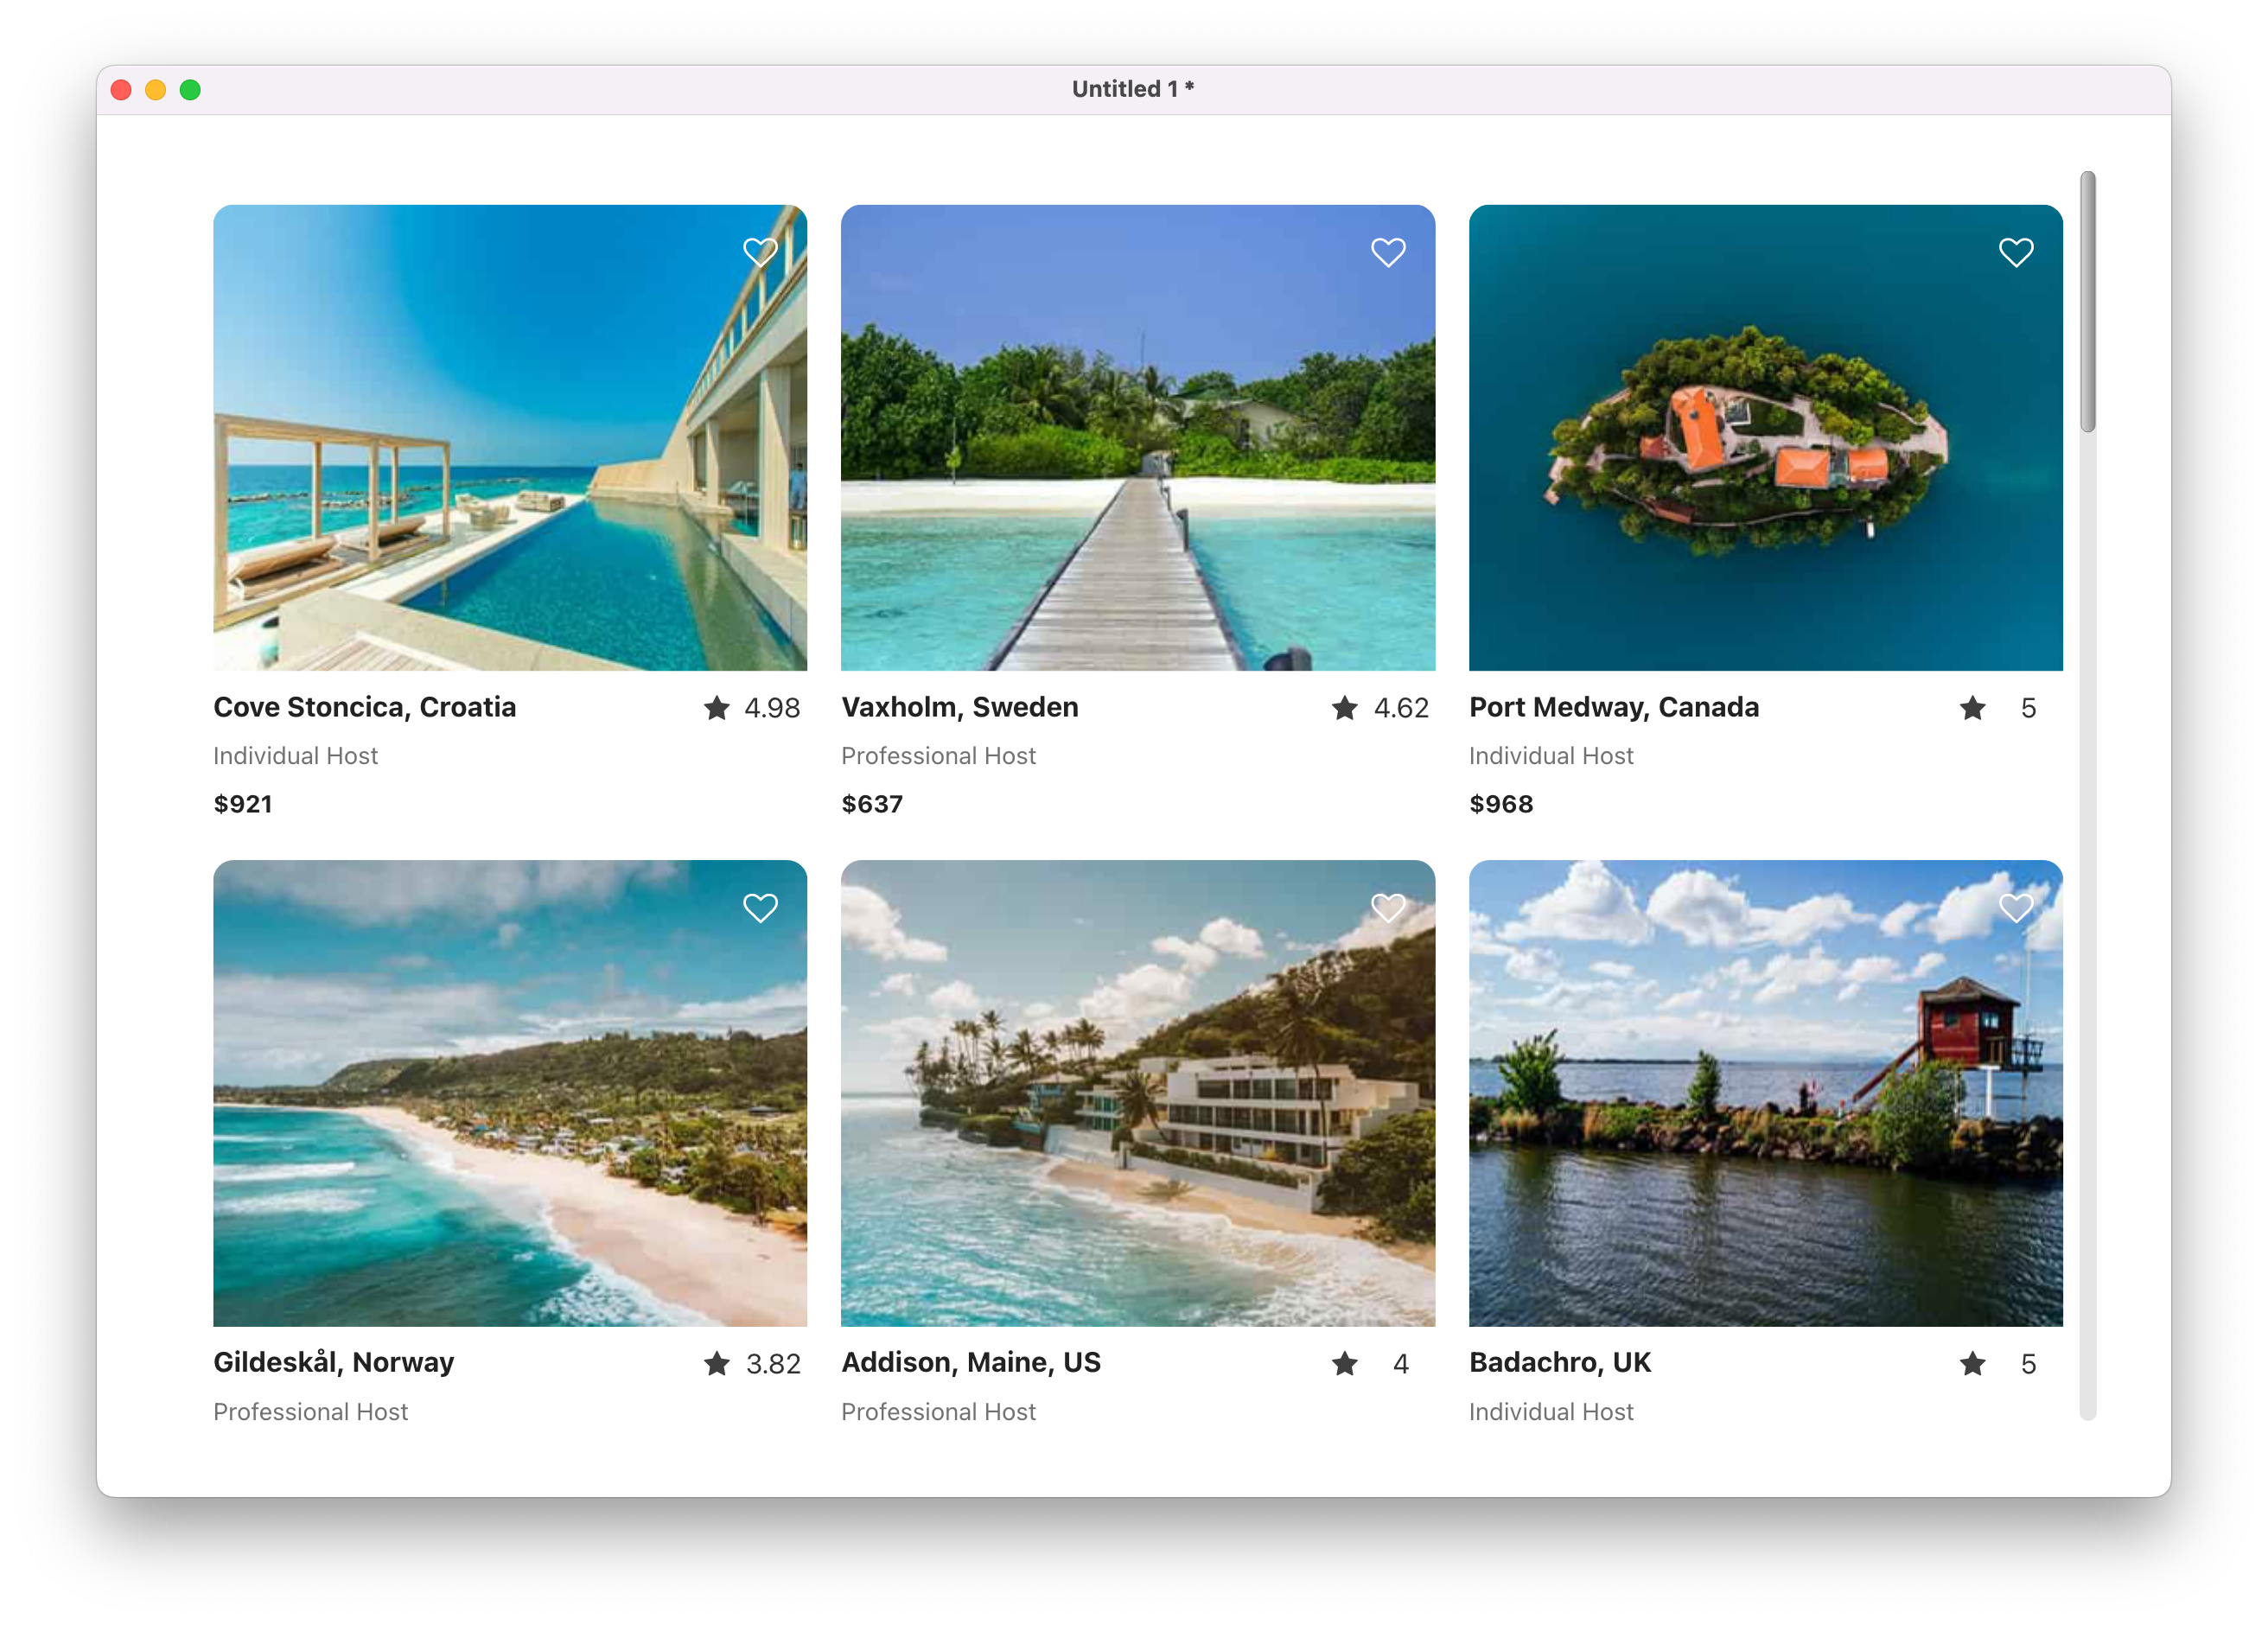
Now we are talking, this is starting to look really good!
Add a little script
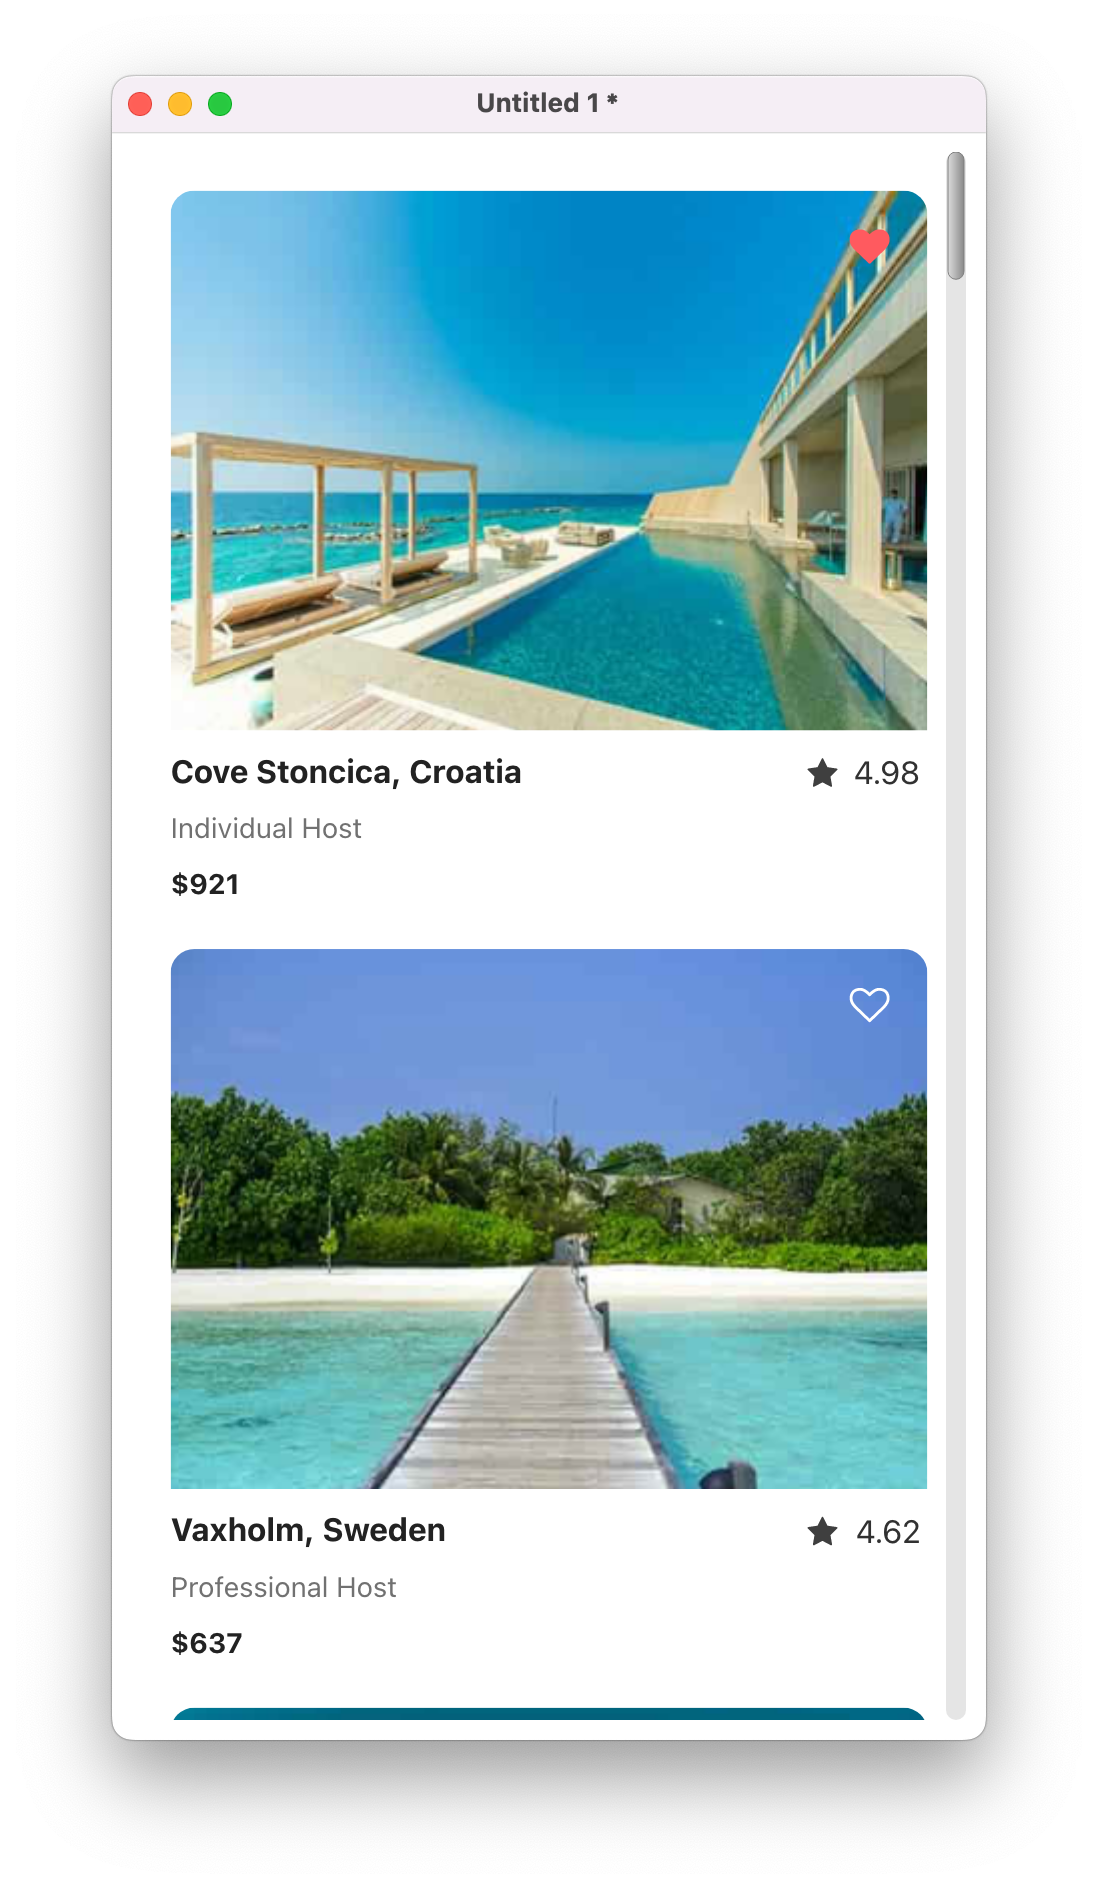
In PolyList you have control over interactions with all the various sub items in your list. An example of this that applies to this list style would be the heart. Ideally we would like this to change to a red love heart on click, to indicate that a click has happened. Let’s take a peek at how we go about that.
In edit mode, right click on the PolyList and click edit script to open the Script Editor. Then add the following code and hit Apply.
on subItemClick pItemIndex, pSubItemName
     if pSubItemName is "heart" then
          set the itemPointer of me to pItemIndex
          set the subItemPointer of me to pSubItemName
          local tCurrentVal
          put the subItemContent of me into tCurrentVal
          if tCurrentVal is "#255,90,95#heart" then
               set the subItemContent of me to "#255,255,255#heart empty"
          else
               set the subItemContent of me to "#255,90,95#heart"
          end if
     end if
end subItemClick
This is looking for a click on the Sub Item with the name heart. It is then changing heart empty as the value to heart as the value and it’s also changing the colour. The if statement here is checking to see if the heart has already been clicked, if it has it returns it back to #255,255,255#heart empty and if it has not it changes the heart value to #255,90,95#heart which gives us our red heart. There are some more interesting discussions on the Sub Items in the comments section of this blog post.
We now have an interactive heart.

Responsive resizing
The last thing we are going to look at to get that real AirBnB experience is what happens when you resize the window. We can achieve this with just a couple of lines of code.
Open your stack script and add the following to it:
on resizeStack
   set the numberOfColumns of widget "PolyList" to max(1,the ceiling of  (the width of me )/300)
   set the rect of widget "PolyList" to the rect of this card
end resizeStack
That’s it. You now have a beautiful list, styled to look like AirBnB, that resizes and adjust the columns as the browser window resizes, meaning it will look amazing on the largest of desktops and the smallest mobile devices. As demonstrated in these screenshots:

What other lists would you like to see built using the new PolyList widget? I would love to try and build the Netflix list style and with the Horizontal scrolling list option likely to be available in the PolyList widget very soon that might just be possible. I’ll let you know.
If you’ve tried to follow along and realised you don’t have anything called PolyList, that is probably because you have not yet got the Summer MegaBundle. PolyList, along with many other new widgets to make LiveCode even more powerful, are included with the bundle. You can now get PolyList in our Extensions Store.
If you did follow along, let me know how you got on, feel free to ask questions or share your screenshots in the comments below.
2 comments
Join the conversationmikey - August 18, 2022
the side-scrolling lists will be interesting for selecting from a lengthy list of options.
Steven Crighton - August 19, 2022
Hi Mikey, Yes I am looking forward to starting to experiment with horizontal scrolling lists with PolyList. This feature is still in early development but I have done some brief testing. Hopefully I can do more on that soon.