
Do you like the Terminator films?
Would you like to build your own Terminator?
Here is a recipe for some of the components involved. As science is progressing, the two most challenging aspects to producing an autonomous agent like the Terminator are the energy supply and the processing capability that allow the Terminator to operate in a dynamic environment.
Here are some insights into parallel processor technology that exists today and how to write your own simple pattern recognition Neural Network.
The Massively Parallel Neural Network CPU from Skynet used in the T-800 Model 101 Terminator, as shown below, does not exist (yet) with the computational power as demonstrated in the movies. However, we are steadily increasing the component density and transistor count of integrated circuits. In fact, Moore’s Law predicted in 1965 that the number of transistors on an integrated circuit would double every two years. This staggering prediction has proved to be very accurate with the TMS 1000 chip in 1971 having 8,000 transistors and the IBM z13 chip in 2015 having 7,100,000,000 transistors.
These integrated circuits are developed for applications where clocked instructions are executed, such as in the CPUs of desktop machines or servers. This means the fundamental design accommodates the execution of instructions that are presented in the form of a program or other logically structured, iterative steps. A parallel hardware architecture is often supported to a degree with multiple cores and virtualisation in the operating system, allowing the execution on multiple threads. This design is also widely used in Artificial Intelligence, but it is not the way the a Terminator brain works. What we would be looking for is something similar to what you would expect to find in our own heads. The human brain has approximately 86,000,000,000 neurons. The brain has no clock that sets timing intervals, no set of formal instructions that were added by means of a programming language, and the brain is also massively parallel.
What is the development status of an artificial brain like that? Similar to the Terminator, we can rely on the military to rise to the occasion. DARPA has not been idle and funded the SyNAPSE project where IBM and HP have been developing a neuromorphic processor, designed to simulate the architecture and function of the mammalian brain. The 4X4 array SyNAPSE circuit board has 5,400,000,000 transistors.
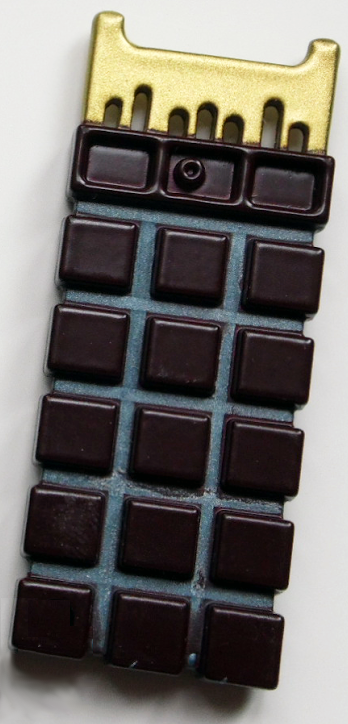
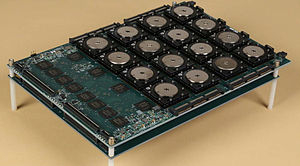
The Terminator brain above and a SyNAPSE circuit board below.
Does the symmetric arrangement of cores look familiar? You can note that the SyNAPSE circuit board has connectors that allow additional boards to be linked together. In fact, 16 SyNAPSE circuit boards would have more transistors than we have neurons in the brain. How scary is that? The scare factor really depends on what you want and can do with that kind of circuit board. Just because you have a fair number of transistors sitting closely together does not mean they are doing anything useful. I don’t want to draw any parallels here, but your next app is also not going to write itself. Similarly, we have to find a way to tell these transistors to take on roles to perform actions that allow our Terminator to work autonomously. The mammalian brain has adopted a wonderful concept of self learning, where it is able to pick up all the knowledge it needs to allow its host to survive in a dynamic environment. This ability has evolved over many generations and resulted in the brains that currently exist on this plane. If we took a closer look at the anatomy of our brain, then we would find regions that appear to have evolved over time and are dedicated to particular tasks. So evolution has hard wired aspects of our brain to perform specific tasks. This includes feedback guided motor control, storing information, and recognizing patterns.
During its relatively short existence and compared to more traditional sciences like Physics, Artificial Intelligence has seen some significant developments. In particular, it has developed strategies and algorithms in areas of cognition that would previously have been solely found in human domain.
Now let’s look at an Artificial Intelligence application that stores patterns in a Neural Network and uses that network to try and retrieve these patterns again. The algorithm I am outlining here can operate in parallel on a large number of nodes, but it is serialized to run as a LiveCode application on your platform of choice.
Time to Get Your Hands Dirty
The Neural Network I am demonstrating here is fully connected, meaning that every node is connected to every other node in the network. This particular network is referred to as a Hopfield Network.
Hopfield Networks store one or more patterns and try to recall them based on partial information of stored patterns that are presented to the network. For example, if you had the letter “H” and you wanted to identify it from a corrupted version, you may implement something like the following:

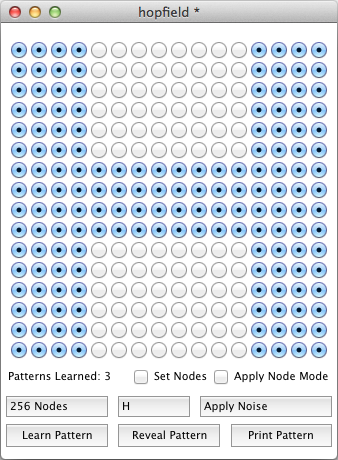
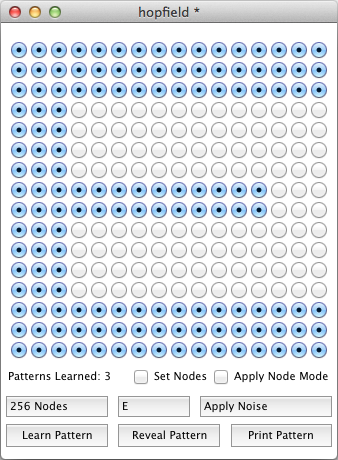
These two images show different states of the Neural Network application. The application is running a network of 16×16 nodes that have learned the letters “T”, “H” and “E”. These are preset patterns I have included in the application. The image above shows the letter “H” that was corrupted by setting 40% of the nodes to random binary states. The general outline of the letter “H” is still visible. After running the Hopfield Network we arrive at the image below, where we try to recall the pattern that is hidden in the noise. The letter “H” is correctly recalled.
This is all great stuff and you now have two options:
- Continue reading to get an idea of what is going on here (I promise not to delve too much into the science of it)!
- Download the application and give it a shot yourself. (Towards the end of the blog you will find some instructions on how to use the network stack).
Initialising a Hopfield Network
As stated earlier, a Hopfield Network is a fully connected network with every node connected to every other node. This association can easily be implemented by nested loops where we probe information from one node to every other node. What we are really after is how much each node influences every other node and we create a weight matrix in order to represent that. This matrix stores weight information from each node to every other node. The result is a matrix with size NxN, where N is the number of nodes in the network. When creating this matrix, we initialise every weight to 0. These weights change as the network learns patterns with the exception of weights from one node to itself. This is 0 and it remains 0 throughout the life of the network.
The LiveCode command for the matrix creation reads the number of nodes from the relevant button and creates a two dimensional array “lNetwork” that stores the initial weights:
on createNetwork
   local tMatrixEdgeSize, tXi, tYi, tXj, tYj
   delete variable lNetwork
   put sqrt (word 1 of the label of button "Number of Nodes") into tMatrixEdgeSize
   repeat with tXi = 1 to tMatrixEdgeSize
      repeat with tYi = 1 to tMatrixEdgeSize
         repeat with tXj = 1 to tMatrixEdgeSize
            repeat with tYj = 1 to tMatrixEdgeSize
               put 0 into lNetwork[tXi & slash & tYi][tXj & slash & tYj]
            end repeat
         end repeat
      end repeat
   end repeat
end createNetwork
Training a Hopfield Network
There are a number of ways to train a Hopfield Network, but they all involve updating weights between individual nodes. In the training approach used here, weights of values 1 or -1 are added to entries in the weight matrix, depending on the state of particular nodes in the network. The “hilite” of the radio buttons indicates if a node is switched on or off and, using a truth table, we extract either 1 or -1 from a button. The weight matrix is updated by multiplying the value of two nodes and adding the result to the relevant weight matrix entry:
on teachPattern
   local tMatrixEdgeSize, tXi, tYi, tXj, tYj, tTruthTable
   put 1 into tTruthTable[true]
   put -1 into tTruthTable[false]
   put sqrt (word 1 of the label of button "Number of Nodes") into tMatrixEdgeSize
   repeat with tXi = 1 to tMatrixEdgeSize
      repeat with tYi = 1 to tMatrixEdgeSize
         repeat with tXj = 1 to tMatrixEdgeSize
            repeat with tYj = 1 to tMatrixEdgeSize
               if tXi is tXj and tYi is tYj then next repeat
               add tTruthTable[the hilite of button (tXi & slash & tYi)] *
                    tTruthTable[the hilite of button (tXj & slash & tYj)] to
                    lNetwork[tXi & slash & tYi][tXj & slash & tYj]
            end repeat
         end repeat
      end repeat
   end repeat
end teachPattern
Recalling a Pattern
Patterns in a Hopfield Network are recalled by performing a weighted sum on the nodes. This means that you switch individual nodes on or off based on the sum of the weights to all other nodes that are switched on. If the result of this weighted sum for a particular node returns >=0, then the node is switched on. If the weighted sum returns <0, then the node is switched off. This recall process can take several iterations over all nodes until a stable network state is reached. Once we run through a complete update cycle without updating any nodes, the pattern recall is considered complete.
on extractPattern
   local tNode, tNodes, tWeight, tNodeChanged, tWeightedSum
   put true into tNodeChanged
   repeat while tNodeChanged
      put false into tNodeChanged
      put getRandomNodeOrder () into tNodes
      repeat for each line tNode in tNodes
         put 0 into tWeightedSum
         repeat for each line tWeight in the keys of lNetwork[tNode]
            if the hilite of button tWeight then
               add lNetwork[tNode][tWeight] to tWeightedSum
            end if
         end repeat
         if tWeightedSum >= 0 and the hilite of button tNode is false then
            set the hilite of button tNode to true
            put true into tNodeChanged
         else if tWeightedSum < 0 and the hilite of button tNode then
            set the hilite of button tNode to false
            put true into tNodeChanged
         end if
      end repeat
   end repeat
end extractPattern
The recall process here uses a random node order generator, so node updates are performed in a random fashion. This makes the recall process more natural as real neural nodes operate in parallel and can fire at any time. The following function returns a randomly ordered list of the node names:
function getRandomNodeOrder
   local tMatrixEdgeSize, tX, tY, tResult
   put space & cr into tResult
   put sqrt (word 1 of the label of button "Number of Nodes") into tMatrixEdgeSize
   repeat with tX = 1 to tMatrixEdgeSize
      repeat with tY = 1 to tMatrixEdgeSize
         put tX & slash & tY & return before line
              random (the number of lines in tResult) of tResult
      end repeat
   end repeat
   delete line -1 of tResult
   return tResult
end getRandomNodeOrder
And that is about all the code you need to implement a basic Hopfield Network. In order to do something useful with it, you require means of representing data, modifying data, recalling data and displaying data. I have provided the complete application for you to download (at the bottom of the page!). Feel free to explore all aspects of the stack – and have fun!
More Helpful Hints:
Using the Sample Stack
The stack provides options to control the number of neurons you would like to use. It provides four default patterns that can be used on each neural network. These patterns can be learned for recall or can be corrupted with a certain amount of noise, allowing you to test how well the network can identify patterns. You also have the option to switch nodes on and off manually with mode tick boxes or you can through the tick box states by clicking over the nodes with the left mouse button. If you would like to add new patterns to the set of default patterns, then you can print patterns to the message box and add them to the array in the “Print Pattern” button script.
When you open the sample stack, you should see something similar to what is shown here – except that all nodes are switched off and no patterns have been learned.
In order to start using the network, you need to first teach it some patterns that should later be retrieved. After that, you can test how well the network can recall these patterns from noisy data.
Teaching Patterns
You can select a pattern from the top middle drop down button. This updates the node states of the network. Once you have a pattern you would like to store in the network, select the “Learn Pattern” button. This sets the weights in the weight matrix and increments the “Patterns Learned” counter. Continue selecting and learning patterns until all three letters have been learned. You do not have to learn the empty pattern. If you like, you can also create your own patterns by moving over the radio buttons and changing the selection mode by pressing the left mouse button.
Hopfield Networks have a relatively low storage capacity and there are a number of equations that provide an approximation on how many patterns can be stored reliably in the network. The word approximation is used here as it also depends on the patterns that are learned. I would start with learning a few patterns first and then increase their count after a few attempts of recalling learned patterns. Later, you can also try changing the network size. Once storage limits are reached you will notice that recalled patterns do not reflect the patterns that were initially stored in the network.
Corrupting Patterns
You can introduce noise into a pattern that is displayed on the network by using the mouse or selecting a percentage of noise from the “Apply Noise” drop down button. Do not select the “Learn Pattern” button after adding noise. This would teach the network to remember the noisy pattern.
Recalling a Pattern
Once the network has learned a number of patterns and you have created a pattern with some noise, try to recall the original pattern by selecting the “Reveal Pattern” button. The network will iterate through the recall process and start updating nodes to arrive at a stable state that demonstrates the pattern it thinks is hidden in the noise.
Changing the Network Size
You can change the network size by selecting a new size from the top left drop down button. This application supports network sizes between 2×2 and 16×16 nodes. Feel free to update the application to vary the supported network sizes.
Adding your own Default Patterns
You can also add your own default patterns by creating a string representation of the pattern that is currently displayed on the network. Select the “Print Pattern” button to write a list of 1s and 0s to the message box. You can then copy and paste this string into the script of the “Print Pattern” button script. Create a new array entry in the “getSampleData” function for the node size from which you printed the pattern and add a key that should represent your pattern in the drop down list. The next time you start the application, you will have access to the new entry you added.
You can download the Hopfield Network App here. (I hope you enjoy this little app)!
Got questions, thoughts, comments, or ideas? Please share them in the comments below!
2 comments
Join the conversationCatalin Anesia - September 20, 2015
Fascinating! thanks …
Peter - March 9, 2022
We are in the phase of developing a neural network with more than one hidden layer. It should help people make decisions based on training with previous findings in really personal talks. Your small program was awe-inspiring. Did you imagine that we could do our work with LC?