
By now many of you will have completed the new interactive tutorial for LiveCode 8. If you haven’t done that yet, you might like to go and complete it before continuing on here.
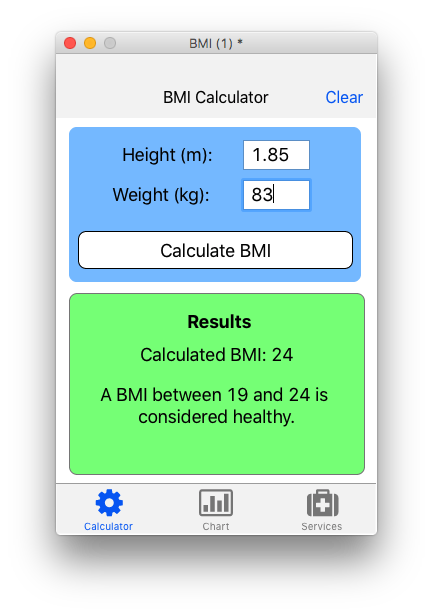
By the end of the tutorial you should have an app that looks something like the image below. If you’re like me and get excited by pancake printers it’s probably telling you something different to the image below but let’s not worry about that just now… the point is you should have an app that uses a web service to calculate BMI and charts it.
Today I’m introducing a new external for HealthKit called mergHK. With mergHK you can read and write to the HealthStore and therefore improve the integration of your health app with the array of other apps that users use to manage their health data. You’ll find that included in the latest DP release of 8.1.
Reconfiguring the calculator for saving BMI values
What we are going to do is make some changes to the app and store our BMI values in the iOS HealthKit HealthStore, using the new mergHK external. This will make the values accessible to other applications and any existing BMI values entered in other apps will be accessible in ours.
The first thing I’d like to do is change the getBMI function to calculate BMI locally. The tutorial provides a great example of how simple it is to use a web service in LiveCode, but considering BMI is easy to calculate we might as well do it locally. Copy this new getBMI function to the stack script:
function getBMI pHeight, pWeight
   return round(pWeight/pHeight ^ 2)
end getBMI
Now we are going to dynamically calculate as the user changes the height and weight values. To do that select height and weight fields and click on the Group button on the toolbar. The new group containing the fields should now be selected. Click on the Code button on the toolbar and add the following code to the new group:
on textChanged
   if field "height" is a number and field "weight" is a number then
      calculateBMI
   end if
end textChanged
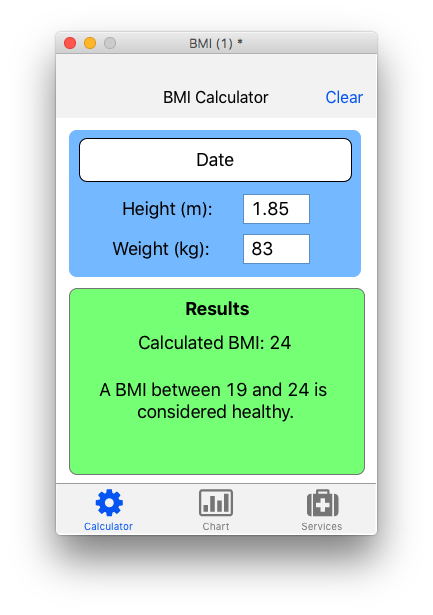
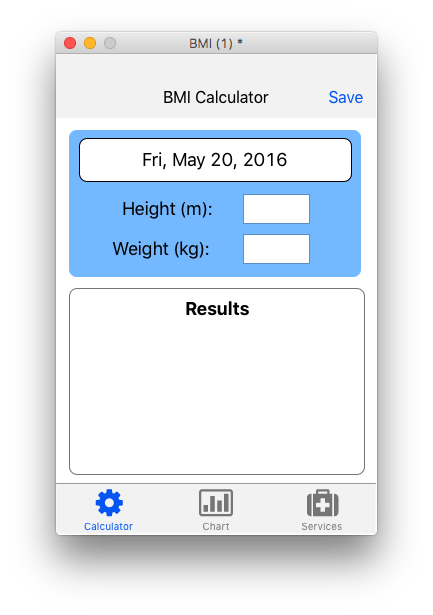
Now our calculated BMI should update as we change the height or weight. This means we don’t need the Calculate BMI button. Instead I would like to add a new button to select the date the BMI should be recorded against. Change the name of the Calculate BMI button to Date and clear the label property. It’s more appropriate the date be above the
height and weight entry, so let’s move it there and move the height and weight down. It should look something like this:
Set the script of the Date button to the following to allow the user to select a date:
on mouseUp
   local tSelected, tRangeEnd, tDateResult

   // the date and time selected by default
   put the cDate of this stack into tSelected
   // the maximum date and time that can be selected
   put the seconds into tRangeEnd

   // launch the date and time picker
   mobilePickDate "date", tSelected,, tRangeEnd

   // get the result
   put the result into tDateResult

   // check and display the result
   if tDateResult is not 0 then
      set the cDate of this stack to tDateResult
      convert tDateResult from seconds to abbreviated date
      set the label of me to the result
   end if
end mouseUp
The next thing we will want to do is make some changes to the preOpenCard hander of the card script. First we are going to clear our calculator when the app opens in the stack script (we’ll do that in a minute), so we are going to replace the Clear header action with Save. Edit the card script so the preOpenCard handler reads as follows:
on preOpenCard
   set the itemNames of widget "header" to "Save"
   set the itemLabels of widget "header" to "Save"
   set the label of widget "header" to "BMI Calculator"
end preOpenCard
And the header widget script to:
on mouseUp
   if the mouseAction of widget "header" is "save" then
      SaveBMI
   end if
end mouseUp
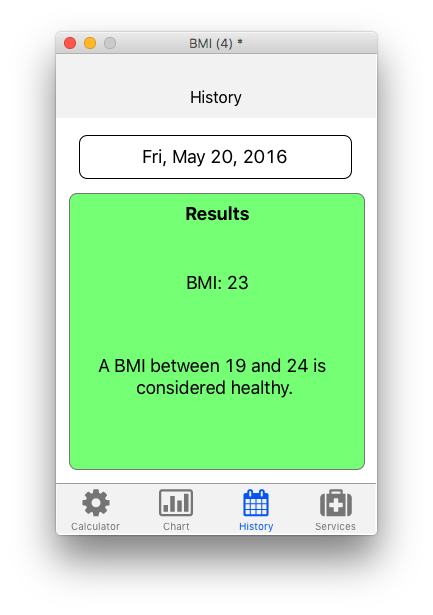
Now if we go to a different card by clicking on Services in the navigation widget and come back to the calculator we should see something like this:
Next up we will implement HealthKit and a new History card in our app.
Implementing HealthKit
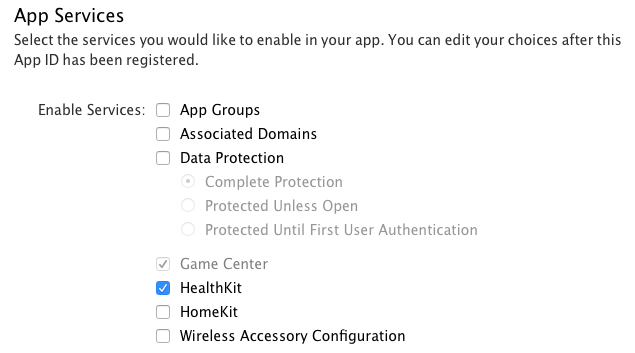
The first thing we need to do to get started with HealthKit is ensure we have a development provisioning profile that has HealthKit enabled. Login to your Apple Developer Account and create a new App ID with the HealthKit service checked:
Next create a new development provisioning profile using your newly created App ID. We will select that provisioning profile in the standalone settings dialog before building our app for iOS.
Before we can read or write to the HealthStore we need to get the user’s permission. Requesting access will present a dialog to the user, the first time your app requests access to that particular type of data. If they decline access they must grant access via the Settings or Health apps if they change their mind.
Add the following code to the stack script.
on preOpenStack
   local tDate
   put the seconds into tDate
   set the cDate of this stack to tDate
   convert tDate from seconds to abbreviated date
   set the label of button "Date" to tDate

   set the cBMI of this stack to empty
   set the cHeight of this stack to empty
   set the cWidth of this stack to empty

   put empty into field "height"
   put empty into field "weight"
   put empty into field "results"
   put empty into field "advice"
   set the backgroundColor of graphic "resultsBG" to "white"

   if the platform is not "iphone" then
      exit preOpenStack
   end if

   send "AuthorizeHealthKit" to me in 1 second
end preOpenStack

command AuthorizeHealthKit
   if mergHKIsHealthDataAvailable() then
      mergHKRequestAuthorization "HKQuantityTypeIdentifierBodyMassIndex", "HKQuantityTypeIdentifierBodyMassIndex"
   end if
end AuthorizeHealthKit

on mergHKAuthorizationComplete pError
   if pError is not empty then
      answer pError
      exit mergHKAuthorizationComplete
   end if
end mergHKAuthorizationComplete

command QueryBMIFromHealthStore
   if not mergHKIsHealthDataAvailable() then
      answer "Health data is not available on this device"
      exit QueryBMIFromHealthStore
   end if

   if not mergHKCheckAuthorization("HKQuantityTypeIdentifierBodyMass") is "sharing authorized" then
      answer "Please enable this app to read and write body mass index data via the Settings or Health apps."
      exit QueryBMIFromHealthStore
   end if

   local tStartDate, tEndDate
   put the seconds+86400 into tEndDate
   put the seconds - 31536000 into tStartDate # last year

   # get a year's BMI history and chart
   mergHKSampleQuery "HKQuantityTypeIdentifierBodyMassIndex", tStartDate, tEndDate
end QueryBMIFromHealthStore

on mergHKQueryResults pQueryID, pResultA, pError
   mergHKStopQuery pQueryID

   if pError is not empty then
      answer pError
      exit mergHKQueryResults
   end if

   local tUUID

   local tResultA

   # create an array of results by date
   repeat for each key tUUID in pResultA
      if pResultA[tUUID]["identifier"] is "HKQuantityTypeIdentifierBodyMassIndex" then
         put pResultA[tUUID]["quantity"] into tResultA[pResultA[tUUID]["start date"]]
      end if
   end repeat

   dispatch "BMIDataFromHealthStore" to card "history" with tResultA
end mergHKQueryResults

command SaveBMI
   if the cBMI of this stack is empty then
      answer "Enter a height and weight to calculate your BMI"
   end if

   mergHKAddQuantitySample "HKQuantityTypeIdentifierBodyMassIndex", the cDate of this stack, the cDate of this stack, the cBMI of this stack, "count"

   answer "BMI Saved!"
end SaveBMI

function getBMI pHeight, pWeight
   return round(pWeight/pHeight ^ 2)
end getBMI

on resizeStack pWidth, pHeight
   set the rectangle of widget "header" to 0,0,pWidth,the height of widget "header"
   set the rectangle of widget "Navigation Bar" to 0,pHeight-the height of widget "Navigation Bar",pWidth,pHeight
   get 0,the height of widget "header",pWidth,pHeight-the height of widget "Navigation Bar"
   set the rectangle of widget "chart" of card "chart" to it
   set the rectangle of widget "browser" of card "Services" to it
   pass resizeStack
end resizeStack
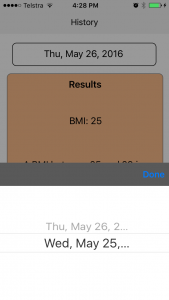
Now create a new card named History. This card will allow the user to pick a date they recorded BMI on and view the results. We need some of the same objects that we have on the Calculator card, so select the Date button and background graphic along with the results fields and background graphic. Once copied over to the card you can resize the objects to look something like the following:
The Date button script just needs to be the following:
on mouseUp
  pickDate
end mouseUp
And the History card script handles the rest:
local sResultA
local sTestDates
local sTestConvertedDates
local sCurrentIndex

on preOpenCard
   set the label of widget "header" to "History"
   set the itemArray of widget "header" to empty

   set the label of button "Date" to space

   if the platform is "iphone" then
       QueryBMIFromHealthStore
   end if
end preOpenCard

on BMIDataFromHealthStore pResultA
   put pResultA into sResultA
   -- present the most recent results

   put the keys of pResultA into sTestDates
   sort lines of sTestDates numeric descending

   local tDate

   put empty into sTestConvertedDates
   repeat for each line tDate in sTestDates
      convert tDate from seconds to abbreviated date
      put tDate & return after sTestConvertedDates
   end repeat
   delete the last char of sTestConvertedDates

   setData 1
end BMIDataFromHealthStore

command setData pIndex
   put pIndex into sCurrentIndex
   set the label of button "Date" to line pIndex of sTestConvertedDates

   local tBMI
   put sResultA[line pIndex of sTestDates] into tBMI

   put "BMI:" && tBMI into field "results"

   if tBMI <= 18 then
      put "A BMI less than 19 is considered underweight." into field "advice"
      set the backgroundColor of graphic "resultsBG" to "blue"
   else if tBMI <= 24 then
      put "A BMI between 19 and 24 is considered healthy." into field "advice"
      set the backgroundColor of graphic "resultsBG" to "green"
   else if tBMI <= 29 then
      put "A BMI between 25 and 29 is considered overweight." into field "advice"
      set the backgroundColor of graphic "resultsBG" to "orange"
   else
      put "A BMI over 29 is considered obese." into field "advice"
      set the backgroundColor of graphic "resultsBG" to "red"
   end if
end setData

command pickDate
   if sTestConvertedDates is empty then
      exit pickDate
   end if

   mobilePick sTestConvertedDates, sCurrentIndex

   if the result is 0 then
      exit pickDate
   end if

   setData the result
end pickDate
Deploying the app
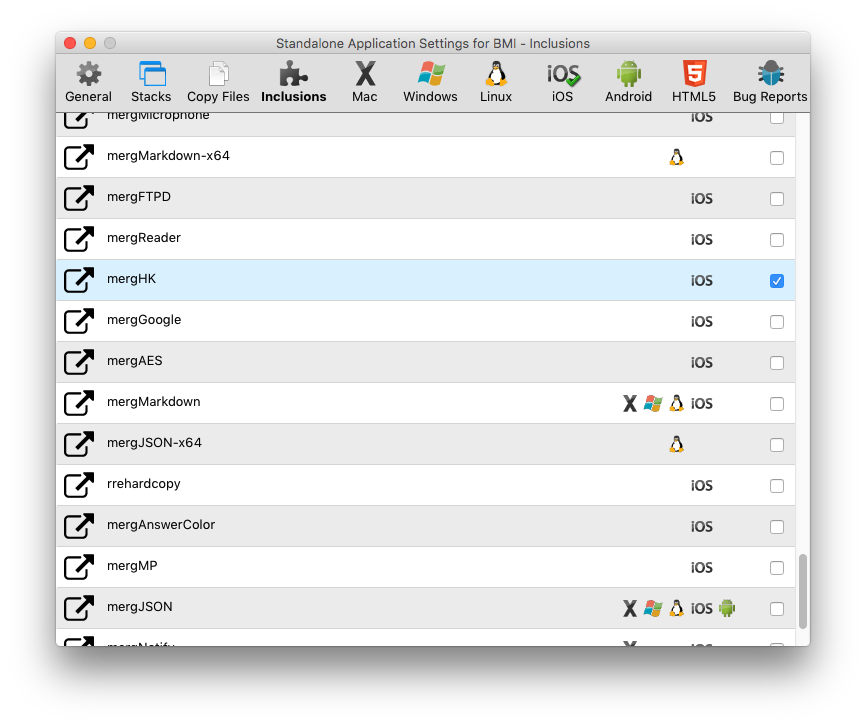
The first thing you need to know is that we are going to need to deploy to an iPhone, as HealthKit is not available on iPads. One of the goals of LiveCode 8.1 was to make including resources in your standalone much simpler, so we are going to use that version to build our application. Open the standalone settings dialog and choose Select inclusions for the standalone application. This will enable the new inclusions pane, which will list all the available inclusions. Scroll down the list and make sure Header Bar, Navigation Bar, Browser and mergHK are all checked.
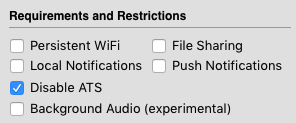
Now we need to go to the iOS pane to change some settings. Enter the app ID and choose the provisioning profile with HealthKit enabled that you setup earlier. Another important setting is in the Requirements and Restrictions area – you need to check the Disable ATS box. You will get a warning dialog because it’s not normally recommended, but the page we view on the Services card via the browser widget does not support https.
Once you have done that you can build the app and copy it to your device. A helpful tutorial that you may like to reference which will explain how to put the app on your phone is, How do I build an iOS application? When it’s on your device and you run it for the first time you should see a dialog like this asking you to give permission for the app to read and write body mass index data:
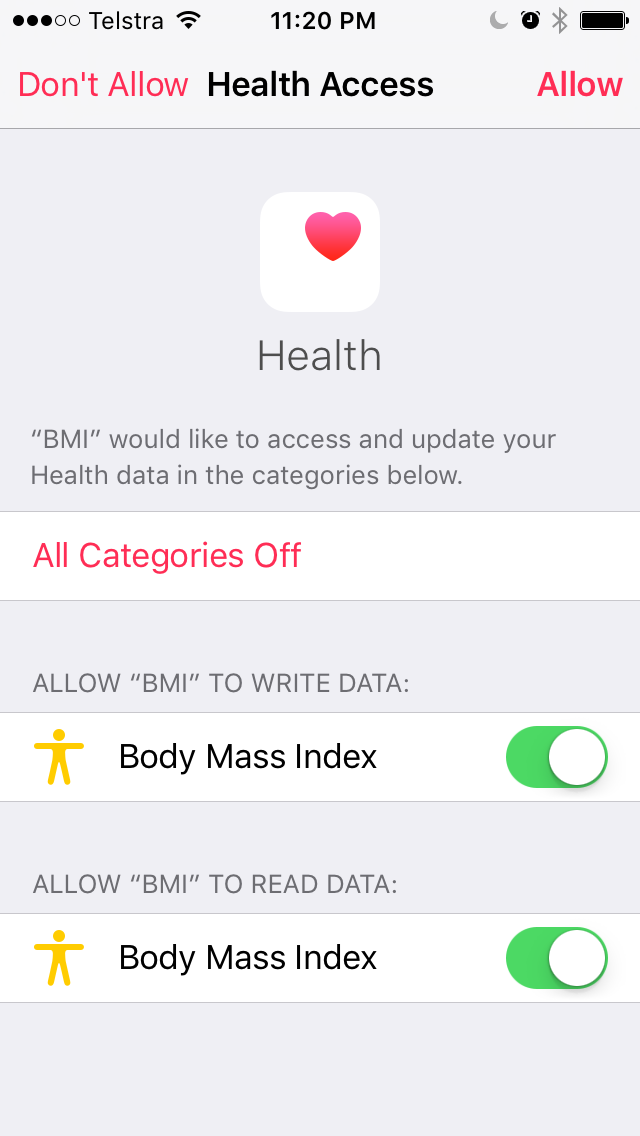
If you go ahead and allow access, then enter a height and weight and Save, the BMI will be saved to the HealthStore. With data in the HealthStore our History card and the Health App will start displaying BMI values.
You can download my version of the app from here.
The HealthKit External is now included in the LiveCode 8.1.0 DP1 release as part of the LiveCode Extension Pack, available with Indy and Business editions.
2 comments
Join the conversationRian Langley - June 3, 2016
Great, but what about Android?
When will the MergExt suite of externals be available/adapted for Android and other operating systems?
Seems that Livecode somehow neglects Android / Windows…
Monte Goulding - June 6, 2016
Hi Rian, one of the great things about Infinite LiveCode is it will make delivering cross platform extensions much easier. I’m certainly looking forward to delivering some great Android features. HealthKit however is an iOS only framework and its development was funded via LiveCode Business Services. If there’s something you need in order to deliver your Windows or Android I’m sure the team would be happy to help. https://livecode.com/services/