How I Almost Wasn’t a Coder

by Steve Robinson on November 19, 2014 3 comments

When I was first introduced to coding, I was so put off that I wanted to give up right away and never touch it again.

It’s a good thing I gave it a second chance. Learning new things can be daunting, and coding is no different. It all comes down to how it’s taught.

The Computer Wouldn’t Listen to Me

In my first year of A-Levels, I took a computing course with a crazy red-haired teacher who kept her dog locked in her car all day. This did reflect on her teaching ability.

There wasn’t really a structure: it felt like a coding nerd at the front of the class trying to explain ideas she didn’t really understand. Her enthusiasm was there, but it wasn’t coming across.

Coding appeared to be this mysterious thing, where you had to be a certain level of nerd with a pasty quality to your skin to get it. Being from Cornwall I had the skin part covered, but for some reason that wasn’t enough. It still looked like a weird combination of symbols, jumbled together by some crazy person. I figured that taking a course in Computing would unveil this mystery, and allow me to delve into the inner workings of a computer. Instead, the class clouded it further.

I saw a computer as this powerful thing that makes fun things like games and clever calculations I could never perform in my own head. I wanted to take the ideas from my head and turn them into something cool, but the damn computer just wouldn’t listen.

A teacher’s job isn’t just to teach you, but to inspire you to learn. I wasn’t inspired. I was bemused, baffled, and belittled. It made me feel like I had to be Stephen Hawking to write even the simplest line of code.

What Changed My Mind

One simple conversation changed everything.

A few years later, I was having a conversation with my dad, telling him how I took this computing class, yet I knew nothing about computers. I was still keen to learn, but I was also very much put off. He gave me some wise advice: Google it.

So I did. I discovered a whole world of coding and other related courses, and I hopped on one: Stanford’s Programming Methodology, by Mehran Sahami. It was awesome. The course used Java, and gave an even friendlier introduction by first teaching about Karel the robot. This little critter changed my life.

It was problem solving in its purest form. I was writing Java programs, but using calls like turnLeft(). English! The computer was finally behaving itself. I was making that little guy pick up beepers all over the place! A chequer board of beepers? No problem for Karel!

My computing teacher’s mistake was diving in the deep end on day 1, trying to explain software, when really, I needed to grasp the fundamentals first. At the end of the day, the software languages and toolkits that we use are just that: tools. Just like a hammer or a screwdriver is to a maintenance guy. The root of it all is problem solving, and this course hopped straight onto that. It didn’t feel like the monster that I thought programming was – it was like solving a puzzle, in my own language!

Once I progressed, with the help of Karel, Mistress Coding was unmasked. Actually, we had been writing Java programs the whole time. We then learned the fundamentals of the Java language, through more games: Block breakers, Hangman, Tetris. Every video game nerd’s dream.

The course was on YouTube, so you could pause it, rewind it, whatever. It was explained concisely, and taught in the familiar way that I had learned Maths and Science courses. On top of it all, Mehran’s enthusiastic delivery was so inspiring. Not that it would have made any difference to me, sitting in my chair at home, but every time students in the real classroom got a question right, they’d get a sweet.

At the end of the course, I was inspired, excited, and I finally felt ready to take some of my ideas and have a computer implement them, just like I’d dreamt of doing years ago. The computer was finally listening to me, the barrier was broken.

A World Wide Web of Resources

It’s really thanks to the coders that I discovered coding in the first place. Geeks at places like Google and YouTube that we might take for granted every day. Through Stanford’s online course I was able to learn coding in an unconventional classroom, even though it wasn’t my subject at uni.

Coding really is something that anyone can do, from the homeless to the ambitious historian, with the right introduction, and some perseverance anyone can code. Thanks to the Internet, the tools are there. The help and support are there, even.

Now I’m working with LiveCode and have found yet another intro to coding that would have given my computing teacher a run for her money. Perhaps LiveCode could be your Karel the Robot?

read more
Steve RobinsonHow I Almost Wasn’t a Coder

Markingdown The User Guide

by Elanor Buchanan on November 18, 2014 4 comments

Since LiveCode went open source we’ve been able to accept community contributions to LiveCode itself, but one area we haven’t had available properly is documentation.

Documentation is one place where we know that community contributions would be really valuable, and where people who don’t want to get into the workings of the engine can still share their expertise.

We have a long list of improvements we want to make to our docs, and one of the things near the top of this list is our guides.

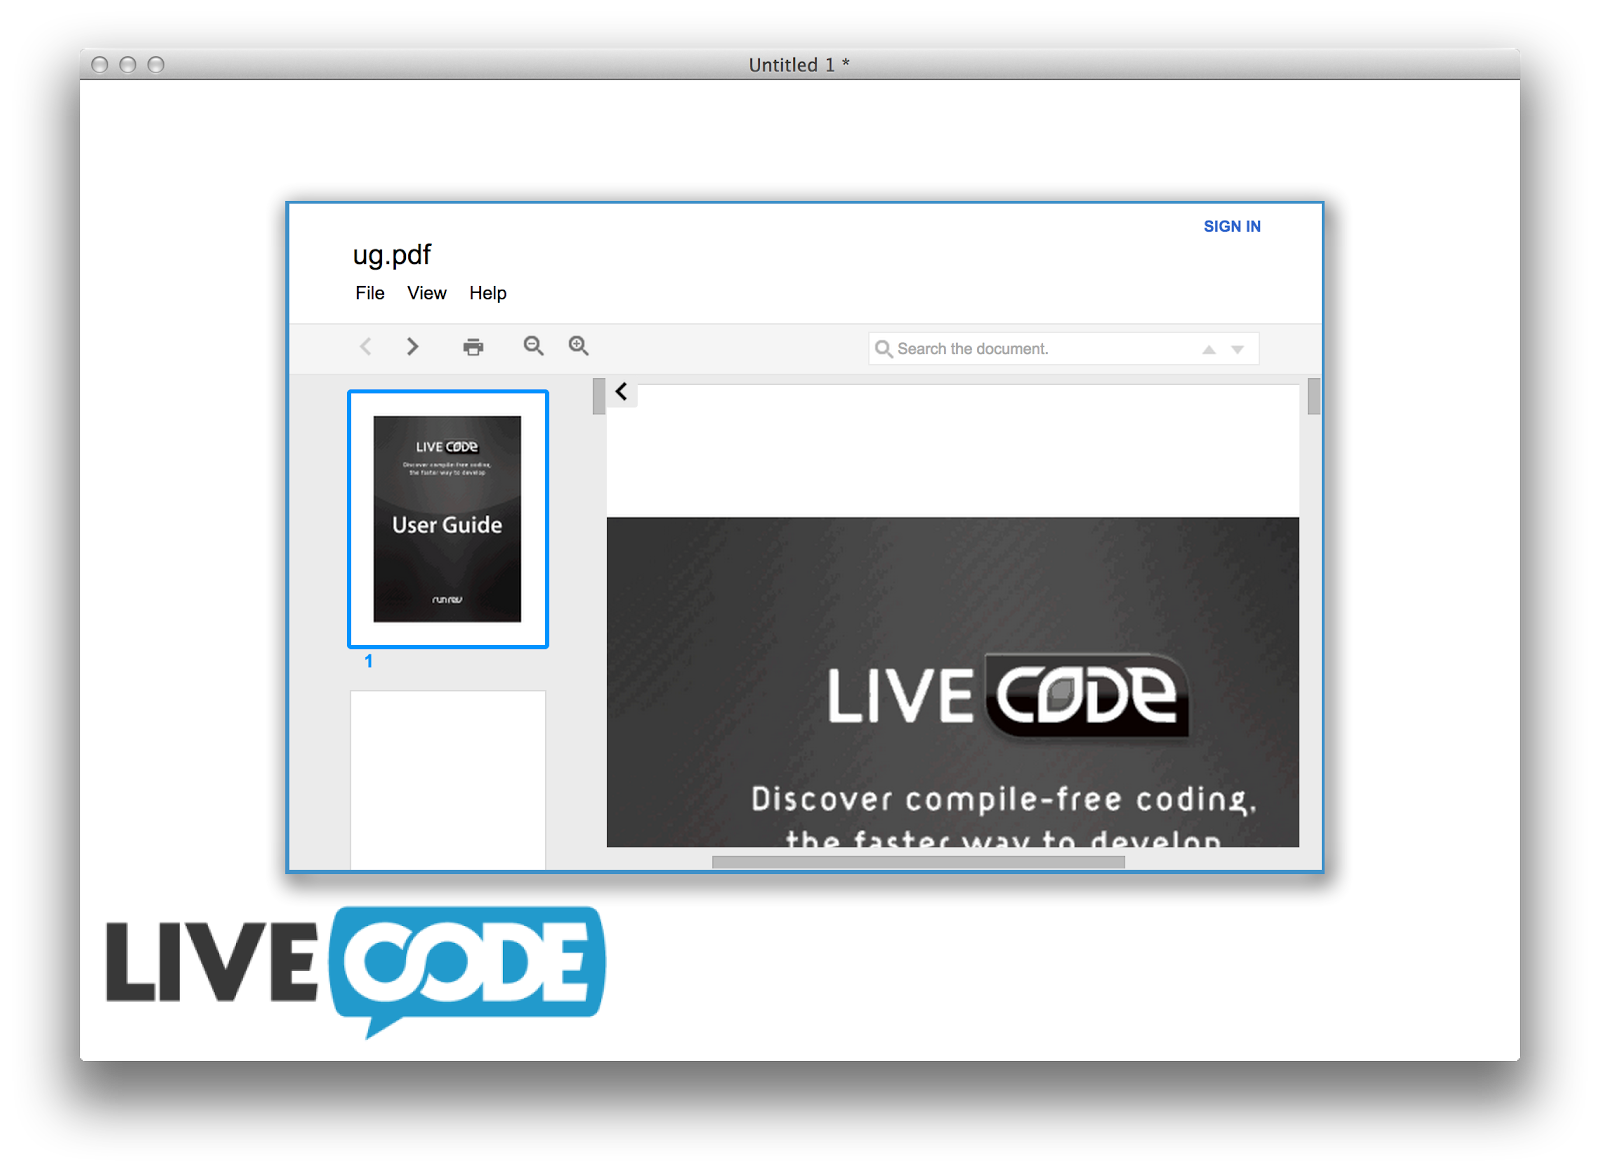
Currently we have 6 guides available from the Developers page  plus the User Guide available within the LiveCode product, under the Help Menu. We are planning to update the Documentation portal in the product in preparation for Widgets, allowing us to display all our guides and API documentation, as well as any Widget documentation, in a single place.

The plan is to write all our guides in Markdown, a plain text formatting system designed so it can be converted to HTML for display. This will also allow us to add the guides to GitHub, which allows display and editing of Markdown files written in GitHub Flavored Markdown

Happily the guides for Beginners, Developers, Mobile, Desktop Externals, iOS Externals and LiveCode Server were initially written in Markdown, so only some small tweaks were needed to make them GitHub flavored. The User Guide however was another matter.

Note: throughout this blog I’ll be using StackEdit, an in-browser markdown editor to show my Markdown source and the rendered HTML.

What did I need to do

The first step in preparing the User Guide to be brought up to date was to convert it from a Word document to Markdown.

To do this I chose to use Pandoc, a universal document converter which can convert from Word to Markdown, as well as a variety of other document formats.

Pandoc has a lot of options, allowing you to specify how you want the ouput formatted. In this case I want 

ATX style headers

Markdown offers 2 styles of headers, Setext and ATX.

-Setext headers underline <h1> headers with equal signs and <h2> headers with hyphens.

– ATX headers put 1-6 hash marks at the start of a header. The number of hash marks corresponds to the header level.


Pipe tables, this means any tables in the Mardown will be formatted as below

| First Header  | Second Header |

| —————- | ——————-|

| Content Cell  |    Content Cell   |

| Content Cell  |    Content Cell   |


  Extract media

  This option extracts images and other media to a folder, and includes the image references in the document.

pandoc -f docx -t markdown_github+pipe_tables --atx-headers --extract-media=images -o UserGuide.md UserGuide.docx

The result

userguide1markdown1


This looked good and I was pretty happy with the result. There were headings of different levels, italicised text, links and bullet points. All in all pretty good for 1 line in the command line.

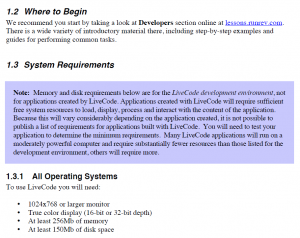
But wait, something was missing. In the User Guide the System Requirements section is marked as a note and highlighted in a box. This additional formatting hadn’t been included in the Markdown file. As I scrolled though the Markdown document I noticed a few cases of lost formatting which would need a little extra work to include in the Markdown.

The reason that this additional styling did not persist after the conversion is that there were custom styles in the Word document that did not convert. Having looked into it I couldn’t find a simple way to include these in the Markdown conversion but if any Blog readers know of a way please do leave me a comment.

Tips, Notes, Important and Caution warnings

The first thing I noticed was that Tips, Notes, Important and Caution warning were no longer highlighted as described and used in the User Guide.

tip

note

important

caution

I wanted to ensure these sections would be highlighted in the Markdown version using  Blockquotes, denoted in Markdown using >
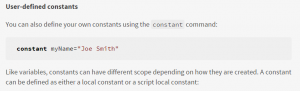
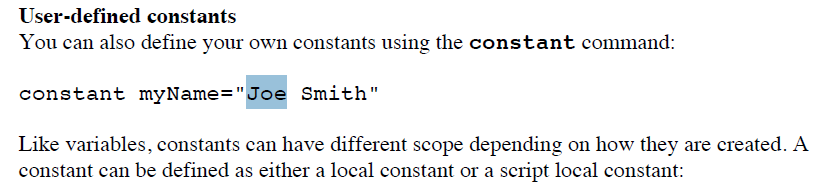
so 

> **Note:** This is  a note.

Displays As

markdown2

But first I had to find all the Tips, Notes and Warnings in the original document. Each type was highlighted in a different color, could I use that to find pull out the relevant text? Yes, by converting the Word document to HTML I could find all the text contained in colored boxes and pull it out.

I then created a very simple stack to find the Tips. Tips are included in a yellow box, in the HTML source this looks like

<P LANG="en-US" STYLE="margin-right: 0.42cm; margin-bottom: 0.42cm; background: #fefec2; line-height: 0.39cm">This style of text box tells you about an alternative way to do something or describes a shortcut.</P>

So all I needed to do was to find all the occurences of this style of paragraph, pull out the text and that gave me all the tips. Then I repeated this for Notes, Important and Caution, just changing the code to look for the relevant background color.

I created my stack, added a field and imported the HTML source into it, then added a button that would output the tips it found to the message box.

on mouseUp

   local tPosition, tPosition2, tPosition3, tPosition4

   local tSearchTerm   

   put “<P LANG=” & quote & “en-US” & quote && “STYLE=” & quote & “margin-right: 0.42cm; margin-bottom: 0.42cm; background: #fefec2; line-height: 0.39cm” & quote & “>” into tSearchTerm

   repeat until matchChunk(the text of field 1, “(” & tSearchTerm & “)”, tPosition,tPosition2) is false      

      get matchChunk(char tPosition2 to -1 of field 1,”(</P>)”,tPosition3, tPosition4)


      put char tPosition2+1 to (tPosition2 + tPosition3) of field 1 & return after msg

      put empty into char tPosition to (tPosition + tPosition4) of field 1

   end repeat

end mouseUp

The matchChunk function returns the position of a given substring in a string, so by searching for the <p> and </p> tags that describe the Tip style of paragraph I could extract all the tips.

I then used the lineOffset function to find the line numbers of these lines in the Markdown file and prepended them with > **Tip:**

 repeat for each line tTip in tTips

      put lineOffset(tTip, tMarkdown) into tLineNumber

      if tLineNumber is not 0 then

         put “> **Tip:** ” before line tLineNumber of tMarkdown

      end if

   end repeat

I then repeated this process for the Notes, Important and Caution sections, just checking for the correct background color in each case.

markdown3

Tables

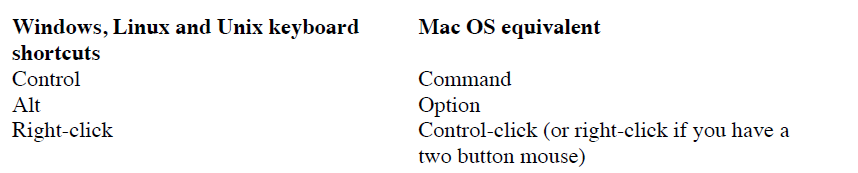
The next thing I noticed was that tables weren’t displaying quite correctly.

userguide2

markdown4

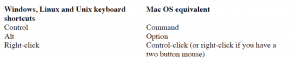
The reason for this was that Markdown requires tables to have headers, whereas the tables in my Markdown documents were formatted like this, with no headers.

|————————————————————–|——————————|

| **Windows, Linux and Unix keyboard shortcuts** | **Mac OS equivalent** |

| Control                                                                                       | Command                            |

| Alt                                                                                                | Option                                   |

| Right-click                                                                                 | Control-click (or right-click if you have a two button mouse) |


My first thought was to take the line after the separator and move it above, like this

| **Windows, Linux and Unix keyboard shortcuts** | **Mac OS equivalent** |

|————————————————————–|——————————|

| Control                                                                                       | Command                            |

| Alt                                                                                                | Option                                   |

| Right-click                                                                                 | Control-click (or right-click if you have a two button mouse) |

This would have worked in this example as the first line happens to be the headers but there are many instances where the table doesn’t actually have headers, so this would not work.

Instead I decided to add empty titles to each table. Again this was simple to do in LiveCode. In this case because I wanted to step through each line in the Markdown file and rebuild it with extra lines in some cases I created a new Markdown file from the original.

 repeat with x = 1 to the number of lines in tMarkdown

      put line x of tMarkdown into tLine


      if tLine begins with “|—” then

         ## This is a table separator line

         if char 1 of line x-1 of tMD is not “|” then

            ## If the previous line is not part of the table then

            ## Create a header line with the correct number of columns

            set the itemDel to “|” 

            put the number of items in tLine into tItemCount

            repeat with y = 1 to tItemCount

               put “| &nbsp;” after tMarkdown2

            end repeat

            put “|” & return after tMarkdown2


            ## Copy the original line the new Markdown

            put tLine & return after tMarkdown2

         else

            ## Copy the original line the new Markdown

            put tLine & return after tMarkdown2

         end if

      else

         ## Copy the original line the new Markdown

         put tLine & return after tMarkdown2

      end if

   end repeat

This method could probably be optimised but as it should (hopefully) only be run a very small number of times I did not take the time to optimise it.

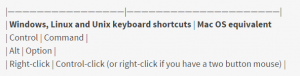
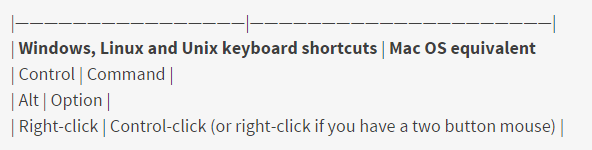
The resulting Markdown

|&nbsp;                                                                                         |&nbsp;                                   |                                

|————————————————————–|——————————|

| **Windows, Linux and Unix keyboard shortcuts** | **Mac OS equivalent** |

| Control                                                                                       | Command                            |

| Alt                                                                                                | Option                                   |

| Right-click                                                                                 | Control-click (or right-click if you have a two button mouse) |


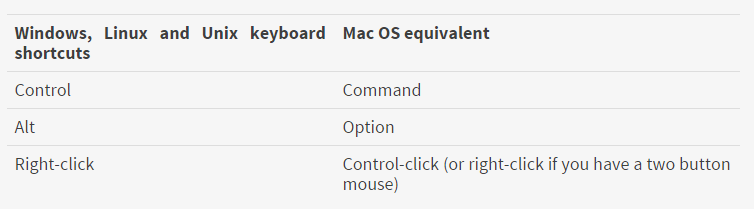
The resulting display

markdown5

Code Sections

The final challenge was to find all the code sections. I had hoped to use the HTML source as I did for the Tip sections but while the Tips and Notes were unique enough to use lineOffset to find them in the Markdown this wouldn’t work for phrases like “mouseUp” or “answer”.

Instead I set the htmlText of a field and then used the property to find all the pieces of code and their associated full lines. I do this by finding any text  that appears in the courier font.

   repeat with tLineNumber = 1 to the number of lines in the keys of tStyledText

      repeat with tRunNumber = 1 to the number of lines in the keys of tStyledText[tLineNumber][“runs”]

         if tStyledText[tLineNumber][“runs”][tRunNumber][“style”][“textFont”] is “courier” then

            put tLineNumber & tab & tStyledText[tLineNumber][“runs”][tRunNumber][“text”] & return after msg

         end if

      end repeat

   end repeat

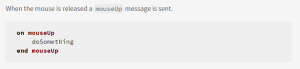
This gives me a list of line numbers and the text that should be put into code blocks. GitHub markdown has two styles of code highlighting, in-line and code blocks. Inline code has backticks around it e.g.

When the mouse is released a `mouseUp` message is sent.

Blocks of code and fenced by 3 back ticks e.g.

` ` `

on mouseUp

doSomething

end mouseUp

` ` `

markdown6


Once I have this list I can step through each code block, decide whether it is inline or a code block and update the markdown based on this.

   repeat for each line tCodeBlock in tCodeBlocks

      put item 1 of tCodeBlock into tLineNumber

      put item 2 of tCodeBlock into tCode


      if tCode is line tLineNumber of tMarkdown then

         ## Code block

         put “` ` `” before line tLineNumber of tMarkdown

         put “` ` `” after line tLineNumber of tMarkdown

      else

         ## Inline

         replace tCode with (“`” & tCode & “`”) in line tLineNumber of tMarkdown

      end if

   end repeat

This can result in multiple code blocks together, one after another e.g.

` ` ` on mouseUp` ` `

` ` `doSomething` ` `

` ` `end mouseUp` ` `

These should be combined into a single code block, one way to do this is by replacing (“` ` `” & return & “` ` `”) with return, using 

replace (“` ` `” & return & “` ` `”) with return tMarkdown

so the markdown above would become

` ` `on mouseUp

doSomething

end mouseUp` ` `

The final step is to ensure there is a new line before and after code blocks to ensure correct display. This can be done using

 replace “` ` `” with (return & “` ` `” & return) in tMarkdown

so the Markdown above becomes

` ` `

on mouseUp

doSomething

end mouseUp

` ` `


After completing all these steps code blocks display as below


userguide3


markdown7 

Final steps

After all these steps the Markdown version of the User Guide was pretty complete. There was a little manual work to do, just passing over the document and making sure everything looked ok but it saved a lot of work and got the User Guide into a good state for updates and contributions.

Coming soon

We still have some work so do polishing and updating the User Guide and other guides, and we need to decide on the best way to get them into GitHub ready for contributions but we’ll be keeping you posted as work progresses.

read more
Elanor BuchananMarkingdown The User Guide

Racing to a Temporary Fix

by Peter Brett on November 13, 2014 8 comments

Recently, I’ve been spending most of my time working on a Secret Project* for LiveCode 8.0.  But the remainder has been spent on my other areas of interest: Linux, server-side LiveCode, and security. Today, we’re going to touch on all of those topics.

Temporary files

You will often find yourself using temporary files. For example, sometimes your app will need to run some other program, and will need to provide it with an input file.  Or perhaps you receive data over the network, and need somewhere to stash it while waiting to decide whether to put the data into long-term storage.

LiveCode provides some tools for working with temporary files. In particular, there is the tempName function, which generates a uniquely-generated filename.

For example, if you write

put the tempName

in the message box on Linux, you might see something like:

/tmp/filevZr4DG

So, the simplest way to create a temporary file for your LiveCode server app to use might be something like:

-- Don’t do this
put the tempName into tTempFile -- 1. Generate a filename 
open file tTempFile for write -- 2. Open the file

Why do I say not to do this?  It’s because of a very “classic” programming problem called a “race condition”.  Read on for an explanation of what this is, how it can affect your app, and how to avoid it.

Race conditions

Modern operating systems can run more than one program at a time.  There are two ways in which they can do it:

  1. if there are multiple CPUs available, then each of them can simultaneously run a program
  2. the operating system can switch the program that each CPU runs at any time (this is called “pre-empting” a program)

Now suppose two programs are running, and suppose that there’s some resource that only one program can access at a time. If the two programs try and access the resource at the same time, then the one that happens to be very slightly faster will “win” the “race” and get to use the resource, while the slower program has to wait its turn.

File creation is a common cause of race conditions. Recall that if you open a file for writing. e.g. with

open file tFileName for write

but the file called tFilename doesn’t exist yet, the operating system will create it for you. But if another program creates a file called tFilename just before you try to open it, you’ll open that file instead of getting a newly-created file.

Let’s go back to the temporary file example, this time with some more comments.

-- *Please* don’t do this
put the tempName into tTempFile -- 1. Generate a filename

At this point, you know that tTempFile doesn’t exist. But don’t forget that other programs might be running on another CPU, or that your app might get pre-empted after step 1, and get stopped for a while.  This could mean that by the time that the next step happens:

open file tTempFile for write -- 2. Open the file

tTempFile might now exist, having been created by another program.

On Linux, and in certain circumstances on other platforms, any program running as any user can create files in the /tmp/ directory.  There are many examples of Bad Things that can happen if someone can control the files that your app writes to, including loss of data or even damage to your operating system.

You can find more in-depth discussion of this problem and some examples of the aforementioned Bad Things in the Mac Developer Library, and much much much more in David Wheeler’s Secure Programs HOWTO.

What can we do about it?

Fortunately, there’s something that can be done to work around the problem: you can use a temporary folder instead of a temporary file. However, the procedure is slightly more involved.  Let’s go through it step-by-step.

-- 1. Make sure that other users can’t read/write into the
--    directories you create
set the convertOctals to true
put the umask into tSaveUmask
set the umask to “0077”

There’s a special property called the umask which can be used control the security settings on the files and folders that your app creates.  Setting it to “0077” will ensure that only the user that your app’s running as can access any of the files or folders that your app creates (apart from system administrators).  Note that you need to enable the convertOctals first (or the security settings won’t be applied properly).  In this example we save the previous value of the umask so that we can restore it at the end.

-- 2. Keep trying to create temporary directories until we get
--    one that doesn’t exist
local tTempDir
repeat forever
 try
   put the tempName into tTempDir
   create folder tTempDir
   exit repeat
 catch e
   if there is a folder tTempDir then next repeat
   if there is a file tTempDir then next repeat
   throw e
 end try
end repeat

Unlike the open file command, the create folder command always causes an error if the requested folder already exists.  This way we can remove the race condition!  If another program simultaneously attempts to create the same tTempDir or a file with the same name, then we can easily detect it in the catch and try a new folder name. Of course, if some other error occurs, such as running out of disk space, then it is important to make sure not to block it.

-- 3. Now we can create temporary files in that directory
put tTempDir & “/tempFileNameHere” into tTempFile
open file tTempFile
-- ... and now use the temporary file! ... --

With the temporary directory having been successfully and securely created, you can go ahead and create as many files in it as you like, without any need to generate filenames or worry about race conditions (because no other non-administrator users can read or write the tTempDir).

-- 4. Reset the umask
set the umask to tSaveUmask

Hopefully this step is quite self-explanatory, unlike anything else I’ve written today.

Conclusion

Even something as simple as creating a temporary file can pose unexpected hazards, but LiveCode provides the tools to steer safely around them. For server-side LiveCode apps running on Linux, I recommend using temporary directories rather than temporary files to improve robustness and security.  For other apps on other platforms, the simple approach may be enough most of the time, but using a temporary directory won’t hurt!

*The project is so secret that I have cunningly hidden all of the code in my Github repository.
read more
Peter BrettRacing to a Temporary Fix

Use the Web Browser

by Neil Roger on November 11, 2014 9 comments

Being able to implement a web browser instance in your LiveCode app is nothing new, but the way it can now be implemented is.

Previously, you were dependent on the machine that your app was running on having a compatible web browser installed. LiveCode then hooked into these browsers which then created an instance within your app using Internet Explorer on Windows and Safari on Mac. This could lead to inconsistencies across the platforms.

Note: Mobile have their own native browser implementations so we won’t be dealing with them in this article.

No longer are these dependencies required, and it’s possible to create a standalone app with a browser instance that will run on any platform (Linux coming soon). But how is this possible?

As of LiveCode 6.7, our dev guys implemented the Chromium Embedded Framework which is used for embedding chromium based browsers within an application. More information on this can be found here.

Now, you may be asking.. “What are the benefits of a browser in my app Is it not just for viewing webpages?”..So with that in mind, hopefully the following short list will give you some ideas of what is possible with the CEF browser

Very Simple File Manager

Looking for an easy way to browse files on your computer? Then look no further! Creating a CEF browser and then setting its URL to the following results in quite a nifty little file browser. nb: When I say simple, I mean simple. This method only allows you to open basic text files and view images.


revBrowserSet *browser Instance id here*, "url", ("file://")

image00


HTML 5 based webpages.

HTML 5 is the way forward in regards to web technology so much so we will soon be allowing our users to deploy straight to HTML 5.

The CEF browser has fantastic HTML5 support and ranks high in the http://html5test.com/ system. So integrating content rich web based media within your LiveCode app is simple. The following is running an interactive 3D simulation in a LiveCode stack:

revBrowserSet *browser Instance id here*, "url", ("http://www.kevs3d.co.uk/dev/shaders/polyhedra2.html")


image04 

 Remote PDF Viewer

Previously, you had to have plugins installed for a browser instance to open and display a PDF. This is no longer the case. With the new CEF browser, you can view PDFs from a remote source as long as the web page is formatted correctly. In this example I am using Google’s Embedded PDF viewer.

More information on how to create such a viewer can be found here.

I then simply set the URL of the browser instance to the URL provided by this Google service:

image02

In-built Video support 

Unlike the previous non-CEF browser, we no longer need a media player such as Quicktime installed in order to play many of the media types available to us. As long as the video/audio is in the appropriate tags within a web page, the content should play.

<video width=”320″ height=”240″ controls>

<source src=”movie.mp4″ type=”video/mp4″>

<source src=”movie.ogg” type=”video/ogg”>

Your browser does not support the video tag.

</video>

(http://www.w3schools.com/html/html5_video.asp)

image03

In-built audio support 

This is just like above but instead of video, we are dealing with audio

<audio controls>

<source src=”horse.ogg” type=”audio/ogg”>

<source src=”horse.mp3″ type=”audio/mpeg”>

Your browser does not support the audio element.

</audio>


image01

Better all-round net compatibility

 Being a more up-to-date browser implementation means that it will be compatible with all web pages that are thrown at it. Previously, on Windows, the older browser instances would throw Javascript errors when visiting a page that was not fully Javascript optimised. These errors were obtrusive and required users clicking an OK dialog to dismiss them. This is no longer the case as the CEF browser handles these types of pages flawlessly.

An example of such an error, which should now be resolved with CEF can be found in the following forum post:

http://forums.livecode.com/viewtopic.php?f=9&t=19299

Javascript communication

Previously it was possibly to execute Javascript within a browser instance directly in your app, now it is also possible execute script within your app via Javascript which is executed in the browser. This opens up a whole world of interactivity between your app and any web pages you are viewing. The best way to show this is to take an excerpt of Ben’s Summer School 2 session and make it available for you to watch:


Now that you know some of the neat things you can do with a browser object its over to you to take things further! If you do decide to use a CEF browser in your next project, please let us know as we are always interested to see what our users are doing with LiveCode.

Get LiveCode 7 today!

read more
Neil RogerUse the Web Browser

The Psychology of Clothes

by Heather Laine on November 5, 2014 2 comments

Recently, I’ve been occupied with shipping out LiveCode 7 branded T-Shirts to purchasers of our special 7 launch bundle. Visualising all you guys and gals unpacking the parcel and wearing the T-Shirt got me thinking about what people wear, why, and how it affects their day to day activities. 

While we were designing the T-Shirt, I discovered that some members of staff have strong views about what kind of shirt they will wear, and what they won’t. We do have the full spectrum here in the team, from staff members its an effort to persuade to wear at least something without holes in, to those who would not be seen dead in any kind of T-Shirt and don’t own a pair of jeans. We have a  “Smart Casual” official policy for our staff, which I think is a kind of extension of our company culture, and reinforces our desire for a workplace where people are creative, comfortable, and valued. Having staff turn up wearing scruffy jeans and baggy tshirts leads to a general air of disreputableness and disrespect, but insisting on a shirt and tie every day would make most of our development team very uncomfortable.

However, I myself and many of you, our users, work from home. Does it matter what I wear? Or what you wear? I think it does. Theoretically, I could sit here at my computer wearing a dressing-gown and slippers, and none of you would be any the wiser (aside from the risk of a sudden Skype with video).  In practice, I dress if not as formally as I would for the office, at least respectably. I don’t feel I would do as good a job if I did not dress for it. It would be a very interesting experiment to run! So interesting that a little googling finds that studies have in fact been run on this question. Enclothed Cognition is the term being invented for the concept. Apparently wearing a doctors lab coat while performing intelligence tests results in better performance – but only if you are told it’s a doctors lab coat, not if you think it’s an artists jacket.

Which brings me on to my thoughts on confidence. Dressing in clothes you like gives you more confidence, which you then are able to project onto your work and your interactions with others. Confidence is attractive therefore you look and work better in clothes you like. So, if you like our LiveCode 7 T-Shirt, you’re going to look great wearing it! Care to send us a photo? 

tshirt7

What do you think? Does it matter what you wear? If you work at home, do you dress up for work? 

read more
Heather LaineThe Psychology of Clothes

Values

by Mildred Foo on November 3, 2014 9 comments

There has been a buzzword circulating round for a long time now – Values.  What are Values you say? 

Values are the intrinsic elements that underpin our behaviour, in this case, that of LiveCode, and they should relate to our day to day experience at work.  It may seem cheesy, but when we are around people we share common values and beliefs with, we feel safe and secure.  When we are happy, we have a more positive outlook on all aspects of life – our environment, colleagues, and from LiveCode’s perspective, the way we work.

At LiveCode, our people are our most precious resource, which is the catalyst for a healthy company.  We actively strive to create a fair and balanced partnership with every individual as they are on the frontline, communicating with our community and representing LiveCode daily.  The relationships we build and the service we provide are key to building a successful brand and more importantly, ensuring everyone has bought into our ethos.  That starts with making people feel valued.

A great entrepreneur of our time said:

“Your culture really is one of the most important things of your company, it’s who you are, it’s why customers choose you.  Build a great company which you would want to do business with yourself.  If you get this right, your culture is right”.

–       Sir Richard Branson

 We start making our people feel valued by showing them trust, providing development opportunities, and practising what we preach.  With this in mind, we recently concluded an activity to renew our Vision and create our Values. 

Our Vision is that Everyone Can Create Apps and that is at the heart of LiveCode.  The role technology plays in our lives is going to grow and we believe we can contribute to empowering people to get the most out of technology in all its forms.

Our Values are simple.  We value every team member, every customer, and the wider community in which we operate.  We value diversity and offer an atmosphere where ideas are welcomed.  We care – personally and professionally.  We are an open-minded company and a great place to work.  We innovate and are always at the forefront of technology.

I am enjoying my time at LiveCode.  We have always looked after our Community and with our Values now clearly articulated (they have always driven the company, we’ve just formalised them), there is equal focus internally.  Happy people = a ready supply of LiveCode ambassadors and a brand people will hear about at a national and global level.

read more
Mildred FooValues

Solving the LiveCode Engine

by Ali Lloyd on October 31, 2014 11 comments

The number seven is interesting, and not just because there are no uninteresting numbers. For one reason or another the number has taken on a mystical quality in various cultures, not least in the office where it now surely holds the distinction of being the ‘most said number of the year’. Incidentally, we are not in general numerologically inclined, but hexakosioihexekontahexaphobes will be pleased to hear that there will probably not be another maintenance release after 6.6.5, despite what would have been the serendipitous proximity of Hallowe’en, the perfect date to unleash it.

There seems to be a certain memorable quality conferred on any set of seven things, and as such seven has become the de facto target for the quantity of a would-be interesting collection. Science, literature and life are littered with examples – Wonders of the Ancient World, colours of the rainbow, deadly sins, to name but a few. 

I am a fan of puzzles. These can be various sorts of puzzles, although the ones that really get my attention are the sort that are generally only found in a so-called “puzzle hunt”. To the uninitiated, these are strange variations on the traditional puzzle – they contain no instructions, and there is always an answer (usually a single word or phrase) as opposed to just a puzzle in a solved state. It turns out that sets of seven is a relatively common theme for these puzzles. Here are two examples (one from a puzzle hunt that is ongoing):

Li Ven Se Tt Le

Quadratum

The point is, for me working from start to finish on LiveCode 7 was in many ways similar to the process of solving a puzzle hunt. In fact, it probably ought to be similar in precisely seven ways, so lets see if I can shoehorn this section into a thematic format. I present a Buzzfeed style list:

Why working on LiveCode 7 is similar to solving a puzzle hunt. 

1. There is a way in

Since there are no instructions, the best puzzles tend to have an early hook to bring you into the world it inhabits. This can be any number of things, perhaps it has the presentation of a traditional puzzle such as a crossword, or perhaps it has some basic questions to answer, images to identify, facts to gather. Sometimes all you have is a pun in the title.

At the beginning of the refactoring project, my main task was to separate evaluation and execution in LiveCode syntax. Every function, command, operator, control structure, and constant in the language of LiveCode has a syntax class which is responsible for resolving expressions or performing actions in the appropriate way. We wanted the resolution of  subexpressions to be completely distinct from the execution. 

 In the first cases I encountered, this could be as easy as simply creating a new function in the engine, cutting a section of the syntax class implementation, and pasting it into the new function. Of course even in a simple case, one needs to read what is actually happening to make sure it is the correct thing to do. This was my way in; learning about LiveCode syntax and how it works; being brought into its world.

Here is an example of one of the more simple refactoring tasks. At the other extreme, refactoring the chunk object was completed with approximately 20 commits. 

2. It consists of a multitude of multi-stage processes

Another thing that distinguishes puzzle hunt style puzzles is the fact that they are generally multi-stage puzzles. There is rarely just one thing to do to get the answer. Sometimes it is not clear how many things will have to be done to complete the puzzle. The analogy here is clear – the many tasks necessary for the completion of the refactoring project all tended to break down into multiple subtasks. On a number of occasions, the details of the later stages of a task were not revealed to us until we had to do them. Of course, like some puzzles, this means that some stages of the project were fairly epic. Some lasted days, others weeks, still others months. That is to be expected, I suppose, when dealing with something on this scale. But the fact that the work would apparently have taken one person almost a decade to complete still boggles my mind. 

Usually a puzzle hunt will try and have a wide variety of puzzle types, testing many areas of skill: linguistic, logical, mathematical, artistic and musical puzzles abound. There is a certain polymathic requirement when dealing with the LiveCode engine too. While most of the engine is written in C++, parts of it are in Objective C, and parts of it are in Java, and when you are supporting many different platforms that means dealing with different APIs from all the operating systems. Just like a puzzle hunt, you have to be prepared to acquire a new skill just for one specific task. You often find yourself becoming an expert in rather strange areas. Like Roller coasters and knot theory

3. Organisation is paramount

The elements of the refactoring project that went the most smoothly were of course those for which we had been able to dedicate a good amount of time to planning and tracking. The trail of spreadsheets and documents in my Google Drive is longer than my virtual arm. This also relates in part to the previous point. The more subdivided the task, the easier the documentation of progress, and the better documented the progress, the more that progress is a boon to the project as a whole.

Spreadsheet

I found this particular progress spreadsheet irresistible in terms of trying to get to 100%

 I and the rest of my puzzle team have frequently found that a suitable organisation of the information gathered is sufficient to spark the next idea, or to unstick oneself. I’m trying to get the phrase “Sometimes it takes looking at different data on three laptop screens to work out how to solve a 3d maze and apply those directions to a Rubik’s cube (last page)” into general usage, but I’m not sure it will catch on.

Computers 

Disclaimer: I did not actually solve this puzzle. 

Refactoring is in itself just a form of organisation. The codebase now is far more readable than it was before; which of course was one of the motivations for undertaking the project in the first place. It is important for people to be able to contribute to an open source project, and clearly the easier it is to understand what is already there, the easier it is to contribute. 

4. It involves looking at a lot of unfamiliar Unicode codepoints

And sometimes understanding them

And sometimes knowing how they are made up

And sometimes switching to different keyboard layouts

 Changing LiveCode’s internal string representation to accommodate Unicode has taught me untold amounts about the scripts used in various countries around the world. The integration of the text shaping library Harfbuzz (so that scripts such as Arabic, Khmer, and Devanagari look as they should on Android devices), amongst other things, resulted in an input source list that looks like this:

 keyboards

On one occasion, such keyboard switching had me completely locked out of my Ubuntu virtual machine, due to not being able to switch to English layout without logging in, but also not being able to actually type any of the characters in my password without switching to English layout. 

5. It requires concentration and attention to detail

Sometimes this is attention to small details in situations where there is not much information. Or in the case of this puzzle, extreme attention to detail (warning: attempting to solve the latter puzzle is a surefire route to madness). Other times it is a case of not trying to understand everything that you’re looking at, just the relevant parts. Like this. The aforementioned chunk object is so fundamental to LiveCode that even a slight mistake in refactoring it caused the LiveCode IDE equivalent of the blue screen of death (which happens to be a white rectangle with the “revLibURL” button on it).

 When replacing c-strings with MCStringRefs in the code, it was frequently the most efficient strategy to merely ensure that the behaviour was identical to what it was before, without completely understanding what the function was doing as a whole. 

6. It sometimes feels like it will never be finished

Getting stuck is a fact of life. Even more so a fact of puzzle hunts. Puzzles have a phase known as ‘extraction’, whereby the answer is obtained using all of the information that has been gathered and worked out. This can be as simple as using some numbers to index some words, or an acrostic that appears after sorting alphabetically. Other puzzles have more intricate extractions mechanisms, and some of the most beautiful involve iteration of procedures from previous parts of the puzzle. In any case, extraction can be very difficult, and it is therefore a very common place to get stuck.

Likewise, the period of time between being “basically” finished with LiveCode 7 and actually being finished felt like an eternity. I say actually finished, obviously there are some things to clean up, some residual bugs and so on. But we’re putting away the syntax caravan, and work is already underway on the widgets and themes project that will form the basis of LiveCode 8. In fact, I would like to get the phrase “putting away the syntax caravan” into general usage to mean almost finished. “How’s that novel coming along?” “Well, it’s not done, but I’m putting away the syntax caravan, if you know what I mean.” “No, I don’t know what you mean, Ali. Stop saying that.”

7. There are many ‘aha’s

The ‘aha’ or lightbulb moment is probably the reason why people who do these puzzles do them. It can be quite exhilarating, the joy of discovery, and is certainly quite addictive. One of the closest real-world experiences to the idealised puzzle ‘aha’ is solving a programming problem. There is a huge amount of satisfaction that comes from finishing off anything, particularly if it has involved an element of mystery, triumph over adversity, and especially if it is completely and utterly epic in scale. The refactoring project ticks all these boxes as far as I’m concerned. And there were ‘aha’ moments in spades. 

Caveat: Why working on LiveCode 7 is not at all similar to solving a puzzle hunt

I mentioned before that there is always an answer to a puzzle hunt puzzle. There is also usually a ‘metapuzzle’, which involves using all the answers to all of the individual puzzles in the hunt. Well, here’s where the analogy completely breaks down. There is not single phrase answer to the LiveCode engine. Like a more traditional puzzle, the best we can say is that it is in a more ‘solved’ state than it was when we started. But that is still deeply satisfying, and a goal I’m happy to have spent my first two years working towards.

Solutions:

Quadratum

Please Remain Seated

Contortionist

English Expectations

Cryptograf

Symphony from the Old World

Circulus In Probando

Team Statistics

and finally

The LiveCode Engine

read more
Ali LloydSolving the LiveCode Engine

Lost in Translation

by Georgia Hutchings on October 23, 2014 11 comments

For the past month I’ve been delving deep into the LiveCode IDE, with the purpose of preparing the product to be localised, so that strings in the UI are in the users’ language of choice. Simultaneously, I have been learning a new programming language myself. 

One of the newest members of the LiveCode Development team, I joined in September fresh out of University looking forward to immersing myself in the world of software development, and picking up a new programming language to boot. I was excited to learn LiveCode, and seeing how well I’d be able to pick it up – as surely that’s the point, after all. 

After a day of settling in and getting myself set-up and ready to work, I began my first project, localising the IDE. Initially, the project required me to trawl through reams of LiveCode script, looking for strings that would need translating, making a note of these strings and passing these strings through a dummy function. The dummy function just returned the strings in all capitals, making it easy to see what had been “translated” and what hadn’t. Ultimately, the localisation function would return the string in the user’s selected language, but for now the project just required that the IDE was prepared for translation and everything that would need eventual translating was documented. 

The first stage of the project, while laborious, was an excellent learning curve for me. I was able to get in to the nitty-gritty of the product, see LiveCode being put to use and begin to write a small amount of LiveCode script of my own. I also got to see the ups and downs of changing the IDE through the IDE – a challenge in and of itself – instantly being able to see changes made or managing to break the IDE with one typo! It also highlighted how the product wasn’t designed with localisation in mind, as I came upon obstacles to translation such as images with English text in them.

The next stages, which I am working on now, involve me preparing the strings for translation, creating a tool for the translators and writing the localisation function. It was in these stages of the project that I was really able to start writing my own LiveCode script. Not only was I able to start doing this with relative ease, with some questions for specific situations, I quickly found myself able to fire off script in LiveCode as if I were writing some text in English. Having done a bit of programming at University and an internship in mobile development, I am not a complete novice when it comes to programming. However, I was impressed at how natural programming in LiveCode felt and I’m pleased to be part of a project that is making the product more accessible to budding developers around the world. 

read more
Georgia HutchingsLost in Translation