
Facebook, a British Prince and Dr. Who?
by JoJo Hernandez on October 21, 2014 12 commentsEncouraging Children to Code
Another three unlikely suspects to combine into a JoJo Blog Post about coding? Well, maybe not!
Who: Facebook, HRH Prince Andrew the Duke of York and Peter Capadli, the most recent appointment to play the notorious Time Traveller, Dr. Who!
Why: To encourage children to learn to code of course!
See it now? Not quite? OK, I shall explain..
There is a growing revolution in the UK and Europe to encourage children to code and to raise awareness of the capacity for children to code from a much younger age. The ideal is that all children will have access to tools to allow them to develop programs and apps, making the digital world an integrated part of their everyday life, in a way that suits them.
The discussion of coding is far more prevalent now than it ever was and it is easy to see why. By capturing young minds we set a path for the future and by educating them and providing them with the right tools, we support them in their journey.
Many businesses are striving to be a part of this revolution, so why are these particular people standing out in striving to support this cause? Well in a sea of articles, these are the ones that most interested me.. and after all it is MY Blog Post, so I thought I would share!
Facebook has joined forces with other industry influencers (including Microsoft and Rovio) and has formed a coalition to launch a pan-European online platform to drive participation in coding.
In September, coding in English schools was made mandatory for all children aged between 5 and 16 years old. Particularly interesting then is to hear that 3 young coding enthusiasts from the UK have beaten off European competition to win the gaming contest.
The Kodu Kup is where teams from the UK faced competition from Portugal, Finland, Norway, Belgium, Greece, Lithuania and Estonia to battle to a Dragons’-Den style final, complete with selling pitch!
One of the most enlightening statements I read came from one of the Team Winners, Alfie, who felt that the team work involved and playing to its strengths was key to their success. He said:
“Kids don’t always need to be told what to do to understand things, through computational thinking and perseverance you can find out for yourself, and if you can get a grasp of computers and computer science you can understand the world around us.”Speaking recently at the TeenTech Awards, presented at Buckingham Palace, HRH Prince Andrew said there needs to be a “culture of enterprise” to help young people turn technology ideas into commercial products and suggested that coding would be a key part of skills required.
The Prince is patron of the Awards, which encourages young people to “recognise that science and technology are the basis of how we are going to be prosperous in the future”. The Awards competition which aims to encourage teenagers to get involved in inventing and designing was developed by science television presenter Maggie Philbin and backed by actor Stephen Fry and Top Gear presenter James May.
Of course you’re screaming.. get to the good bit – WHY is Dr. Who involved??
It was announced at the beginning of September that the British Broadcasting Corporation (BBC) had published computer programming study guides, quizzes and other support materials on its Bitesize site to coincide with the newly introduced computing curriculum in England. They have also revealed details of several programming themed children’s programs set to air late autumn.
Uh-huh.. Dr Who???
Well my favourite initiative – as I am a total Dr Who geek*.. yes, you may laugh – was announced yesterday.
In an article featured in the Technology section, the BBC unveiled the launch of their new Dr Who game, in which you take control of a ‘friendly’ Dalek and navigate a series of challenges. Rather than just your standard game, the challenges involve you solving different problems using coding, to move onto the next level.
The online game, aimed at 6-12 year olds, is voiced by Peter Capaldi, the Doctor himself and was written by Doctor Who TV series writer, Phil Ford.
The game will be available to play for free on the CBBC website from Wednesday October 22 and I know I am going to be giving it a bash.. will you?
Have you seen any interesting articles, blog posts or competitions lately, aimed at getting children into coding? Do share!
*JoJo Hernandez is our Finance Director, Fashion Lover & self confessed *Whovian!
read moreRecursion for Runaways
by Hanson Schmidt-Cornelius on October 16, 2014 15 comments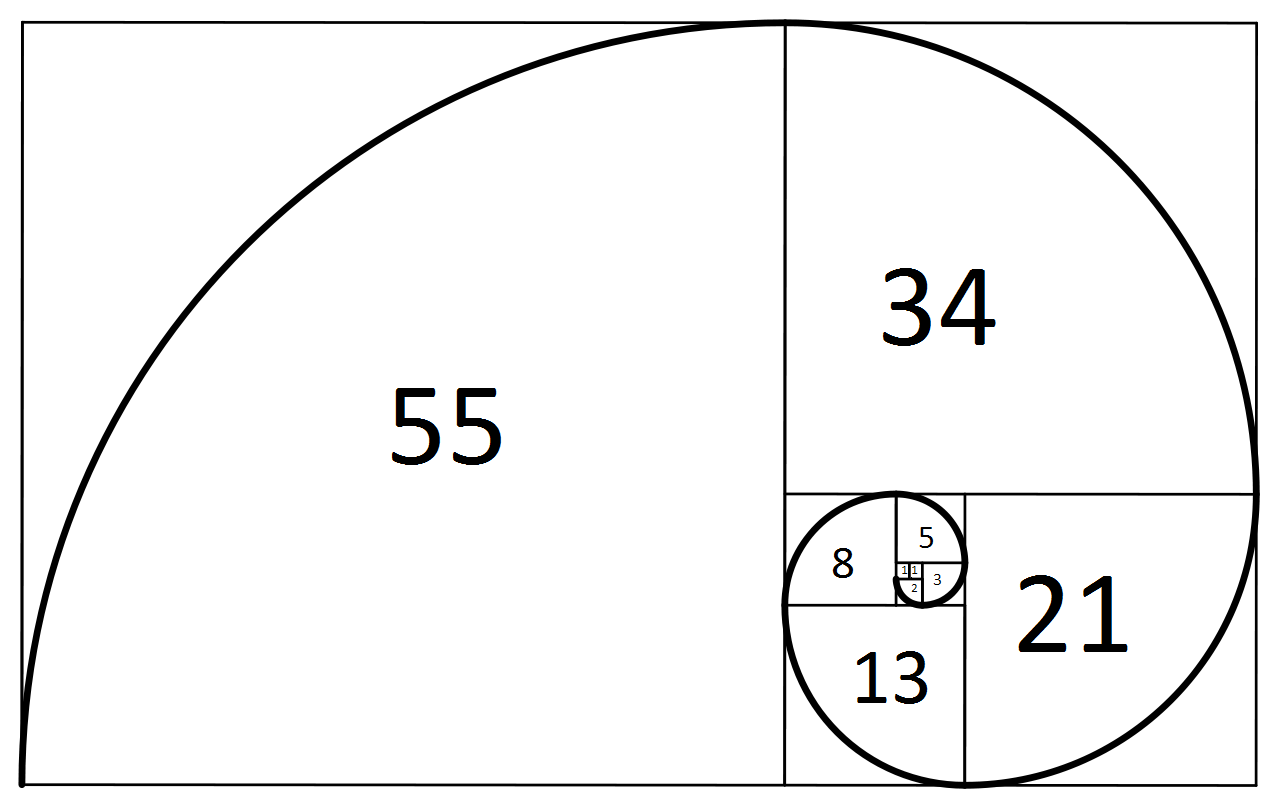
If you like to tinker with maths and are looking for more exotic operators, for example to calculate the Factorial or the Fibonacci series, then this is something you are going to have to implement yourself in LiveCode. But there is no need to despair, this can be done pretty much with a single line, wrapped in a function definition.
MATHS HAZARD – You may skip the following paragraph if you are not a friend of mathematical definitions.
The Factorial of a non-negative number n can be defined as the product of all of its positive integers that are less than or equal to n, with the Factorial of 0 returning 1. The operator for Factorial is denoted by an exclamation mark (!), allowing us to write the operation as follows: n!
The following example demonstrates how Factorial is calculated for the number 6:
6! = 1*2*3*4*5*6 = 720
Now this does not seem to be too much of an issue to implement or write, but how do you go about writing a function in LiveCode that does all the heavy lifting for you, so that you do not have to write a long sequence of multiplications?
Well, there are fundamentally two algorithmic approaches you could consider. These are iteration and recursion. They both operate in quite different ways and have advantages and disadvantages.
Let us look at the iterative approach first, as this is possibly the programming paradigm most people are familiar with.
We create a function that takes an argument for which we are calculating the Factorial product. This function then cycles through all the positive integers that are less than or equal to the initial argument and multiplies all of these integers together. The function result is the Factorial result.
function factI x
  local tProduct = 1
  local tCounter
  repeat with tCounter = 1 to x
     multiply tProduct by tCounter
  end repeat
  return tProduct
end factI
Now in order to implement this algorithm we need two local variables and a repeat loop. This keeps track of the result as it is being updated through each iteration of the loop. But what if you really do not want to be bothered with local variables and loops and keeping track of data?
Well, meet recursion. Recursion can remember all the data that is specific to an instance of a function call. This means that we can pretty much throw most of the code away that we use in the iterative approach. Yes, we do not need local variables and we do not need a repeat loop. In fact, we can calculate the Factorial of a number with a single line of code in a function.
A recursive implementation usually contains some kind of condition check so it knows when to stop and when to call itself. This has been implemented in the following code using an “if then else statement”. If we are below a certain value stop, otherwise call the function again, but with a changed argument.
function factR x
  if x < 2 then return 1 else return factR (x - 1) * x
end factR
Now that was not too painful, but what is actually going on here that allows us to write code that is so much shorter?
Consider calculating 6! and let us expand how factR calls itself at each recursive level:
Level 1: factR(6)
Level 2: (factR(5) * 6)
Level 3: ((factR(4) * 5) * 6)
Level 4: (((factR(3) * 4) * 5) * 6)
Level 5: ((((factR(2) * 3) * 4) * 5) * 6)
Level 6: (((((factR(1) * 2) * 3) * 4) * 5) * 6)
               (((((1 * 2) * 3) * 4) * 5) * 6) = 720
Note: The parentheses demonstrate the execution order at each level and are not intended to be interpreted in a mathematical sense. The commutative law applies.
So this gives us a total of 6 calls to the function factR for 6!
Another number sequence we mentioned in the beginning is that of Fibonacci. This sequence received its name from Leonardo of Pisa who published the historical mathematics book “Liber Abaci” around 1202. Leonardo of Pisa was also know by the name Fibonacci.
This Fibonacci number sequence starts: 1,1,2,3,5,8,13,21,34,55,89,144,233,377,610,. . .
This sequence has fascinated mathematicians for centuries and reveals remarkable patterns that are very much linked to natural structures, such as the formation of shells, branches and even the arrangement of the seeds in sunflowers. My particular interest is the use of the Fibonacci numbers for the close approximation of the Golden Ratio.
A Fibonacci number is generated by calculating the sum of the previous two numbers in the Fibonacci sequence. This operation is quite different to that used to derive the Factorial number sequence, never the less, it is possible to also wrap this into an iterative and recursive implementation.
Calculating the Fibonacci numbers iteratively requires additional local variables, compared to calculating the Factorial numbers. We step through all of the Fibonacci numbers and create the next ones by adding the previous two numbers together.
function fibI x
  local tFirst = 1, tSecond = 1
  local tCounter, tSum
  repeat with tCounter = 3 to x
     put tFirst + tSecond into tSum
     put tSecond into tFirst
     put tSum into tSecond
  end repeat
  return tSecond
end fibI
In order to implement this algorithm we need four local variables and a repeat loop. As with the Factorial calculation, this keeps track of the result as it is being updated through each iteration of the loop.
The recursive approach can again do away with local variables and the repeat loop, creating the implementation as follows:
 function fibR x
  if x < 3 then return 1 else return fibR (x-1) + fibR (x-2)
end fibR
Now I am not going to demonstrate how the recursive levels are expanded here and would like to leave this for the reader to explore. What I would like to add is that calculating the Fibonacci number for 6 calls fibR a total of 15 times.
Now recursion (or meta programming as it is sometimes referred to) is great as it can really reduce your code and hide a lot of the complexity, but beware. Some algorithms are better suited to recursion than others, and recursion can be computationally more expensive than iterative approaches. For example, calculating 20! calls factR 20 times, and that is great. Calculating the Fibonacci number of 20 calls fibR a staggering 13529 times.
read moreTurbo Charging the Android Emulator
by Neil Roger on October 15, 2014 12 commentsAh, the good ol’ Android Emulator….Many a support request has come in regarding this, mainly to complain of how dog slow it can be especially in comparison to the iOS simulator.
The main reason for the speed difference between both is that the Android “Emulator” is physically emulating the software and hardware of actual devices whereas the iOS “simulator” is only simulating the iOS operating system and has full access to all of the system resources (e.g. CPU, GPU etc)
With the above in mind, an Android Emulator is good if you’re starting with Android development or if you are in a pinch but ideally testing your application on a physical device gives you the best experience and doesn’t leave you wanting to pull your hair out.
With that being said, there is an alternative “Emulator” that I have used in the past and it has also recently been brought to our attention via support (Thanks Fulvio), which provides far superior performance compared to Google’s “out of the box” Emulator.
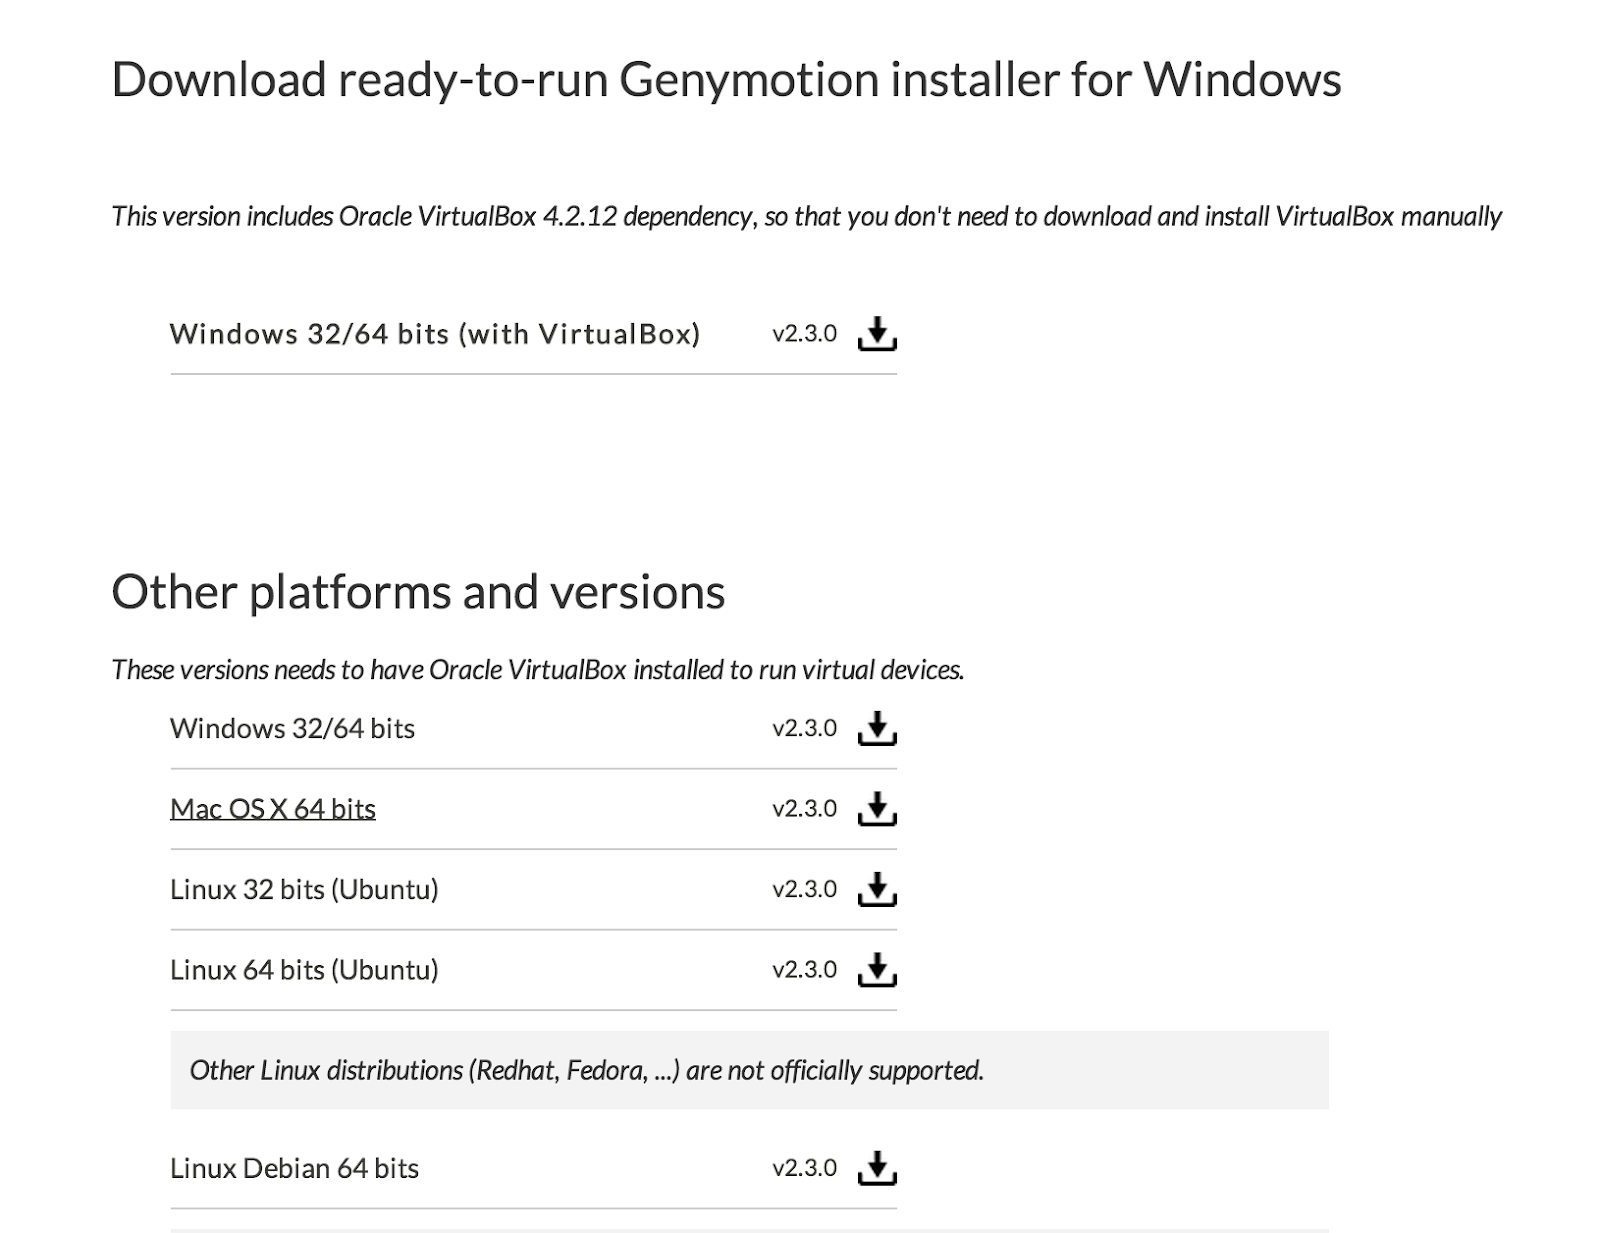
The software in question is Genymotion and is available to download from:
There are many versions available, but the Free version should provided you with everything you need to get testing your apps at super speed!
Now, its not a simple case of installing Genymotion and off you go, there are few things required in order to make this emulator work with a LiveCode built Android App. In order to save you from throwing your computer off the wall, I will now go through the GenyMotion setup step-by-step 🙂
Here we go:
-
The first thing you will want to do is download Genymotion and install it on your system.
-
Genymotion runs an emulator within a Virtual machine with Virtualbox being the software that it uses for this purpose. So, the next thing to do is head over to https://www.virtualbox.org/ then download and install the latest release of Virtualbox.

-
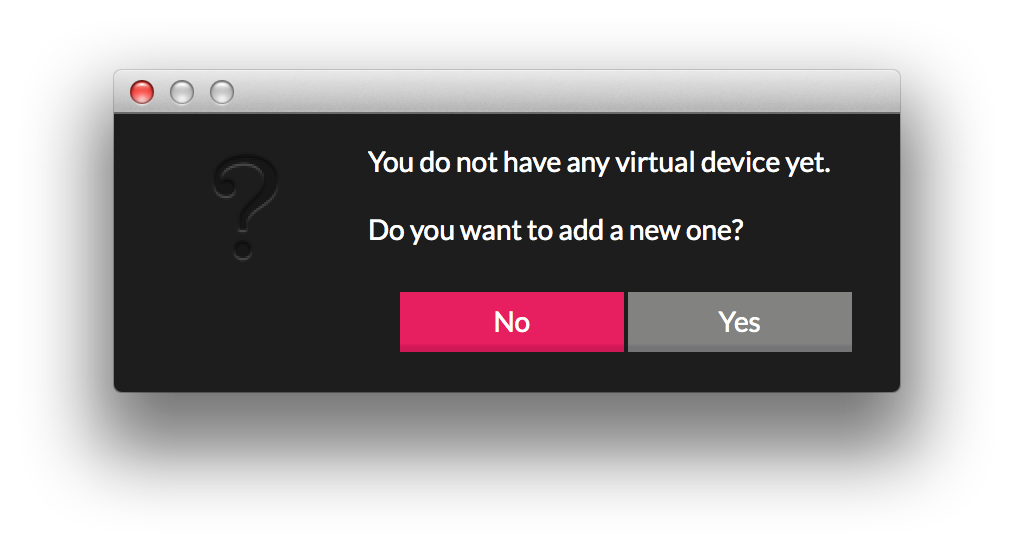
We are now at a stage where we can run the Genymotion executable, so let’s do this.
Once launched, it will present you with the following screen. Select “yes”:
-
You will now be presented with the “Virtual Device Creation Wizard”. In order to create a new device, you will need to sign in with your Genymotion account. After you have signed-in, you will be presented with a list of emulator copies of all of the latest Android Devices.
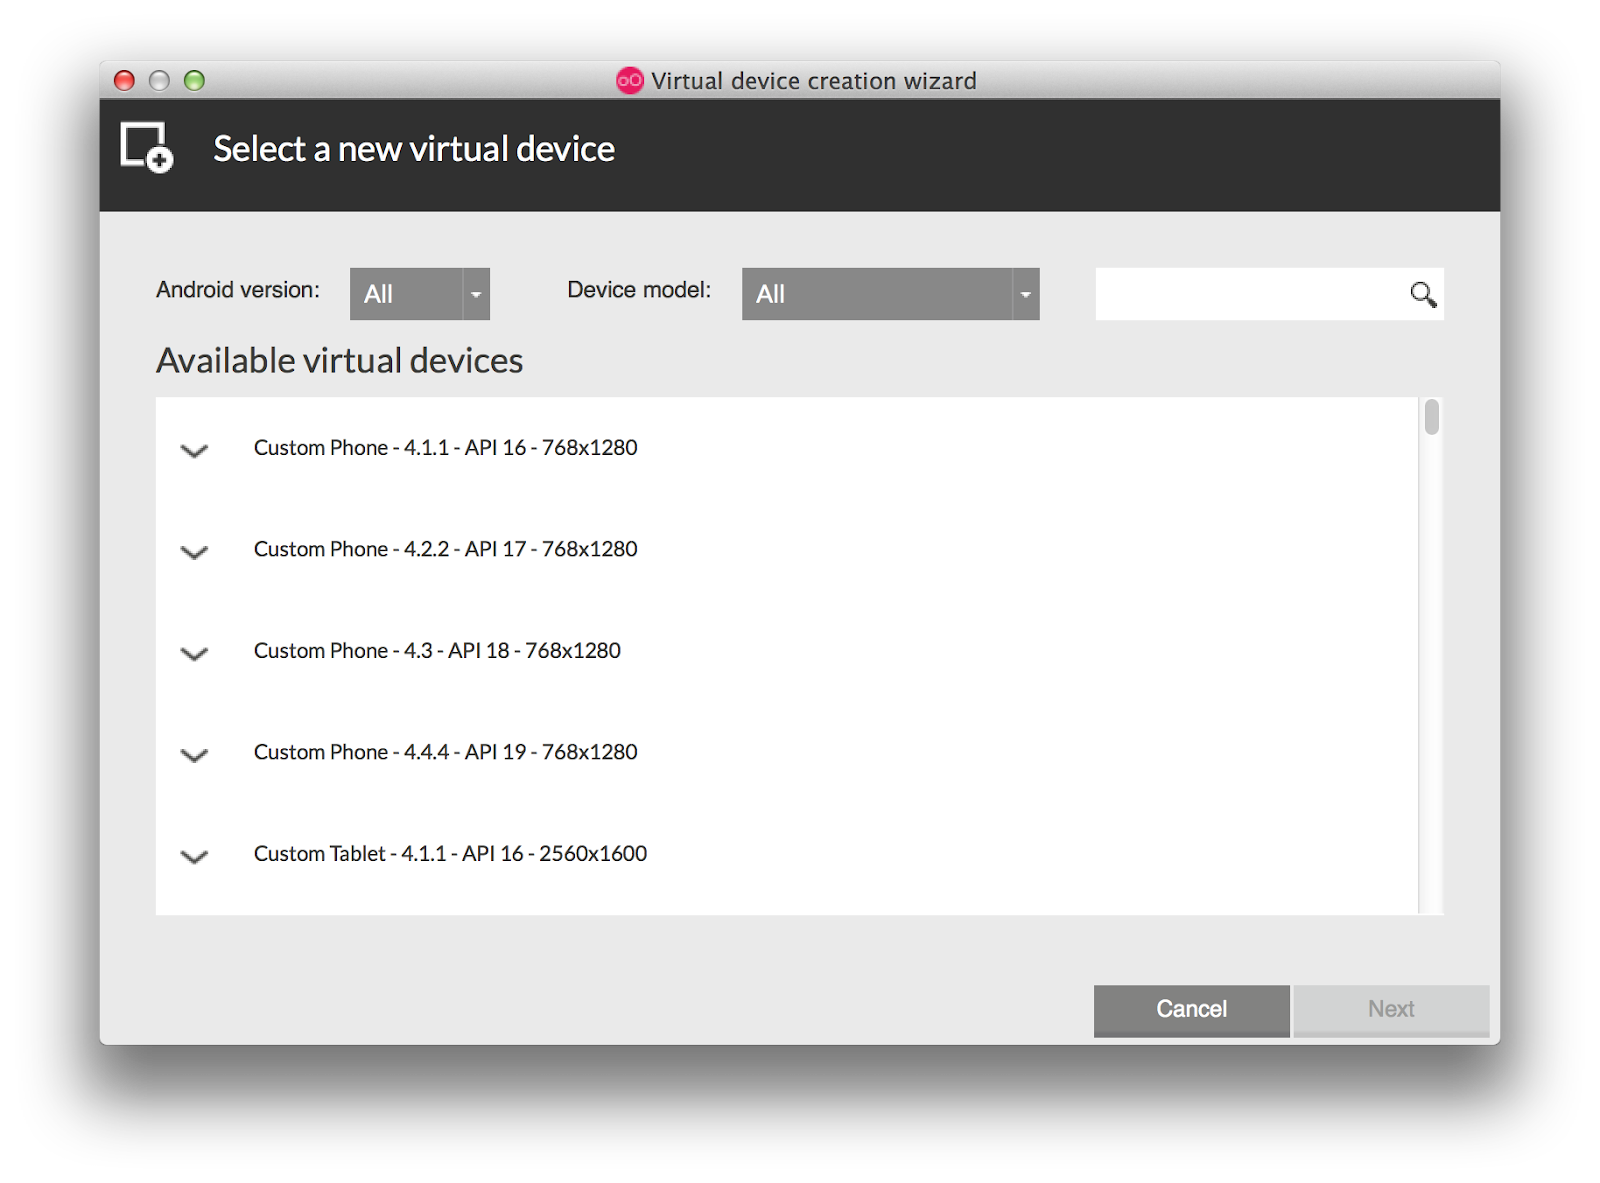
-
For simplicity, I am going to create an emulator using the first option of “Custom Phone- 4.4.1-API 16 768 x 1280”. So I select this, and press “Next”. This then allows me to name my emulator, I leave the name as its default value and press “next” again. This will then proceed to download this emulator for use:
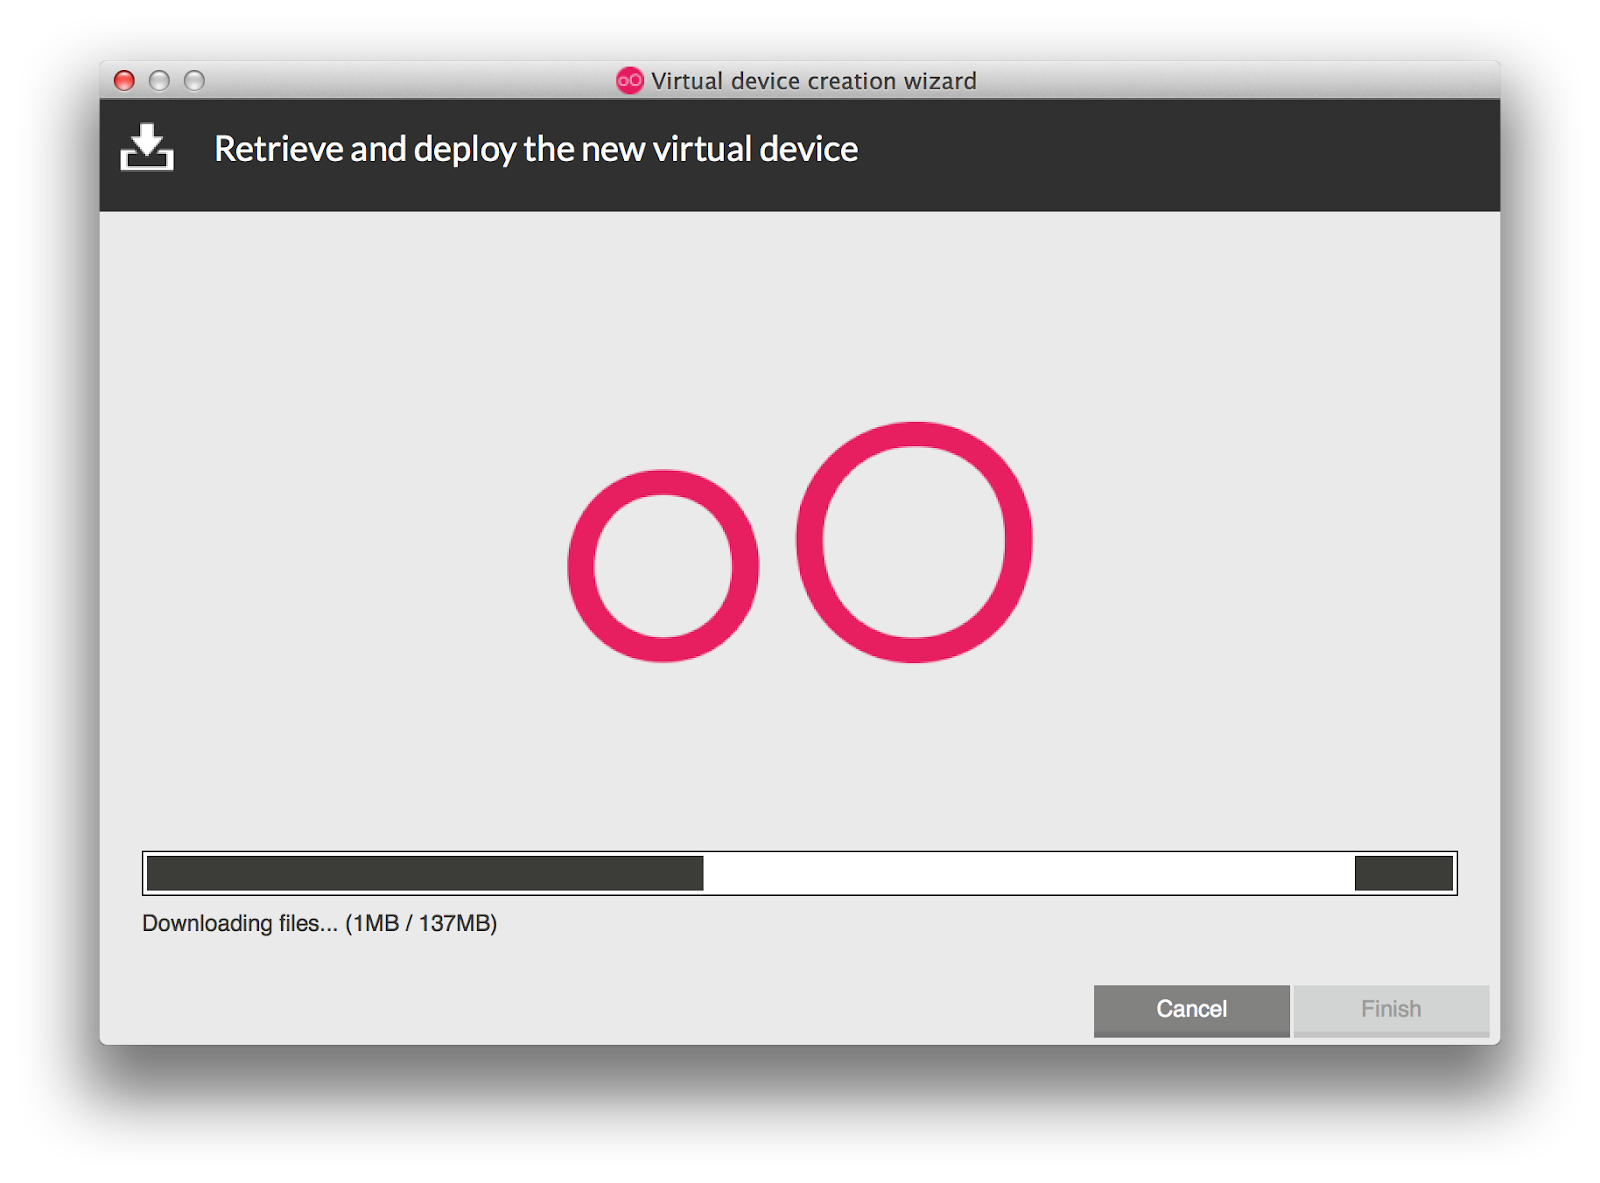
If all goes as expected, a “The virtual device has been successfully created” message screen will appear:

-
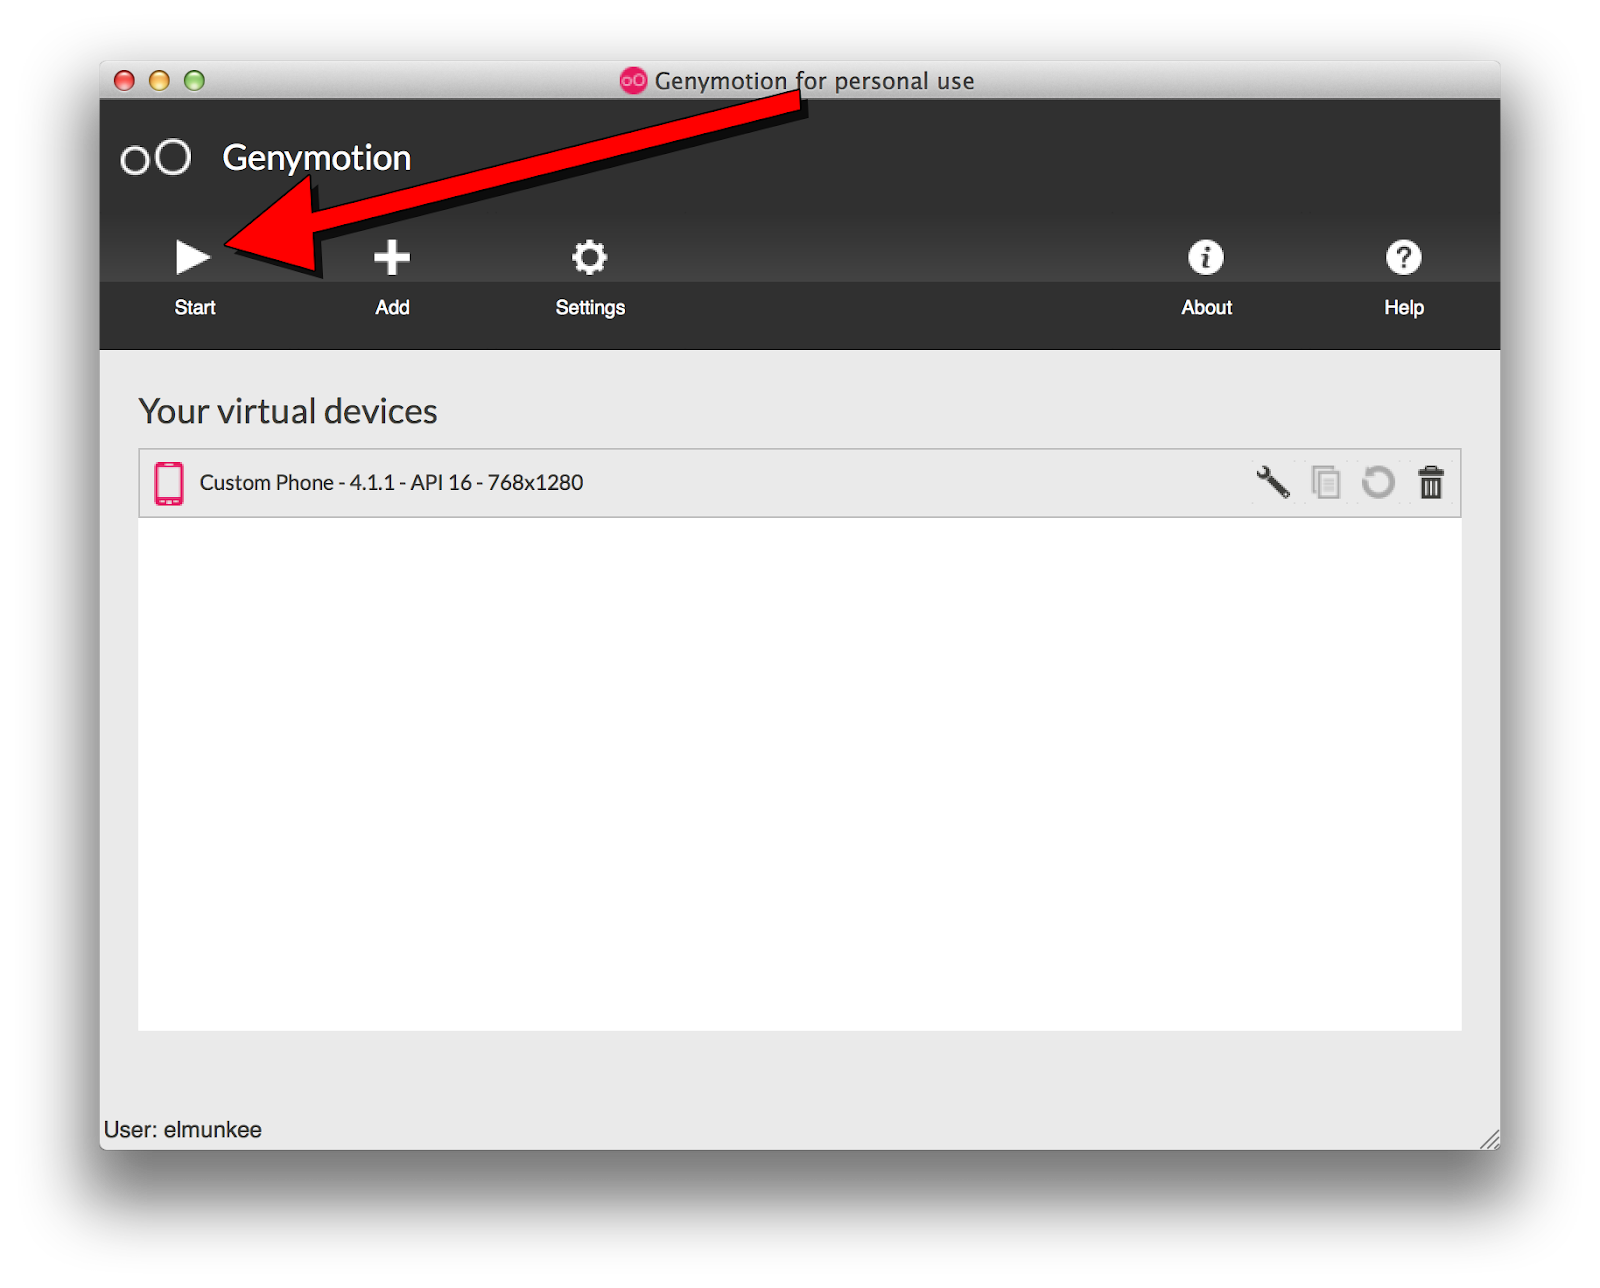
After the device is created, press “Finish”. This will take you back to the “Your devices” screen. From here, you can select your device and press “Start”:
-
After around 10 seconds of loading ( Retina MacBookPro), the emulator is up and running and oh my…..is it fast!
-
Now fire up LiveCode, and if you already have this setup for Android development and have a stack open which has its deployment platform set to Android, you should see the Genymotion emulator in the list of “Test Targets”..so good, so far 🙂

-
Now…try to deploy your stack to the emulator… uh oh….”Houston, we have a problem”
The error that occurs in the emulator is due to the incompatible architecture that a LiveCode built Android APK uses. LiveCode builds ARM based Android standalones (as around 99% of Android devices use this architecture) whereas, Genymotion is built on x86 architecture.
Don’t worry, I haven’t strung you along and there is a solution to this which involves installing an ARM translation library. All of this is explained in the following XDA developer post-
http://forum.xda-developers.com/showthread.php?t=2528952
With the main steps we need being 1 – 4

So basically, you have to download the ARM translation installer zip, drag it onto the Genymotion emulator, accept the flash and restart the emulator after the flashing has finished. (to restart, simply quit the emulator and re-launch)
-
Now if everything has went as planned, you should now be able to deploy to the emulator from within LiveCode 🙂
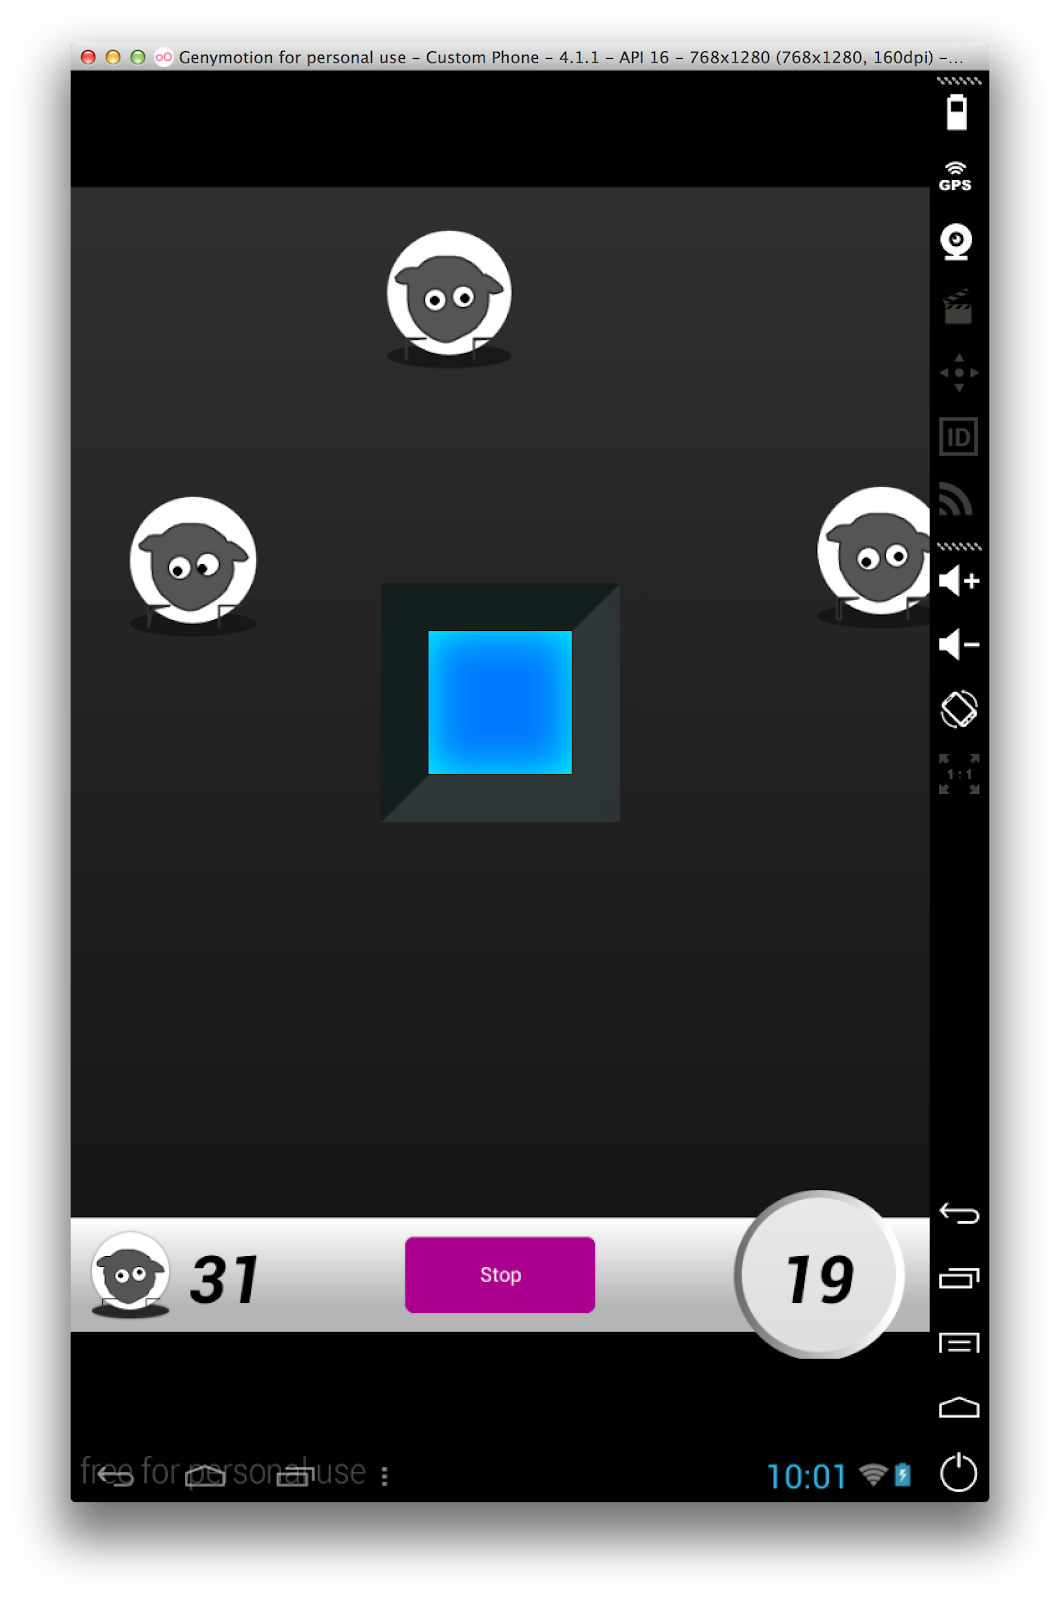
TAADAA! Here we have Sheepherder running in Genymotion with the performance being on par with any physical device.
Thats it! I hope you find this useful when it comes to testing your LiveCode Android Apps along with making your Android development a more enjoyable,fun and stress free experience 🙂
Please let us know how you get on in the comments below or if you have any other emulator related tip/tricks
read moreBuilding LiveCode
by Panagiotis Merakos on October 13, 2014 6 commentsBuilding LiveCode
We have been very busy in the RunRev office this period. Among all the other things we are doing, we are producing Release Candidates for both LiveCode 6.7 and 7.0. In the meantime, we are fixing some bugs that were introduced as a result of the iOS 8 release. These fixes will be contained in LiveCode 6.6.4, and then rolled up to 6.7 and 7.0. They include updates in various parts (engine code, IDE code, dictionary entries, release notes etc).
When everything is ready, all these different pieces have to be brought together to a complete product, and nicely packed within an installer. This is done through the process of building. After building the installers are uploaded to http://downloads.livecode.com/livecode/ webpage, but are not immediately accessible to the public. At this point, they are thoroughly tested, not only by RunRev developers, but also sometimes by some of our most experienced community members. Once we make sure that everything works as expected, the installers become public and are available for all the users to download.
The first time I did a build was for LiveCode 6.7 DP5, and since then I have done most of the 6.7 builds. In this post. I will briefly describe you the process of building, as I first experienced it.
I was really surprised to find out that for building LiveCode, we use … LiveCode(!), for a significant percentage of the process. Theoretically, it is possible for 100% of the process. However, in order to resolve more easily merging conflicts between the various bugfixing or feature branches, we use some other tools as well.
The LiveCode stack that is used contains facilities for building LiveCode engines, docs, notes, installers, and server engines for all platforms. It looks like this:

(I have slightly changed the location of the buttons to fit the width of this post!)
The first thing to do is make sure that all pending and already reviewed pull requests are merged into the develop branch of the main LiveCode GitHub repository. If not, we have to merge them, and resolve conflicts, if any. After that, the develop branch is ready to start building from. Note that the develop branch is used only for LiveCode 6.7 builds. For other LiveCode versions, different branches are used.
Then, using the above stack, we generate the public key in the Environment stack. This is used to sign the LiveCode app, and is needed for the commercial license activation.
The next step is the actual build of the LiveCode engines, for both the community and commercial version, for each platform. We use Xcode for MacOS and iOS, a top level Makefile (that references Makefiles in each relevant folder) for Linux, Visual Studio for Windows, and a script that builds all the binary components and necessary Java support for Android. Alternatively, we could just use the above stack, select all platforms (apart from Linux x64) and click Build Engines button. However, it is easier to track down and fix any errors that may occur if you follow the first approach.
Next, in case there are updates in the IDE, we have to get them from the LiveCode SVN repository. Apart from the updates in the IDE code, we must make sure we get the newest IDE-related bugfix notes, if any. The notes have to be put in a separate folder, so as to be exported automatically into the release notes. At this point, the hard work is done. The remaining part is just clicking buttons on the above LiveCode stack.
So, we go back to our stack, and click Build Docs and then Build Notes button. Afterwards, we select Community from the drop-down menu, tick Windows, Linux and Mac OS X and click Build Tools (this creates the installers) and then Build Server. Next, we do the same for Commercial.
Now, everything is ready and all we need to do is upload the binaries to the RunRev server. We use FileZilla for that. Finally, we press the Archive button, to make them appear in the download page.
It was very interesting to be involved in the whole building cycle. Special thanks to Michael for always being there to help 🙂
read moreMy LiveCode Journey
by Steve Bezuidenhout on October 3, 2014 11 commentsMy Before, During and After LiveCode Journey: From Zero to Not-Yet-Hero
Before LiveCode
I was always interested in creating “things” for the World Wide Web, even though I never sat in a single formal class on how it is done. This ambition of mine was really daunting, ambitious and downright stupid to say the least. I always asked the question “How did they do it? Can I also do this?”
? ? ? ? ? ? ? ? ? ?
Beginning with websites, I started to teach myself basic raw HTML coding. I even had in the mid 90’s a tourism promoting website, hosted on servers in the USA, for the Region/Province I lived in. Then smart phones hit our lives with a huge bang! I downloaded and played around with various mobile apps and again the question “How do they do these things?” popped into my thoughts. I started to follow my tried and tested HTML method of learning which in short was……..read, watch Youtube videos, analyse code, try things on my computer/laptop………but soon I realised there was a “monster” by the name of Javascript standing between me and possible mobile app development.

I jumped into various platforms (the ones that let you drag and drop things into your app and by some magic stroke your app is there). I tried a few, had small successes here and there but I still did not understand how I made it happen. This understanding part was very important for me. I also joined coding groups in town, but I could not escape the “Monster”. The “friendly” services and assistance (as per website sales propaganda) invited me to email and assistance will be rendered to me chop-chop. I realised very soon that the internet route returning assistance to me via a return email is blocked and in many cases remained blocked for a considerable time. My hopes were (again) dashed in finding answers to and knowing and understanding “How they do it. How do they develop these app-things for smart phones?” This quest for knowledge (specifically for app design) has been coming on a long, long time……probably 4-5 years. But by nature I am not a quitter, I don’t give up until proven beyond any doubt that “Steve, you are defeated. Accept it and move on with your life.”
Then one evening around October 2013 I stumbled upon another promising solution to my quest. This time it was called LiveCode. I thought for a while before I downloaded the free Community version, but I never let my hopes and aspirations go through the Roof of Optimism. I told myself “Steve, you were here before. Don’t get your hopes up. Somewhere in this dark tunnel of your ambition to code a mobile app (without the monster JavaScript) will be some unknown, unanticipated curve ball.”
During LiveCode
I started my LiveCode Community Edition journey on the usual path……read blogs, opinion pieces, tutorials, watched Youtube videos etc. On one video I even heard the CEO, Mr Kevin Miller of RunRev proclaim very boldly that “Our primary goal/purpose as a company is that everyone can code….” I thought to myself: “Mmm, a very bold, a very ambitious statement, but if he/RunRev lays that claim so confidently I must test his belief that EVERYONE can code.” I am after all part of “everyone” and I should be able to do it. By the beginning of December 2013 I decided to part with USD 500,00 and spoil myself with this LiveCode thing (Commercial Edition) as a Christmas gift. But in my neck of the woods USD 500.00 is a little fortune. So discussions and negotiations with the family started on and off. I got mostly the NO answer. At one stage I thought, I will never win this. One question put to me that kept my head very busy and which I must answer convincingly to the family was “Why don’t you use the Community version, learn it, get comfortable with it, ensure that there will be no surprises down the road.” Eventually the resistance on the part of the family was melted by the Christmas spirit…….some members even decided to contribute towards the USD 500.00. To my pleasant shock and surprise, joy and my strong belief in the Christmas spirit I saw in digital white and black that “for a limited time only” my Christmas gift was only USD 249.00! I jumped into action.
Early January 2014 I got in touch with RunRev via a very helpful, true customer service oriented angel called Heather Laine. I started the process of foreign currency purchases via my bank, ran into a few hiccups and regulations. Heather guided a lot and, one day, in the third week of January I returned home from the bank a very happy, proud and excited potential owner/subscriber of the LiveCode-thing that may hopefully be the realisation to my desire, namely to produce an app by myself, without the Javacode-Monster blocking my way. I was ready to test Kevin Miller’s belief and theory that “Everyone can code.”
Soon, once a week, on Wednesdays I found myself in “class” under a very pleasant andextremely helpful Neil Roger. My gosh, I haven’t been in class for more than a quarter of a century! Thanks to our country’s excellent communications capabilities I was able to participate when I had to travel outside town end even outside the country. I once attended a class from Kenya. I was hooked, optimistic and firmly believing that “Everyone can code.” Then my sinister side kicked in and I told myself (in no uncertain terms) that soon and very soon you will hit nasty surprises and curve balls, because this customer experience is truly out of this world and you will surely sooncome back into this world with a spectacular bang. I decided to enjoy the ride, get as much knowledge about LiveCode as possible and anticipate the spectacular “down to earth” service crash. I am still waiting……..and waiting…
I was so excited and truly, in a very short space of time, on my way to develop mobile apps. I wanted to meet these people and I nearly did. I had a planned journey to London, but, in short it was cancelled at the very last moment. I even had appointments set up to visit a school where LiveCode is taught to high school kids. I promised myself that I will fulfil the wish to visit RunRev in Edinburgh, Scotland. I will do it….
My LiveCode first baby steps were amazing. In a very short space of time I was truly confident that I, like everyone else, can code. I remained glued to my screen reviewing Elanor Buchanan’s video lessons. I deciphered the code, understanding as a non-coder how it works, tested a few ideas and after a week or two I excitingly realised: Wow, I can truly code. I can give birth to app ideas on my smart phone with the help of midwife LiveCode. I told and showed the Coding Group what I had achieved in a very short space of time. The Greek speakers of the Group (javascript as a language is very Greek to me) could not believe their eyes and ears. We now have a separate Non-Java coding group going within the bigger Coding Group.
As from next year the Coding Group wants to start with a bunch of school kids (especially girls) to get them interested in coding as a hobby. Hopefully the hobby will grow into a desire to formally study software engineering. We are confident that our small steps will benefit the community and country and also change lives. In the meantime we popularise the idea of apps to solve everyday community challenges.
I have, in the meantime, subscribed to LiveCode until January 2016. I have yet to deploy an app in the store, but that is not a priority for now. The priority is to conquer the English-like language, increase my (and other’s) self confidence and hopefully add value to the future of some very disadvantaged kids in my neck of the woods. I take small steps every day and make giant leaps on the big idea of facilitating coding for everyone.

I am still amazed that, after years of producing nothing in terms of mobile apps, I now have sample apps (a local radio, citizen ID number verification, mySQL backend apps) on my smart phone. As a person I feel a real sense of achievement. My earlier nightmares of mobile app development have turned into very real and nice dreams…..thanks to LiveCode.
My LiveCode journey is not over. I want to achieve all my short term goals and long term aspirations, share with others what I have learned in the last few months and just enjoy the ride. I am slowly but surely getting there and, by the way, I am also slowly but surely getting to the age of 60 which is just a number between your birth and where you are today.
After LiveCode
The chapter on “After LiveCode” cannot be written yet as I am still in the “during” phase. It is a very exciting phase that I don’t want to leave for now. I must still learn and read a lot.
Happy LiveCoding………..
Steve Bezuidenhout
Windhoek (Namibia)
Africa
Head In The (Word) Clouds
by Ali Lloyd on September 12, 2014 26 commentsThe word “cloud” was much in evidence at the RunRevLive Conference this year. This was primarily because of LiveCloud, a cloud database for LiveCode, whose aesthetically pleasing t-shirts were donned in abundance, and whose capabilities were amply demonstrated by the official conference app. This pervasiveness stood in stark contrast to that of the San Diego sky, which staunchly refused to have anything whatsoever to do with clouds for the whole week-and-a-bit.
So perhaps it was with those LiveCloud t-shirts in mind that I, whilst putting the finishing touches to the demo stack to accompany my talk and contemplating compelling use-cases for the trueWord chunk, decided to code a word cloud creator.
Well, I say ‘decided to code’; first I checked if anyone had done one already that I could steal. No dice. Then, in case anyone else had even thought about it, I threw the question out to some of the team: “How easy would it be to get LiveCode to make word clouds?” We weren’t sure, and I needed something by the morning. So I gave it a go.
Initially I attempted to define an algorithm for word placement, keeping track of the current border and repeatedly traversing it to find the next available space. This quickly got too complicated, with many additional considerations to do with overhangs and such- a more heuristic approach was necessary.
The idea of a word cloud is not only that the size of a word is related to its frequency, but also that the distance of the word from the center is, on the whole, inversely related to frequency. So once you have the words in frequency order, the ideal path on which to try and position them is a spiral.
The spiral equation can be written parametrically as x = tsin(t), y = tcos(t), which means that at a given time t, the distance from the origin of a point on the spiral is also t, since x² + y² is t²(sin²t + cos²t) = t². So when we search for positions to place words, we can search along the spiral for the next available position, knowing that we are uniformly increasing the distance from the center as we vary the angle.
Here’s the code for returning the location on the spiral at time pTime:
function spiralLoc pTime
   local tX, tY
   put pTime * sin(pTime) into tX
   put pTime * cos(pTime) into tY

   return (tX & comma & tY)
end spiralLoc
When following this strategy, we need a way of testing whether words are overlapping. Initially I had thought about taking a snapshot of a field containing the text and changing the alpha value of all the white pixels so that they would be transparent. Then I’d have an image to use for hit testing using LiveCode’s intersect command. It was pointed out to me, however, that the import snaphot command includes transparency data if you use the …of object form, and so this was as simple as the following:
on snapshotField pWord
   set the opaque of field pWord to false
   set the showborder of field pWord to false
   import snapshot from rectangle (the rect of field pWord) of field pWord with effects
end snapshotField
Then to test if we can place a word, we just use LiveCode’s intersect command to check whether it intersects any previous word at the proposed position:
function canPlace pNum, pTime
   // we can always place the first word
   if pNum is 1 then return true
   if imageIntersects(pNum) is false then return true
   return false
end canPlace
We now have essentially all the ingredients for a LiveCode word cloud creator. First of all, a handler to generate the list of frequencies:
function listFrequencies pText
   local tArray, tList
   repeat for each trueWord tWord in pText
      add 1 to tArray[tWord]
   end repeat
   repeat for each key tKey in tArray
      put tKey & comma & tArray[tKey] & cr after tList
   end repeat
   sort tList descending numeric by item 2 of each
   return tList
end listFrequencies
Then a handler to create the image for a given word. The pWeight parameter is the frequency of the given word divided by the frequency of the most frequent word.
on createImage pWord, pWeight
   set the textSize of the templateField to pWeight*kMaxSize
   create field pWord
   set the text of field pWord to pWord
   set the height of field pWord to the formattedHeight of field pWord
   set the width of field pWord to the formattedWidth of field pWord
   snapshotField pWord
   delete field pWord
end createImage
Repeating this for each of the words we are using to create the cloud gives us the set of images to place. We then try to place each image horizontally (and if that fails vertically) on the spiral path:
on placeWord pNum
   local tVertical, tTime
   put 0 into tTime
   repeat while tTime < kLimit
      if sFilledTimes[tTime] is empty then
         set the angle of image pNum to 0
         set the loc of image pNum to spiralLoc(tTime)
         if canPlace(pNum) then
            put true into sFilledTimes[tTime]
            exit placeWord
         else
            set the angle of image pNum to 90
         end if
         if canPlace(pNum) then
            put true into sFilledTimes[tTime]
            exit placeWord
         end if
      end if
      add kIncrement to tTime
   end repeat
   put ("couldn't place word" & pNum) after msg
end placeWord
Watch the placement routine in action in this slightly annoying gif

These handlers together give a relatively pleasing word cloud, although I wanted to make a few simple tweaks to improve it. First of all, word clouds tend not to be circular but elliptical, so I introduced a flattening factor of 0.5 to the spiral equation. Also I felt the word sizes were not contrasted starkly enough, so I used the square of the weights instead. Sometimes words were being placed too close together, requiring a small white outer glow on the text to make such words fail the intersection test. Initially coding them as constants, I allowed the user to input various parameters like maximum font size, spiral flatness, maximum number of words, minimum word length, etc.
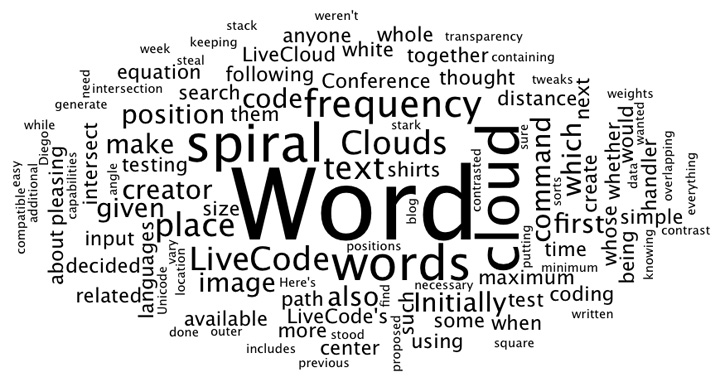
Here is the word cloud of this blog post!
What’s more, this being LiveCode 7.0, I was able to put text of all sorts of different languages into the text input box and everything worked exactly as expected. Here’s one with some sample text from various languages.

A Unicode compatible word cloud creator in under 160 readable lines – not many other languages can boast that sort of economy. What’s more, it only took a few hours to achieve something which by all accounts is distinctly non-trivial.
Many thanks to Ben and David who came up with some useful suggestions while I was coding this. If you can come up with any improvements, particularly to speed, I would be interested to hear them in the comments. Perhaps surprisingly, taking a snapshot of the group each time instead of looping though all previous images to find the intersection seems to slow things down.
Download my word cloud stack here.
read more
Recent Comments