In Q1 2015, China overtook the United States as the largest country in terms of quarterly iOS app downloads. How can your mobile app business take advantage of this fast-growing country? Obviously, one of the first things you need to do is to build localized apps for the Chinese language.
The release of LiveCode 7 with full Unicode support has made building apps to support multiple languages much easier than before. In this article, I will cover some of the basic LiveCode localization tasks and techniques for building apps that support multiple languages. I will also give a talk on this topic in the coming Create-It webinars on May 28th. I welcome people to join this webinar, too.
L10N and L18N
L10N and L18N are the two terms used a lot when localization is discussed. L10N is a short hand for the word “localization,” since there are 10 characters between the first “l” and last “n” characters. L18N is the short hand for “internationalization” and the same explanation applies. So what are the differences between the two? According to Apple’s developer website, they have the following explanation:
“Localization is the process of translating your app into multiple languages. But before you can localize your app, you internationalize it. Internationalization is the process of making your app able to adapt to different languages, regions, and cultures. Because a single language can be used in multiple parts of the world, your app should adapt to the regional and cultural conventions of where a person resides. An internationalized app appears as if it is a native app in all the languages and regions it supports.”
Therefore, I assume you understand the regional and cultural conventions of the language you want to localize for before starting the localization effort.
Popular languages to localize for
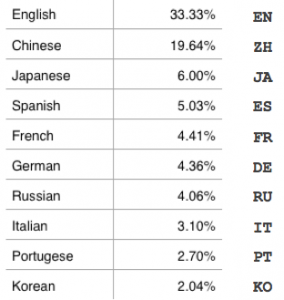
Based on the analysis of a recent article, the 10 most popular languages to localize for are shown below:
I also attached the unique two-character language code on the right that represents each language. You are welcome to check out the article to find out what other popular languages to localize for. As a developer (at Apple), I did the top three languages myself and as a global product manager (at Trend Micro) I did all of the top 10 languages.
Basic Localization Tasks
Below is a list of the basic tasks that you should do with LiveCode to localize your apps:
- Select/Change Language
- Detect Preferred Language
- Save Language Settings
- Restore Language Settings
- Configure Language Options
- Save/Restore Unicode Text
Select/Change Language
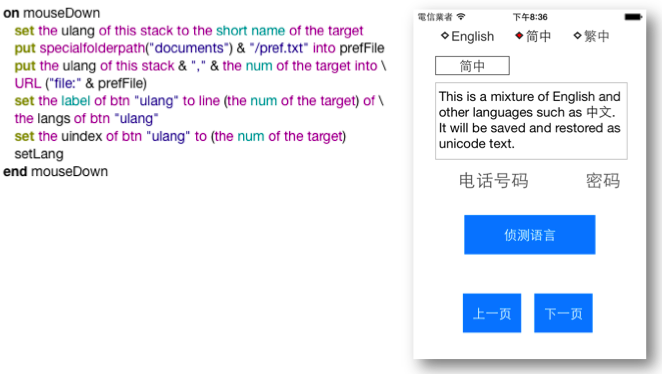
There are two common ways to let users select the language they prefer. If there is only a small number of (2 to 3) languages, a group of radio buttons can be used. If more languages are supported, clicking a button to select the language from a pick list can be implemented.
As you can see from the source stack and the sample code below, I normally use a custom property (ulang) of the stack to remember the language selection. In the case below, I name each radio button with the country code that represents the displayed language so I can easily set the language’s custom property with the short name of the radio button. This allows me to support any number of languages without changing my code. I also save selection (and its line number to find the language name from a list) in a preference file so I can later restore the selected language when the app is run again. The sample code is a bit more complicated than needed here since I supported and synced both radio button and pick list selection methods for the demo purpose. It can be simpler if only one of the two methods is supported.
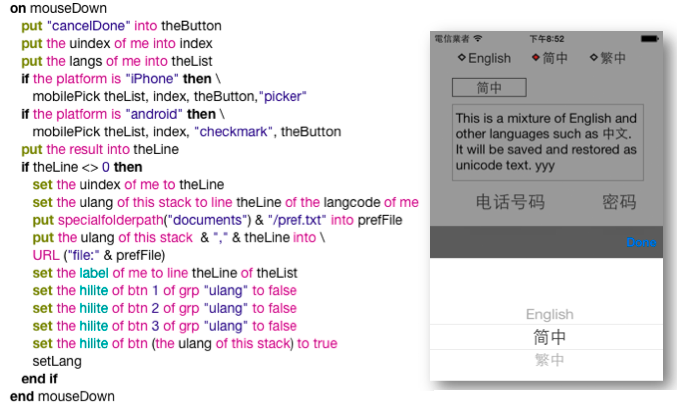
The other popular way to choose a language is by clicking a button to select the language from a pick list. You can find an implementation example from the source stack and code below. Again, the code is bit more complicated than needed as it supported and synced both radio button and pick list selection methods for the demo purpose.
Detect, Save, and Restore Preferred Language
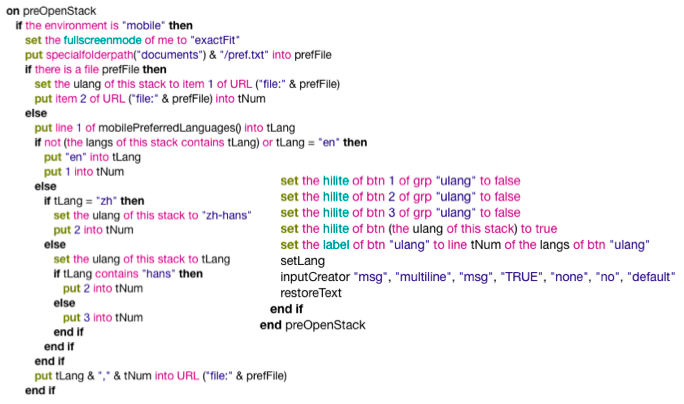
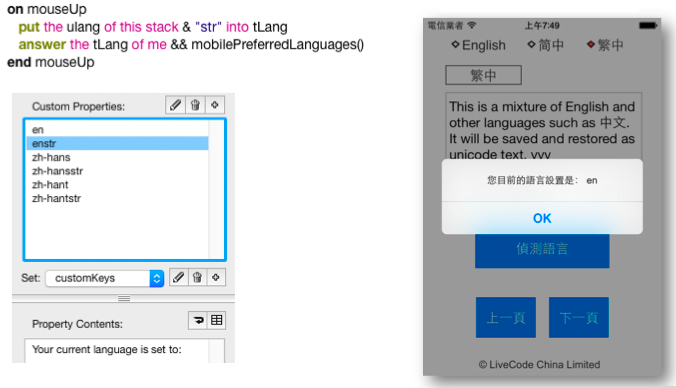
Before we give the user a chance to select the preferred language, our app should be able to pick a default language for the user when it is run the first time. This can be accomplished by detecting the default language set and used by the system via the mobilePreferredLanguages() function. As you can see from the code example below, this detection/setting is normally done before the stack (app) is opened.
A couple of iOS specific things to note here: one is iOS returns a list of preferred languages, one per line and, hence, we use “line 1 of mobilePreferredLanguages()” in the code; the other is iOS distinguishes Traditional Chinese (zh-Hant) and Simplified Chinese (zh-Hans) and returns a different code for each and, hence, different code to handle each.
In addition to detecting default language and setting (and saving) it as a default preferred language, the preOpenStack script also restores the language preference if it was saved before. Also, whenever a language is selected (via one of the two methods), it is saved to the preference file.
Configure Language Options
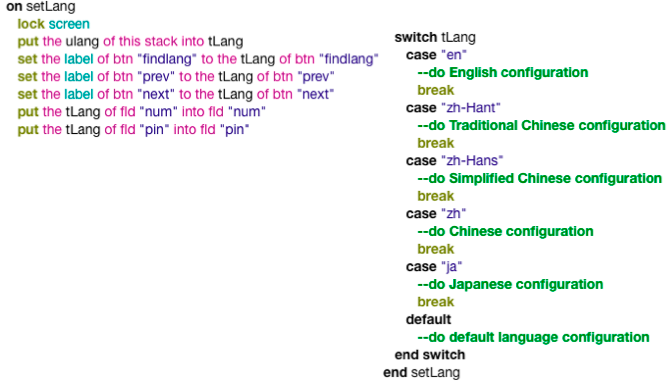
Whenever a language is selected, some configurations should be done based on the user selection. Typically, these include changing the UI messages, field content/label, button label, and showing/hiding some language specific objects, etc. You can use the “switch” statement to handle various language configurations and also set up a default configuration for the languages not covered by all the cases in the switch statement.
Personally, I prefer using custom properties to store different language strings for the localization purpose. I found two advantages of doing so. One is I know exactly where and what I need to do for each object and I do so easily. As long as I use the language code as the custom property name, I can simply write the code once to support any number of languages without changing the code. For people who are more organized, they can even create a language file to support each language. In the file, they can specify what objects to localize and what languages (custom properties) and their data to associate with the object. A script can then be written to read the file and do the various configurations in one shot for each language. Below is an example of using custom properties to store the localized strings to display in an answer dialog when the “Detect Language” button in the middle of the demo app is clicked.
The sample code below shows how the language options can be configured when the user changes the language or when the app is launched.
Save/Restore Unicode Text
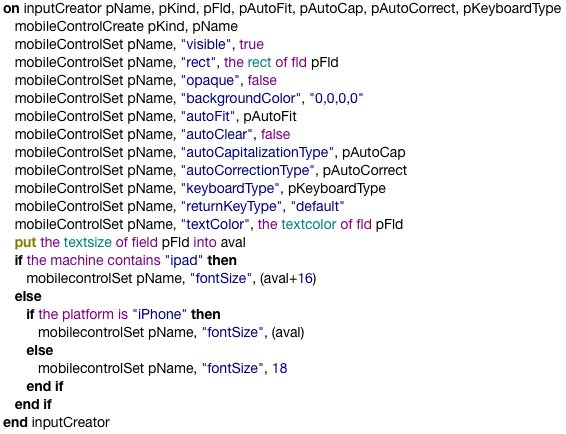
If the chosen language requires Unicode support, the most common task your app needs to do is saving and restoring the Unicode text. You can use the code below to create a native multiline input field that is modeled after a LiveCode field (to copy its rect, font size, etc.) when the app launches or when an object is clicked. You may want to modify the code to change the background color, text color, text font size, etc. based on the devices you tested.
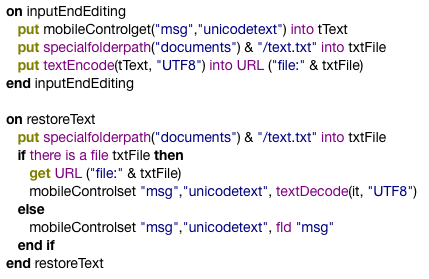
The two common functions used to save and restore Unicode text are textEncode and textDecode. Normally, you textEncode the text (with UTF8) when you save it to a file and then textDecode it when you read it from a file. The sample code below shows how to save the Unicode text when it is done editing and how to restore it (mostly when the app launches). For the inputEndEditing script to work, it should be placed in the same place where the inputCreator script is stored.
The above is all you need to know to get started building localized apps for multiple languages. It is easy and fun and I will not do it any other way without LiveCode. You will find all the source code and the demo app from the links below. If you have any questions or comments, feel free to contact me with the email address listed below. Thanks!
Source stack download link: http://parng.com/loc/loc.zip
Demo Android app download link: http://parng.com/loc/loc.apk
Demo iOS app download link: http://parng.com/loc
About the Author
Dr. Andy Parng was a Silicon Valley veteran for over 30 years. He is currently in Beijing to promote LiveCode in China. He has the complete software product lifecycle experience by being a researcher at AT&T Bell Labs for 4 years, as a developer at Apple for 3 years, and as a global product manager for the entire Trend Micro consumer product line for 5 years with a 60-million user base and US$400 million annual revenue. He used SuperCard to build the award-winning Living Album software that was bundled with over 1.5 million Apple Macintosh computers. Dr. Parng received his Ph.D. in Human Factors and MS in Computer Science from the University of South Dakota with the Outstanding Graduate Student Award. He can be contacted at andy@livecode.cn.


2 comments
Join the conversationMaxV - May 26, 2015
Isn’t better to use profiles?
trevix - November 21, 2016
Yes, but what happened to profiles in LC8? Are we going to get them back? (as of now there is no more mention of it in the property inspector