Since LiveCode went open source we’ve been able to accept community contributions to LiveCode itself, but one area we haven’t had available properly is documentation.
Documentation is one place where we know that community contributions would be really valuable, and where people who don’t want to get into the workings of the engine can still share their expertise.
We have a long list of improvements we want to make to our docs, and one of the things near the top of this list is our guides.
Currently we have 6 guides available from the Developers page plus the User Guide available within the LiveCode product, under the Help Menu. We are planning to update the Documentation portal in the product in preparation for Widgets, allowing us to display all our guides and API documentation, as well as any Widget documentation, in a single place.
The plan is to write all our guides in Markdown, a plain text formatting system designed so it can be converted to HTML for display. This will also allow us to add the guides to GitHub, which allows display and editing of Markdown files written in GitHub Flavored Markdown.
Happily the guides for Beginners, Developers, Mobile, Desktop Externals, iOS Externals and LiveCode Server were initially written in Markdown, so only some small tweaks were needed to make them GitHub flavored. The User Guide however was another matter.
Note: throughout this blog I’ll be using StackEdit, an in-browser markdown editor to show my Markdown source and the rendered HTML.
What did I need to do
The first step in preparing the User Guide to be brought up to date was to convert it from a Word document to Markdown.
To do this I chose to use Pandoc, a universal document converter which can convert from Word to Markdown, as well as a variety of other document formats.
Pandoc has a lot of options, allowing you to specify how you want the ouput formatted. In this case I want
ATX style headers
Markdown offers 2 styles of headers, Setext and ATX.
-Setext headers underline <h1> headers with equal signs and <h2> headers with hyphens.
– ATX headers put 1-6 hash marks at the start of a header. The number of hash marks corresponds to the header level.
Pipe tables, this means any tables in the Mardown will be formatted as below
| First Header | Second Header |
| —————- | ——————-|
| Content Cell | Content Cell |
| Content Cell | Content Cell |
Extract media
This option extracts images and other media to a folder, and includes the image references in the document.
pandoc -f docx -t markdown_github+pipe_tables --atx-headers --extract-media=images -o UserGuide.md UserGuide.docx
The result
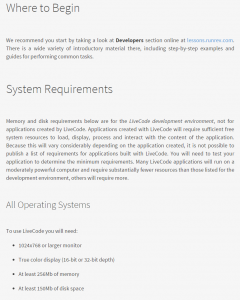
This looked good and I was pretty happy with the result. There were headings of different levels, italicised text, links and bullet points. All in all pretty good for 1 line in the command line.
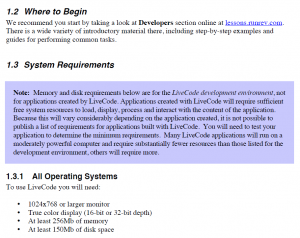
But wait, something was missing. In the User Guide the System Requirements section is marked as a note and highlighted in a box. This additional formatting hadn’t been included in the Markdown file. As I scrolled though the Markdown document I noticed a few cases of lost formatting which would need a little extra work to include in the Markdown.
The reason that this additional styling did not persist after the conversion is that there were custom styles in the Word document that did not convert. Having looked into it I couldn’t find a simple way to include these in the Markdown conversion but if any Blog readers know of a way please do leave me a comment.
Tips, Notes, Important and Caution warnings
The first thing I noticed was that Tips, Notes, Important and Caution warning were no longer highlighted as described and used in the User Guide.
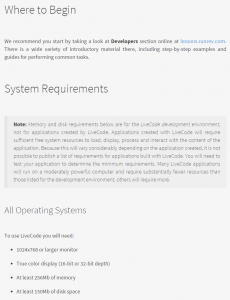
I wanted to ensure these sections would be highlighted in the Markdown version using Blockquotes, denoted in Markdown using >
so
> **Note:** This is a note.
Displays As
But first I had to find all the Tips, Notes and Warnings in the original document. Each type was highlighted in a different color, could I use that to find pull out the relevant text? Yes, by converting the Word document to HTML I could find all the text contained in colored boxes and pull it out.
I then created a very simple stack to find the Tips. Tips are included in a yellow box, in the HTML source this looks like
<P LANG="en-US" STYLE="margin-right: 0.42cm; margin-bottom: 0.42cm; background: #fefec2; line-height: 0.39cm">This style of text box tells you about an alternative way to do something or describes a shortcut.</P>
So all I needed to do was to find all the occurences of this style of paragraph, pull out the text and that gave me all the tips. Then I repeated this for Notes, Important and Caution, just changing the code to look for the relevant background color.
I created my stack, added a field and imported the HTML source into it, then added a button that would output the tips it found to the message box.
on mouseUp
local tPosition, tPosition2, tPosition3, tPosition4
local tSearchTerm
put “<P LANG=” & quote & “en-US” & quote && “STYLE=” & quote & “margin-right: 0.42cm; margin-bottom: 0.42cm; background: #fefec2; line-height: 0.39cm” & quote & “>” into tSearchTerm
repeat until matchChunk(the text of field 1, “(” & tSearchTerm & “)”, tPosition,tPosition2) is false
get matchChunk(char tPosition2 to -1 of field 1,”(</P>)”,tPosition3, tPosition4)
put char tPosition2+1 to (tPosition2 + tPosition3) of field 1 & return after msg
put empty into char tPosition to (tPosition + tPosition4) of field 1
end repeat
end mouseUp
The matchChunk function returns the position of a given substring in a string, so by searching for the <p> and </p> tags that describe the Tip style of paragraph I could extract all the tips.
I then used the lineOffset function to find the line numbers of these lines in the Markdown file and prepended them with > **Tip:**
repeat for each line tTip in tTips
put lineOffset(tTip, tMarkdown) into tLineNumber
if tLineNumber is not 0 then
put “> **Tip:** ” before line tLineNumber of tMarkdown
end if
end repeat
I then repeated this process for the Notes, Important and Caution sections, just checking for the correct background color in each case.
Tables
The next thing I noticed was that tables weren’t displaying quite correctly.
The reason for this was that Markdown requires tables to have headers, whereas the tables in my Markdown documents were formatted like this, with no headers.
|————————————————————–|——————————|
| **Windows, Linux and Unix keyboard shortcuts** | **Mac OS equivalent** |
| Control | Command |
| Alt | Option |
| Right-click | Control-click (or right-click if you have a two button mouse) |
My first thought was to take the line after the separator and move it above, like this
| **Windows, Linux and Unix keyboard shortcuts** | **Mac OS equivalent** |
|————————————————————–|——————————|
| Control | Command |
| Alt | Option |
| Right-click | Control-click (or right-click if you have a two button mouse) |
This would have worked in this example as the first line happens to be the headers but there are many instances where the table doesn’t actually have headers, so this would not work.
Instead I decided to add empty titles to each table. Again this was simple to do in LiveCode. In this case because I wanted to step through each line in the Markdown file and rebuild it with extra lines in some cases I created a new Markdown file from the original.
repeat with x = 1 to the number of lines in tMarkdown
put line x of tMarkdown into tLine
if tLine begins with “|—” then
## This is a table separator line
if char 1 of line x-1 of tMD is not “|” then
## If the previous line is not part of the table then
## Create a header line with the correct number of columns
set the itemDel to “|”
put the number of items in tLine into tItemCount
repeat with y = 1 to tItemCount
put “| ” after tMarkdown2
end repeat
put “|” & return after tMarkdown2
## Copy the original line the new Markdown
put tLine & return after tMarkdown2
else
## Copy the original line the new Markdown
put tLine & return after tMarkdown2
end if
else
## Copy the original line the new Markdown
put tLine & return after tMarkdown2
end if
end repeat
This method could probably be optimised but as it should (hopefully) only be run a very small number of times I did not take the time to optimise it.
The resulting Markdown
| | |
|————————————————————–|——————————|
| **Windows, Linux and Unix keyboard shortcuts** | **Mac OS equivalent** |
| Control | Command |
| Alt | Option |
| Right-click | Control-click (or right-click if you have a two button mouse) |
The resulting display
Code Sections
The final challenge was to find all the code sections. I had hoped to use the HTML source as I did for the Tip sections but while the Tips and Notes were unique enough to use lineOffset to find them in the Markdown this wouldn’t work for phrases like “mouseUp” or “answer”.
Instead I set the htmlText of a field and then used the property to find all the pieces of code and their associated full lines. I do this by finding any text that appears in the courier font.
repeat with tLineNumber = 1 to the number of lines in the keys of tStyledText
repeat with tRunNumber = 1 to the number of lines in the keys of tStyledText[tLineNumber][“runs”]
if tStyledText[tLineNumber][“runs”][tRunNumber][“style”][“textFont”] is “courier” then
put tLineNumber & tab & tStyledText[tLineNumber][“runs”][tRunNumber][“text”] & return after msg
end if
end repeat
end repeat
This gives me a list of line numbers and the text that should be put into code blocks. GitHub markdown has two styles of code highlighting, in-line and code blocks. Inline code has backticks around it e.g.
When the mouse is released a `mouseUp` message is sent.
Blocks of code and fenced by 3 back ticks e.g.
` ` `
on mouseUp
doSomething
end mouseUp
` ` `
Once I have this list I can step through each code block, decide whether it is inline or a code block and update the markdown based on this.
repeat for each line tCodeBlock in tCodeBlocks
put item 1 of tCodeBlock into tLineNumber
put item 2 of tCodeBlock into tCode
if tCode is line tLineNumber of tMarkdown then
## Code block
put “` ` `” before line tLineNumber of tMarkdown
put “` ` `” after line tLineNumber of tMarkdown
else
## Inline
replace tCode with (“`” & tCode & “`”) in line tLineNumber of tMarkdown
end if
end repeat
This can result in multiple code blocks together, one after another e.g.
` ` ` on mouseUp` ` `
` ` `doSomething` ` `
` ` `end mouseUp` ` `
These should be combined into a single code block, one way to do this is by replacing (“` ` `” & return & “` ` `”) with return, using
replace (“` ` `” & return & “` ` `”) with return tMarkdown
so the markdown above would become
` ` `on mouseUp
doSomething
end mouseUp` ` `
The final step is to ensure there is a new line before and after code blocks to ensure correct display. This can be done using
replace “` ` `” with (return & “` ` `” & return) in tMarkdown
so the Markdown above becomes
` ` `
on mouseUp
doSomething
end mouseUp
` ` `
After completing all these steps code blocks display as below
Final steps
After all these steps the Markdown version of the User Guide was pretty complete. There was a little manual work to do, just passing over the document and making sure everything looked ok but it saved a lot of work and got the User Guide into a good state for updates and contributions.
Coming soon
We still have some work so do polishing and updating the User Guide and other guides, and we need to decide on the best way to get them into GitHub ready for contributions but we’ll be keeping you posted as work progresses.


4 comments
Join the conversationAndy Piddock - November 19, 2014
Great work Elanor.
I’m sure there are many of us who are keen to see the docs updated and having them in markdown format on GitHub will get more of us involved in this.
Elanor Buchanan - November 20, 2014
Thanks Andy, we really want to get the docs out there for contributions, after all the more you all do the less we have to. But joking aside having community involvement in the docs is something we really want to get up and running and we are working towards it.
MaxV - November 20, 2014
GitHub permits you to start a Wiki in each project. So the best solution for an open-source project like Livecode is to move to a wiki type documentation.
Wiki pages on GitHub may have any syntax:
* MarkDown
* MediaWiki
* AsciiDoc
* Creole
* Org-mode
* Pod
* Rdoc
* Textile
* reStructuredText
A Livecode wiki already exists here: http://livecode.wikia.com/ , but an official Wiki would be more appreciated.
Elanor Buchanan - November 20, 2014
Thanks MaxV, we’ll look into that.