How to Deploy Apps to Android Devices

by Panagiotis Merakos on July 21, 2015 8 comments

Are you writing an app for Android?

Do you want to test your Android app on an actual Android device?

If you are developing for Android and you want to test the app either in a simulator or on a physical android device, then you will need the Android software development kit (SDK). The Android SDK  enables developers to create applications for the Android platform.

read more
Panagiotis MerakosHow to Deploy Apps to Android Devices

Why You Should Spend (More) Time Submitting a Bug Report

by Panagiotis Merakos on February 27, 2015 3 comments

During the last few months, I have been working on the maintenance of LiveCode 6.7.x and LiveCode 7.0.x releases. This mainly involves fixing bugs. I have come across many different types of bug reports in terms of quality and clarity. In this post, I will describe how important is to provide a well-structured bug report as well as some tips on how to produce a high quality bug report.

read more
Panagiotis MerakosWhy You Should Spend (More) Time Submitting a Bug Report

Using git bisect to find a buggy commit

by Panagiotis Merakos on December 16, 2014 3 comments

During the last month I have been switching between translating the IDE to Greek, and refining LC 6.7 and 7.0 releases, in terms of fixing bugs. Some bugs are quite easy to fix. Some others though, can be quite tricky. The first thing to do is locate where the bug comes from, and the next step is to actually fix it. In some cases, tracking down the cause of the bug is not that obvious. However, if you can find a previous version of the code where the bug was not present, then you can use some Git tools to find the specific commit in the history which introduced the bug. You could try to check out each commit, build it, and check if the bug is present or not. Usually there are a large number of commits, so this can take a really long time. This is a linear search. Hopefully, we can do much better by doing a binary search.  This is where the git bisect command comes in.

What is git bisect?

Git bisect is an extremely useful command in the Git version control system. The bisect command does a binary search through your commit history to help you identify which commit introduced an issue. It is quite quick. Imagine that between a working version of the code and a buggy one, there are a few hundreds commits, say N. Using git bisect requires only log(N) steps!

How to use it?

1. You start by specifying two states, a bad and a good one. A state can be a commit hash, a branch name, or a tag name:


code1panos

In this example, HEAD is the current revision (ie the bad one), and 6.7.0-dp-6 is a tag of a good revision.

2. We then test it for the presence of the bug. We inform Git if the bug is there by running git bisect good, or git bisect bad:

code2panos

3. Repeating the same process bring us closer to the faulty commit:

codepanos3

4. If we ever arrive at a commit that won’t build for a known or irrelevant reason, or if we just don’t know if the specific revision is good or bad, then we simply run git bisect skip. It doesn’t define it as good or bad, picks a neighbor commit and moves on:

codepanos4

5. Voilà! We fould the commit that introduced the bug!

codepanos5

After finding the problematic commit, we can see the diffs in github, and find out the cause of the bug.

6. We then move back to the HEAD (git bisect reset) and fix the bug!

codepanos6


read more
Panagiotis MerakosUsing git bisect to find a buggy commit

Building LiveCode

by Panagiotis Merakos on October 13, 2014 6 comments

Building LiveCode 

We have been very busy in the RunRev office this period. Among all the other things we are doing, we are producing Release Candidates for both LiveCode 6.7 and 7.0. In the meantime, we are fixing some bugs that were introduced  as a result of the iOS 8 release. These fixes will be contained in LiveCode 6.6.4, and then rolled up to 6.7 and 7.0. They include updates in various parts (engine code, IDE code, dictionary entries, release notes etc).

When everything is ready, all these different pieces have to be brought together to a complete product, and nicely packed within an installer. This is done through the process of building. After building the installers are uploaded to http://downloads.livecode.com/livecode/ webpage, but are not immediately accessible to the public. At this point, they are thoroughly tested, not only by RunRev developers, but also sometimes by some of our most experienced community members. Once we make sure that everything works as expected, the installers become public and are available for all the users to download.

The first time I did a build was for LiveCode 6.7 DP5, and since then I have done most of the 6.7 builds. In this post. I will briefly describe you the process of building, as I first experienced it.

I was really surprised to find out that for building LiveCode, we use … LiveCode(!),  for a significant percentage of the process. Theoretically, it is possible for 100% of the process. However, in order to resolve more easily merging conflicts between the various bugfixing or feature branches, we use some other tools as well.  

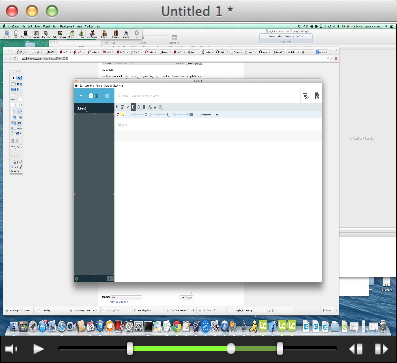
The LiveCode stack that is used contains facilities for building LiveCode engines, docs, notes, installers, and server engines for all platforms. It looks like this:

PanosBlogPostOctober2014

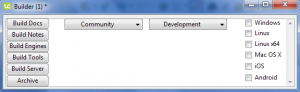
 (I have slightly changed the location of the buttons to fit the width of this post!)

The first thing to do is make sure that all pending and already reviewed pull requests are merged  into the develop branch of the main LiveCode GitHub repository. If not, we have to merge them, and resolve conflicts, if any. After that,  the develop branch is ready to start building from. Note that the develop branch is used only for LiveCode 6.7 builds. For other LiveCode versions, different branches are used.  

Then, using the above stack, we generate the public key in the Environment stack. This is used to sign the LiveCode app, and is needed for the commercial license activation.

The next step is the actual build of the LiveCode engines, for both the community and commercial version, for each platform. We use Xcode for MacOS and iOS, a top level Makefile (that references Makefiles in each relevant folder) for Linux, Visual Studio for Windows, and a script that builds all the binary components and necessary Java support for Android. Alternatively, we could just use the above stack, select all platforms (apart from Linux x64) and click Build Engines button. However, it is easier to track down and fix any errors that may occur if you follow the first approach. 

Next, in case there are updates in the IDE, we have to get them from the LiveCode SVN repository. Apart from the updates in the IDE code, we must make sure we get the newest IDE-related bugfix notes, if any. The notes have to be put in a separate folder, so as to be exported automatically into the release notes. At this point, the hard work is done. The remaining part is just clicking buttons on the above LiveCode stack.

So, we go back to our stack, and click Build Docs and then Build Notes button. Afterwards, we select Community from the drop-down menu, tick Windows, Linux and Mac OS X and click Build Tools (this creates the installers) and then Build Server. Next, we do the same for Commercial

Now, everything is ready and all we need to do is upload the binaries to the RunRev server. We use FileZilla for that. Finally, we press the Archive button, to make them appear in the download page.

It was very interesting to be involved in the whole building cycle. Special thanks to Michael for always being there to help 🙂

read more
Panagiotis MerakosBuilding LiveCode

Multimedia on Mac OS – A quick progress update

by Panagiotis Merakos on July 7, 2014 16 comments

Things are running smoothly regarding the update of the player object. In this post I will briefly describe what has been done so far.

The first step was the refactoring of the MCPlayer related code. Formerly, the MCPlayer class used ifdefs in most functions, based on whether it was using the ‘platform player’, ‘quicktime’, or was on Linux. Now, MCPlayer is split into two classes in separate files (player-legacy.cpp/.h and player-platform.cpp/.h). The former is the pre-platform API version; the latter the platform API version. This made it easier to update the platform-player version to use its own controller.

The next step was to implement a custom controller bar. For the reasons described in the previous blog post for Multimedia on Mac OS, we had to implement our own controller. After some discussion, and some research on the appearance of modern video controllers, we are almost there! Below is a preview of the current, and probably final version.

 playerpurple


Because some users may not like this color, we thought it is better to make it customisable. So we added some properties to the player object. In fact, we tied in some existing properties that were not used for the player object. For example, the hiliteColor. For the player object, the hiliteColor is the color of the played area, as well as the color of the volume area in the volume popup window. It is also the color of a button background when this button is clicked. So, if you don’t like the purple color that is set by default, all you have to do is add a new button (or just type in the message box) with the following code:

on mouseUp

set the hiliteColor of player to re

end mouseUp 

The result is the following:

 playerred 

In the player object, you can also set the foreColor, which is the color of the selected area, i.e. the color of the area between the selection handles. This is dark grey by default.

 player3


Modify the code in your button, to change both the hiliteColor and the foreColor

on mouseUp

set the hiliteColor of player 1 to127,255,0″

set the foreColor of player to “106,156,56”

end mouseUp

The result is the following:

player4 

Finally, we had to move from Quicktime/QTKit to AVFoundation. This transition is now done, and the new player object seems to work perfectly with the AVFoundation APIs. Some tweaks have still to be done, in order to ensure similar (or at least as similar as possible) behaviour with the old Quicktime/QTKit controller. Next, and final step as far as the player object is concerned, is to test it thoroughly and fix any bugs that may arise.

read more
Panagiotis MerakosMultimedia on Mac OS – A quick progress update

Multimedia on MacOS

by Panagiotis Merakos on May 15, 2014 23 comments

The current project I am working on is about multimedia on MacOS. It includes replacing all  multimedia functionality (in the player object, revVideoGrabber external etc)  in LiveCode to use the latest Mac APIs (AVFoundation, introduced in OSX 10.7). All these multimedia capabilities rely on the QuickTime/QTKit APIs. But Apple recently deprecated QuickTime APIs. This means that apps that use QuickTime will be rejected in the AppStore submission.

 So, after transitioning the existing Quicktime/QTKit code to AVFoundation, users should be able to submit a multimedia based app to the AppStore for their OS 10.7 customers and above.

 The problem is that the new APIs do not provide the same functionality as the original QuickTime API, so we must ensure that we will provide our users with the same feature set they are currently used to. For example, the player control bar. QTKit’s controller is broken in OSX 10.7+ and AVFoundation does not have a controller until OSX 10.9. This means that we need to write our own custom controller.  

 I have almost finished implementing the custom controller, at least as far as the functionality is concerned. It probably needs a bit more work to look prettier! 

Below are both the QTKit controller and our custom controller, as implemented so far. Note that the selection handles are broken in QTKit controller on OSX 10.7+

QTKit controller for multimedia playback


custom controller
Custom controller for multimedia playback

The next stage is to update the LiveCode player object and all other multimedia functionality in the engine to use the newest AVFoundation APIs, as well as to implement a QTKit/AVFoundation version of the revVideoGrabber, since it too relies on the deprecated QuickTime API.

read more
Panagiotis MerakosMultimedia on MacOS

Fixing Bugs

by Panagiotis Merakos on April 14, 2014 3 comments

The in-app purchasing feature I was working on during the previous months is now finished, and is available in LC 6.7 DP1. So, in the meantime, before moving to a new project, I had the chance to do some bug-fixing. It was my first exposure to bug-fixing, and I have to admit that it was more interesting than I imagined! To begin with, I started browsing our bug database in the Quality Control Center. The steps for fixing a bug are three:  reproduce – find where it comes from – fix!

 I thought that as a beginner, I should start with something relatively easy, so I tried to sort out some crash-related bugs. I believe these are easier to fix, or at least easier to reproduce and find the exact line of code where the crash occurs. This can be done by trying to run LC in the IDE with the debugger active and see what line of code it stops on. Well, this isn’t necessarily the line that contains the bug, but you know you are close! If you step backwards, you will find where the actual bug occurs. Using this method, I fixed a couple of bugs. Not surprisingly, modifying the same single line of code, fixed three different bugs that at a first glance  seemed unrelated.

The next category of bugs I tried to fix were the “platform-specific ones”. In this kind of bug, the LC functions that were reported to misbehave, usually communicated with particular System functions that were deprecated. The fix to these bugs required more time. I had to search the web for the new up-to-date System functions, and replace the deprecated ones.

After that, I felt I was ready to face some harder bugs! I tried different categories, android orientation-related bugs, engine architecture-related bugs, engine objects-related bugs and some more. When I could not fix a bug, I tried to post a helpful comment or provide a workaround. In any case, either being successful in resolving these bugs or not, I enjoyed it because it gave me the opportunity to gain a deeper understanding on how the engine works. Moreover, I was impressed with how much attention to detail the LiveCode users that reported some bugs pay! I remember a bug where the user had reported that in a specific version of LC, the “unlock cursor” command delayed by one(!) pixel, meaning that when you unlock, the cursor had to be moved a pixel (at least) for the change to take effect. Impressive!

read more
Panagiotis MerakosFixing Bugs

In-App Purchasing for Amazon and Samsung App Stores

by Panagiotis Merakos on March 10, 2014 2 comments

During the last 2.5 months I have been working on extending in-app purchasing (IAP) feature to apps distributed through Amazon Appstore and Samsung Apps Store. I am excited to work on such a ‘hot’ topic. A quick introduction :

What is in-app purchasing?

With in-app purchasing you can sell digital goods (lives/bullets/extra levels to a game, access to a service etc) from within your app.

Why to use IAP in my app?

There are various ways to make money from your app. All of them fall into one of the following three categories:

  1. Charge users for downloading your app (paid model)
  2. Offer your app for free and charge for additional/premium features (free with IAP)
  3. Charge for both the app and additional features (paid with IAP)

It seems that the “freemium” (i.e. free app with IAP) business model is proved to be the most profitable with the largest revenue shares :

inapp3

source : Distimo Publication – February 2014

What will change in the existing Livecode API for in-app purchasing?

The Livecode engine currently supports in-app purchasing for apps distributed through the Google Play Store (formerly Android Market), as well as the Apple AppStore. This support will now be extended so that apps distributed through other avenues (the Amazon & Samsung app stores) can make use of the in-app purchase features provided. For this reason, new LiveCode commands, functions and messages will be added. However, all of the existing (IAP-related) commands and functions will still be supported (for Google Play Store and Apple AppStore).

Why is this important?

From the developer’s point of view, being able to distribute a freemium app from multiple channels, means higher revenue. Moreover, they do not have to worry about how each store-specific IAP API works, since the same code will work across all stores. All they have to do is just select the store in the Standalone Application Settings for the app, and then the LiveCode IAP API will “behind the scenes” communicate with each store-specific IAP API, depending on which store the developer has selected to distribute the app through.

inapp2

IAP APIs for Samsung, Amazon and Google

The new LiveCode IAP API will allow the user to query for specific product information (such as price, description etc) before they make a purchase, and will support purchasing of subscription items for all available stores.

I will keep you posted on the progress of the project, so stay tuned!

read more
Panagiotis MerakosIn-App Purchasing for Amazon and Samsung App Stores