
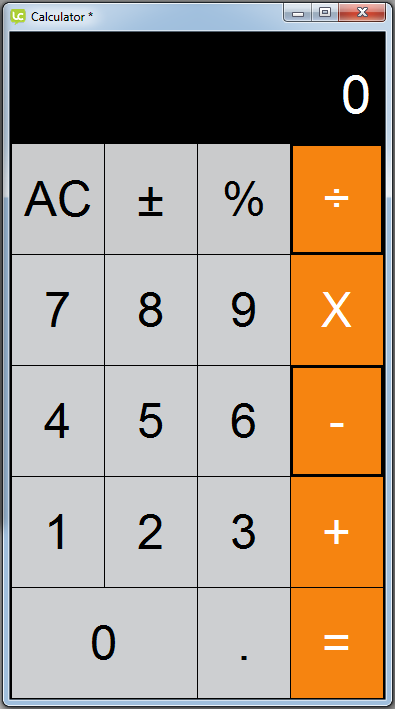
Creating a User Interface is also about responding to user interactions. For example when a user clicks an operator button the background colour gets darker, we implemented this by setting the Hilite fill to dark orange.
In the original app a black border remains as an indicator to remind them of which operator has is selected – giving a better user experience.
To do this we need to add some code to our buttons.
Adding code to the multiply button
To add code to a LiveCode control select the control, in this case the multiply button, and click the Code button in the Menubar. A new editor will open up.
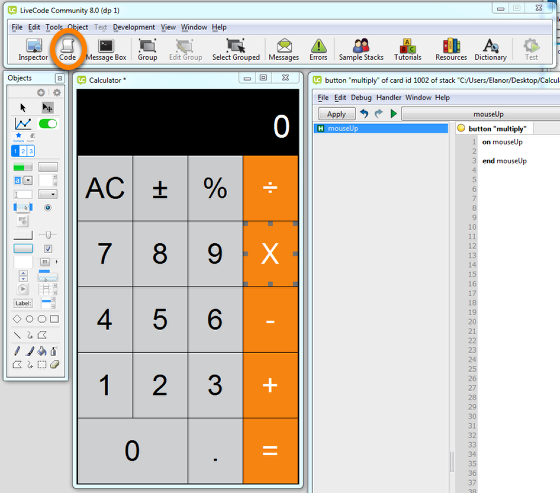
This where we edit the code for the button.
Any LiveCode object can have code associated with it, when a user action occurs a message is sent to the object where the action occurred so it can respond.
For example buttons receive mouseUp messages, fields recive textChanged messages. For more on LiveCode events and messages see chapter How LiveCode Works of the Beginners
Guide.
You will see that the script already has a mouseUp handler, this is because this is the most common message for buttons to respond to.
When the button is clicked we want to set the border to black and make it visible, we do this by setting the relevant properties in the code.
Setting a property in code has exactly the same effect as setting it in the Property Inspector, it just allows you to change object properties dynamically within your app.
To do this set the script of the button to
on mouseUp
   set the showBorder of me to true
end mouseUp
You should notice that the indicator on the button "multiply" tab(1) is yellow, this means your code has not been applied yet. To apply your code click the Apply button(2).
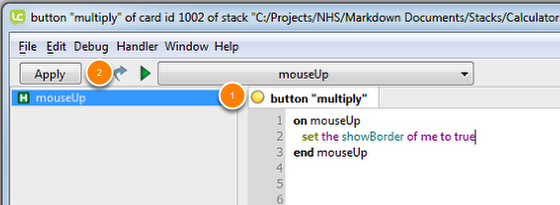
The indicator should turn green, if it turns red there is an error in your code which will need to be corrected, LiveCode should display a message at the bottom of the Script Editor telling you where the error is.
What does "me" mean in the code? In LiveCode the keyword me refers to the control the script belongs to, so in this case me means the multiply button, so using me means only the border of the multiply button is
set.
In this example LiveCode sees the line
set the showBorder of me to true
is equivalent toset the showBorder of button "multiply" to true
Add the same code to the other 3 operator buttons. Because we used me the code can be copy and pasted and each button will always be referring to its own border.
Resetting the border colour
When you click an operator its border is set to black, but the borders for the other operators don’t get set back to their original state.
We want to reset the borders of the other operators and then set the border of the chosen operator. This will require more code in each button and is an ideal time to think about the most efficient and clearest way to implement the code in our app.
If the same thing happens multiple time, or in multiple places, or the same thing happens to a number of controls we can consolidate this code into a single place. This saves us time and if we want to make a change to the code we only need to do it once and we won’t
accidentally have small differences in our code leading to inconsistent behaviour.
We achieve this by creating a custom command which we call from each operator button, telling the custom command which button was pressed. Because all our buttons are on the card we can implement it on the Card Script and each button can access it.
For more on the LiveCode Object Hierarchy Message Path see the How LiveCode Works chapter of the Beginners Guide.
To implement this custom command open the Card Script from the Object menu, add the following code and apply the script.
This command turns off the borders of all the operator buttons and then turns on the border for the pressed button.
pOperator is a parameter, a piece of information that is passed to the command, in this case it tells us which button was pressed.
command operatorPressed pOperator
    set the showBorder of button "divide" to false
    set the showBorder of button "multiply" to false
    set the showBorder of button "minus" to false
    set the showBorder of button "plus" to false

    set the showBorder of button pOperator to true
end operatorPressed
Now we have to go back and change the code of each of the operator buttons so that they each call operatorPressed, passing their name as a parameter.
Set the code of each of operator button to
on mouseUp
    operatorPressed the short name of me
end mouseUp
Responding to User Interactions