Creating a simple graphical application in LiveCode can take just minutes. First you create a user interface, including any windows, palettes, dialogs you require. Then you populate the user interface with controls, like push buttons, check boxes, text fields or menus. Finally, you use LiveCode’s English-like programming language to tell your application how to behave.
Stacks, cards and objects
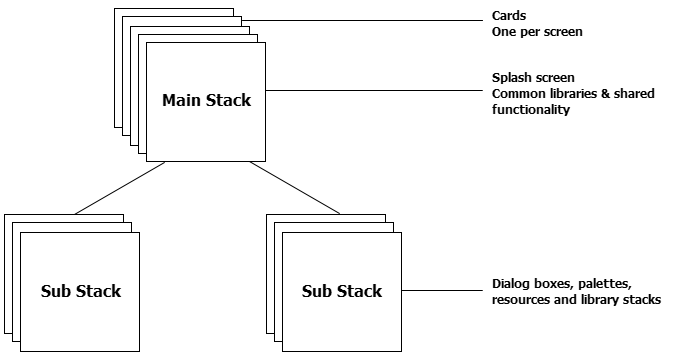
The first step in creating a LiveCode application is creating a window, which in LiveCode is called a stack. Each window you see in LiveCode is a stack. Palettes, dialog boxes, and standard windows are all stacks.
Each stack contains one or more sets of information called cards. Each card can have a different appearance or all the cards in a stack can look the same. By going from card to card in a stack, you change what’s being displayed in that stack’s window. You can think of a LiveCode stack as a stack of playing cards (hence the name), where you can flip through the cards, but only one card at a time is visible. A stack can have a single card or many cards.
All user interface objects (controls) are created by dragging them on to a card area.
Object and Event Driven Programming
Any graphical application you build using LiveCode will be based on objects. With LiveCode you typically create the objects of your application before writing any code. You can start by drawing the buttons, text fields, and other controls that make up your application. LiveCode operates like other layout, drawing or application development environment. You can select controls by clicking them, move them by dragging them around, resize them, and change their layer to move them closer or further from the top of the interface.
Once you have the objects in place, you can proceed to attach code to each object to respond to the events you want. LiveCode includes objects for all the basic operating system elements, including buttons, checkboxes, text fields, menus, graphics, and many more. In addition there are native mobile controls and you can create and customize your own objects that look and behave however you want.
A LiveCode application is driven by user actions. LiveCode constantly watches the computer for common actions, such as clicking on a button, typing into a field, sending data across a network, or quitting an application.
When an event occurs, LiveCode sends a message to the most appropriate object. When writing your program, you decide what messages you want your program to respond to. For example, if a user clicks on a button, LiveCode sends a message to the button. You add code to the button that tells it how to respond to being clicked on.
There are a wide range of possible events. When a user clicks on a button, a series of events are sent to the button. For example, when the mouse first moves within the border of the button a mouseEnter message is sent. Then a series of mouseMove messages are sent as the mouse moves over the button. When the mouse button is depressed a mouseDown message is sent and when the mouse is released a mouseUp message is sent. You donít have to respond to all of these events. You simply place code within an object to handle the events you want your application to respond to.
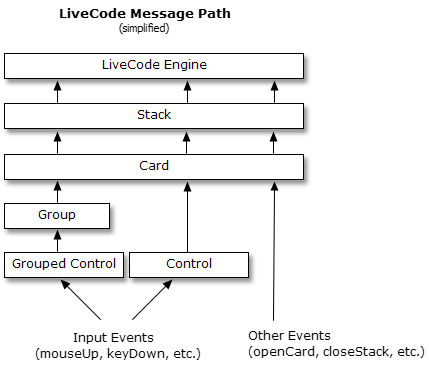
Messages and the Message Path
Each LiveCode object is part of another object, of a different object type. For example, each object is part of a card, each card is part of a stack etc. This object hierarchy defines the ownership and inheritance relationship between objects.
If a message is not handled by the object it is initially sent to, meaning you have chosen not to respond to that message, it is passed on to the owner of the initial object. In LiveCode the order in which objects have the opportunity to respond to a message is called the Message Path and is based on the object hierarchy. This makes it possible to group similar functionality together at different levels within your application.