
Extending LiveCode
Introduction
LiveCode 8.0 is the most exciting release in the history of the technology. It provides a simple way to extend the functionality or control set of LiveCode.
Our focus in LiveCode 8.0 is extensibility. You can now build and share widgets (custom controls) and libraries that are treated by LiveCode as engine level elements.
LiveCode 8.0 can be thought of as a version 7.0 with a new module allowing extensions to be plugged into the engine. As a result, 8.0 should be as functional and stable as LiveCode 7.0.
This guide will take you through the process of installing and using these new widgets and libraries and for the adventurous among you, provide a guide to building and sharing your own extensions.
LiveCode Builder Extensions
To make it possible to create extensions and plug them into the LiveCode engine we’ve created a new flavour of our language calledLiveCode Builder. LiveCode Builder looks a lot like LiveCode Script so should feel familiar for any seasoned LiveCode developer. There is lots of new syntax which exposes parts of the LiveCode engine that were only previously available to those who were skilled c/c++ developers.
To learn more about LiveCode Builder and creating extensions, read on.
Warning: It is important to stress right at the start that no aspect of LiveCode Builder should considered final. Every piece of syntax in LiveCode Builder is subject to change.
Creating LiveCode Builder Extensions
We have provided a new “Extension Builder” stack to help make development and packaging of extensions as easy as possible.
Note: LiveCode Builder is a different flavour of LiveCode so it is not possible to edit LiveCode Builder scripts in the main LiveCode Script IDE.
Extension Builder
Open the “Extension Builder” from the tools menu:

- Select the extension you wish the develop or click the “open” icon in the header back to locate an extension you’ve not loaded before. All LiveCode authored widgets in the application package at: /contents/extensions/. To play with one of these extensions we recommend copying the folder from the application package to your desktop and loading it from there. Changing the extension id in the source code will also mean it doesn’t conflict with the existing extension.
- Data that the builder was able to parse from the directory such as icons, resources, API’s the user guides.
- Console: Shows status, error and log messages.
- Test: Creates a stack, compiles the extensions and creates an instance.
- Script: Opens the lcb script in an external default editor.
- Insall: Installs the extension into the IDE
- Uninstall: Uninstalls the extension from the IDE
- Package: Creates a .lce package which can uploaded to the extension store. It is placed in the extension directory
Note: A great way to get started is to tweak the script of one of our widgets examples.
Create your Own Simple Widget
A widget and a library are identical, except that a widget draws to a canvas. As a result, the authoring process is much the same for both extension types.
Create a .lcb file
We recommend using the Atom text editor, available at https://atom.io/. A LiveCode package is available which provides some colorization as well as indentation. If you prefer to use TextWrangler, there is a colorising script here. It should be placed in /Application Support/TextWrangler/Language Modules/
Start by creating a plain text file in a new directory and save it to disk with the extension “lcb”:
Note: The extension builder currently relies on there being only one .lcb file in a given directory.
Declare Type and Identifier
Start by declaring the type of extension, either “widget” or “library” followed by your identifier (See “Select A Developer ID” below).
This is the unique identifier by which your extension will be referred to by the LiveCode Engine.
Declare Meta Data
Next, provide meta data to help LiveCode display your product correctly in product and in the online portal.
end widget
Importing libraries
The LiveCode builder syntax is broken down into modules. There are 3 classes of module:
| Type | Description |
|---|---|
| Default | The module is part of LiveCode builder and is included by default. Their syntax is always available to you as a LiveCode developer. |
| Optional | The module is created and distributed by LiveCode Ltd and must be imported by the extension developer in order to make use of the syntax. |
| Custom | This module is created and distributed through the online portal and must be imported by the extension developer in order to make use of the syntax. |
LiveCode builder contains the following modules:
| Module | Type | Description |
|---|---|---|
| com.livecode.canvas | Optional | Provides the syntax and types for 2D drawing allowing developers to draw to a canvas. Required if creating a widget. |
| com.livecode.widget | Optional | Contains syntax specific to widget building such as “my width” and “the mouse position”. |
| com.livecode.engine | Optional | Contains syntax for all extension building such as “dispatch” and “log”. |
| com.livecode.arithmetic | Default | Contains syntax for basic mathematical operations. |
| com.livecode.array | Default | Contains syntax for operations on arrays. |
| com.livecode.binary | Default | Contains syntax for operations on binary data. |
| com.livecode.bitwise | Default | Contains syntax for bitwise logical operators. |
| com.livecode.byte | Default | Contains syntax for operations on byte chunks. |
| com.livecode.char | Default | Contains syntax for operations on char chunks. |
| com.livecode.codeunit | Default | Contains syntax for operations on codeunit chunks. |
| com.livecode.date | Default | Contains syntax for accessing the date and time. |
| com.livecode.file | Default | Contains syntax for file I/O operations. |
| com.livecode.foreign | Default | Provides the type bindings for foreign types. |
| com.livecode.list | Default | Contains syntax for operations on lists. |
| com.livecode.logic | Default | Contains syntax for logical operators. |
| com.livecode.mathfoundation | Default | Contains syntax for foundational mathematical operations. |
| com.livecode.math | Default | Contains syntax for mathematical operations. |
| com.livecode.sort | Default | Contains syntax for sorting operations. |
| com.livecode.stream | Default | Contains syntax for stream I/O operations. |
| com.livecode.string | Default | Contains syntax for operations on strings. |
| com.livecode.system | Default | Contains syntax for accessing system information. |
| com.livecode.type | Default | Contains syntax for general operations on types. |
| com.livecode.typeconvert | Default | Contains syntax for conversions between types. |
| com.livecode.unittest | Default | Contains syntax for unit testing LiveCode Builder programs. |
Warning! Module names are subject to change.
The new LiveCode dictionary has a full list of all available syntax as well as the module each belongs to. As a general rule we recommend importing all three optional module whenever developing widgets.
metadata title is "My Pink Circle" metadata author is "Benjamin Beaumont" metadata version is "1.0.0" end widget
Core Handlers
There are three core handlers that any widget developer should implement:
| Handler | Description |
|---|---|
| OnPaint | The OnPaint message is sent to your widget whenever LiveCode requires it to redraw. The performance of you widget is tied primarily to this handler and should be kept as efficient as possible. |
| OnCreate | The OnCreate message is sent to your widget when it is first created by LiveCode. This can be used to initialise default data and where applicable, reduce the burden for calculating constants etc in the onPaint handler. |
| OnGeometryChanged | The OnGeometryChanged message is sent when the control is changed in size. |
| OnSave | The OnSave message is sent when your widget is about to be destroyed and enables the widget to save data set on the widget. |
| OnLoad | The OnLoad message is sent when your widget is created and enables the widget to retrieve data saved on the widget. |
For the most basic example, only the OnPaint() handler is required.
public handler OnPaint() end handler end widget
Draw a Pink Circle
use com.livecode.canvas public handler OnPaint() // Set the paint to a solid pink color // Fill the path variable tCirclePath as Path put circle path centered at point [my width / 2, my height / 2] with radius (my width/2) into tCirclePath set the paint of this canvas to solid paint with color [1, 0, 1] fill tCirclePath on this canvas end handler end widget
Test the Code
Now open the extension builder stack as shown above and click on the load icon to load your .lcb file into the builder.

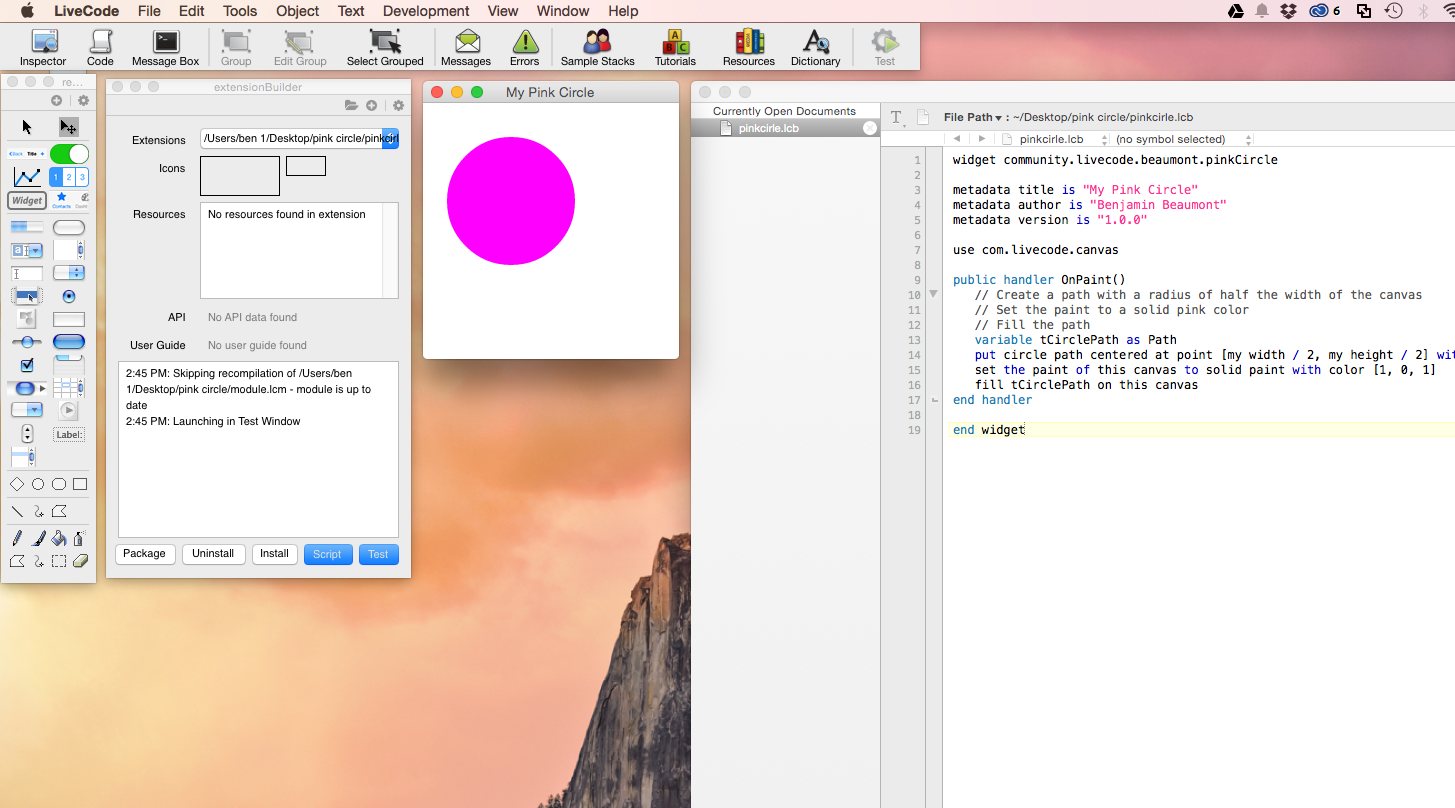
Click test. Your widget should be displayed on the new stack. If you can’t see it, check behind the extension stack.
Properties
In order to make a widget useful to end users it is likely that you’ll want to expose properties that allow them to specify how your widget should behave.
To specify a property you must provide a name and the method to get and set the property.
The simplest properties to get/set are numbers or strings. So lets create a circleMargin property that allows users to define a margin.
In the above example, when the circleMargin property is requested, the variable “mMargin” is returned, when set, the handler “setMargin” is called. To have LiveCode Builder handle the getting/setting of data, provide the variable name, to take full control over the getting/setting process define handlers. In our case we’re taking a mixed approach.
We’ll define a member variable to store the value for the margin. LiveCode Builder is type so you must also specify the type of your variable. Remember, the canvas you are drawing to has subpixel precision so our margin can be a decimal number. As a result, we’ve chosen the specify our margin as a real number. For a full list of types available in LiveCode Builder please see the Typing section of the language specification guide below. We also suggest a nameing convension for variable in the section on variable and case sensitivity.
We also need to insatiate our circleMargin to a default value. We do this by adding an onCreate handler which is called when the widget is first created.
Finally we have to implement our setMargin handler.
Implementing the “setter” ourselves provides us with a little more flexibility. In this case when the property is set we want our pink circle to immediately redraw to reflect the property change. We do this by calling “redraw all”.
To test the property click “test” and from the message box set the property.
Full Example
use com.livecode.canvas use com.livecode.widget use com.livecode.engine // Properties property circleMargin get mMargin set setMargin // Local variables private variable mMargin as real public handler onCreate() end handler
Loading and Saving widget data
When you widget is created you are sent a OnSave message. It has the following structure and expects and array return type. You can fill this array with whatever widget data you have. LiveCode saves this data along with instances of the widget in the stack file.
end handler
This same array will be returned to you when the widget is next opened.
Understanding Error Messages
Clicking on the “test” button causes the extension builder to compile your source code file (.lcb) and produce a compiled module file (.lcm). If an error is encountered it is output in the “console” section of the builder:
- source path – The path the .lcb file that is being compiled
- line number – The line number in the script on which the error occurred.
- char number – The character number on which the error occurred.
- error message – The description of the error.
LiveCode Builder API
To start creating more complex widgets see the LiveCode Builder api in the documentation stack in the IDE.

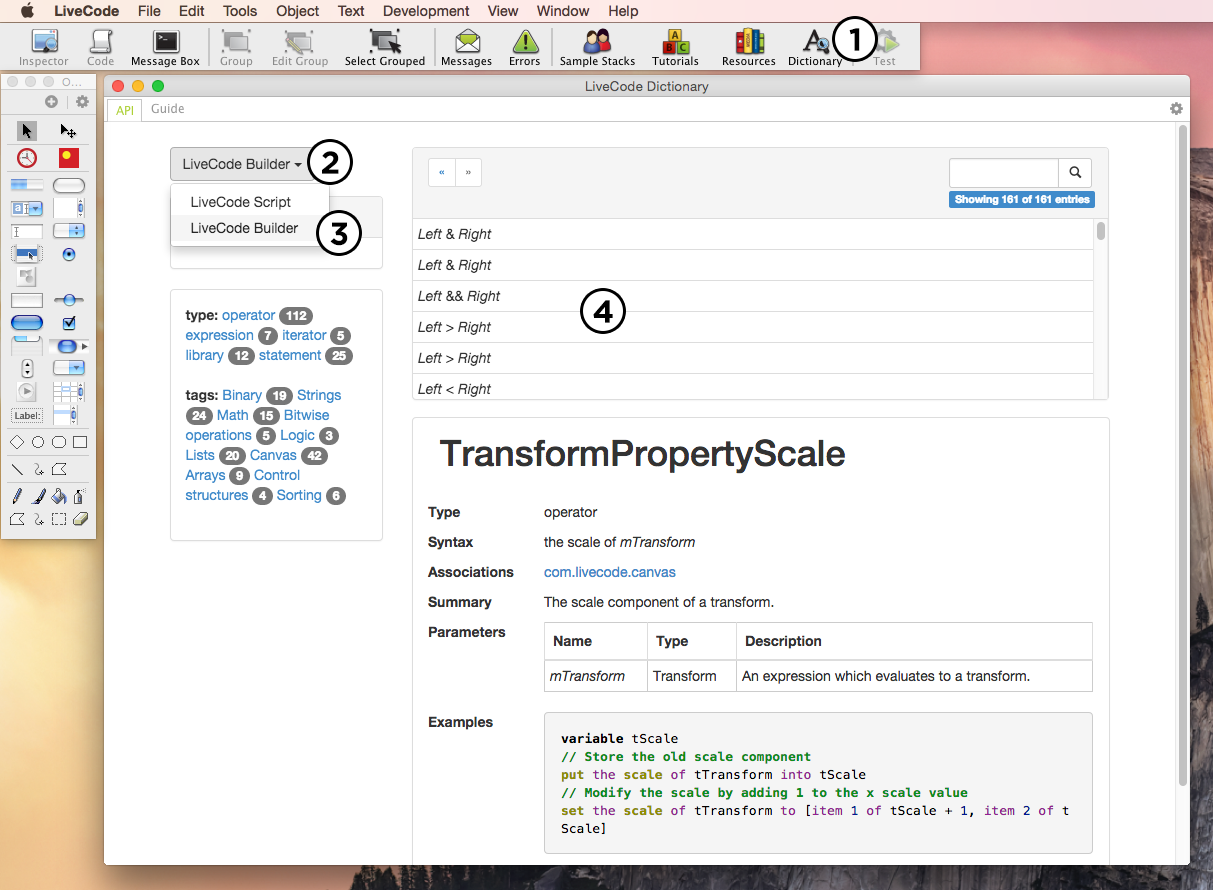
- Open the dictionary
- API chooser
- Choose the “LiveCode Builder” API
- The list of all the syntax available
Creating Libraries
A extension library is written in much the same way as the above widget. The only difference is that all the public handlers implemented are loaded into the engine on startup.
Loading and Creating Widgets Manually
To load a compiled library file call:
To create a widget from script call:
Composed Widgets
Widgets can either be ‘host’ widgets, as in the previous example, created when a widget is directly embedded in a stack, or ‘child’ widgets which are created when a widget is used as a child widget within another widget. The syntax for composed widgets is included in the com.livecode.widget module.
A simple composed widget
This composed widget example composes the clock widget and the selector widget, to create a version of the clock widget with adjustable time zone. The label at the top of the widget reflects which portion of the widget the mouse is over.
metadata author is "LiveCode" metadata version is "1.0.0" private variable mInsideChild as String private variable mInside as Boolean private variable mSelector as Widget private variable mClock as Widget public handler OnCreate() put the empty string into mInsideChild set property "numSelections" of mSelector to 6 set annotation "Name" of mSelector to "Selector" set annotation "Name" of mClock to "Clock" place mClock end handler
Notice that Widget is a variable type. This widget stores references to its child widgets in private variables. In the OnCreate handler, the widget objects are created, stored in the private variables and ‘placed’. Child widgets can be stored as variables and manipulated without actually being drawn to a canvas if they are unplaced. Properties implemented by child widgets can be got and set using the property <propName> of <child widget> syntax. Placing a widget ensures that they are drawn, in placement order. Setting an annotation of a child widget assigns it a tag so that when an unknown child widget is returned by an operator, its annotation can be used to identify it.
redraw all end handler public handler OnMouseLeave() end handler
In the OnMouseEnter and OnMouseLeave handlers, the target is used to obtain a reference to the child widget that triggered theOnMouseEnter and OnMouseLeave events, and the previously assigned annotation put into the mInsideChild variable, which in turn is rendered to the canvas in the OnPaint handler.
set the stroke width of this canvas to 4.0 stroke rectangle path of my bounds on this canvas end if if mInsideChild is not the empty string then set the paint of this canvas to solid paint with color [0.0, 0.0, 0.0] fill text mInsideChild at top of my bounds on this canvas end if end handler
The rectangle of each child widget is controlled using the following syntax:
the rectangle of <widget>– Enables manipulation of the rectangle property of a child widget.the width of <widget>– Enables manipulation of the width property of a child widget.the height of <widget>– Enables manipulation of the height property of a child widget.the location of <widget>– Enables manipulation of the location property of a child widget.
Finally, messages posted by child widgets can be handled in the direct parent by handling the appropriate message (prepending ‘On’). For example, the selector widget posts optionChanged when one of its numbers is selected. This is handled by this composed widget example in an OnOptionChanged handler.
Documenting Your Extension
Extensions can provide an API (Dictionary) and User Guide as part of the installed package. They are installed and viewable through the LiveCode Dictionary stack.
API (Dictionary)

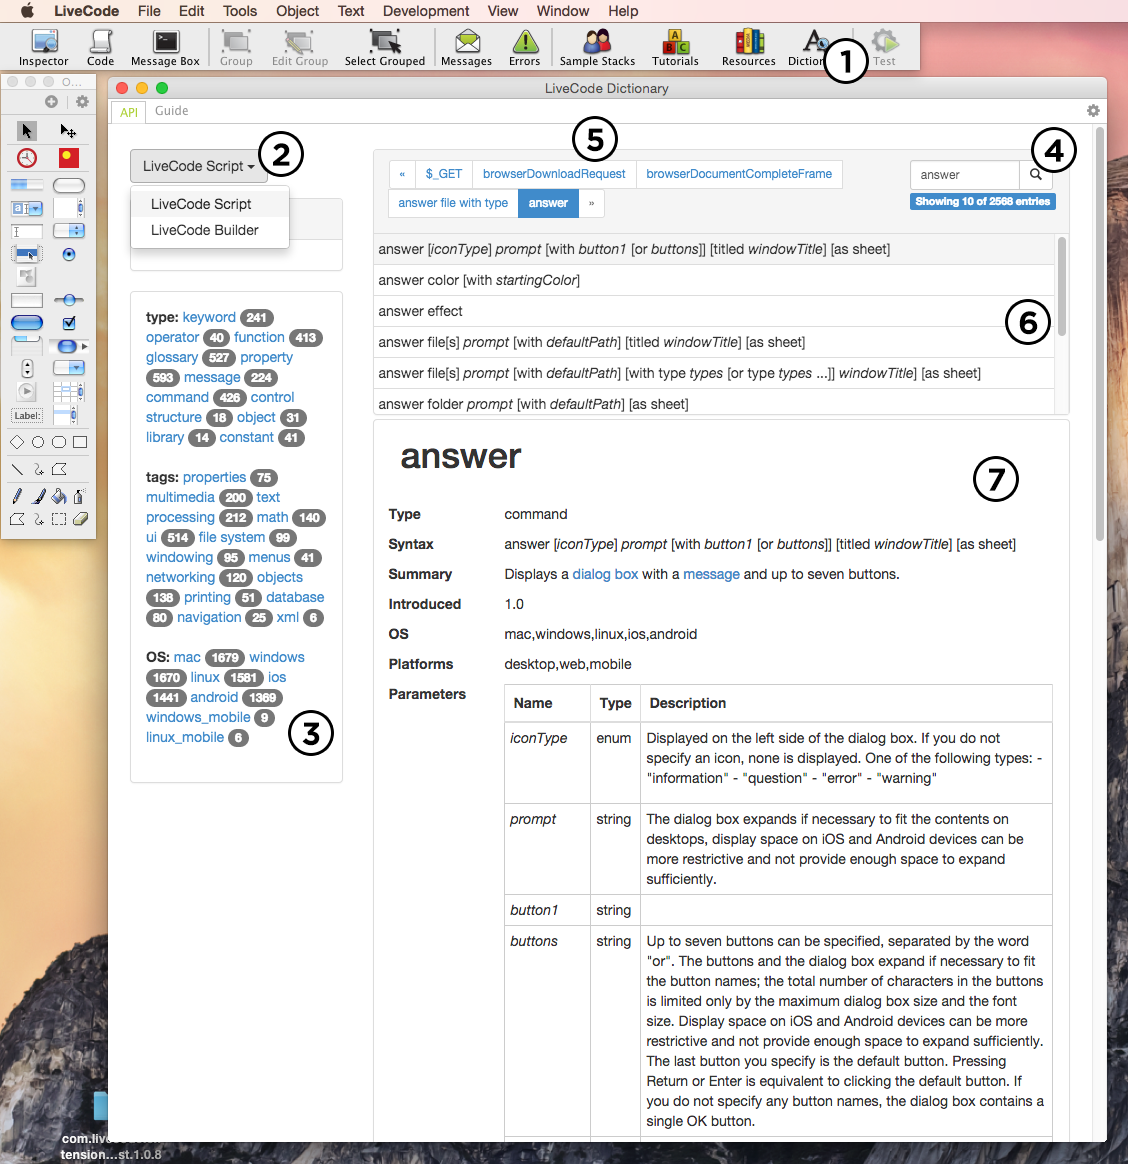
- Open the documentation stack from the menubar
- API chooser – Choose which API to view. By default, LiveCode 8.0 comes with the LiveCode Script API and the new LiveCode Builder API. Any extension that contains an API is displayed here.
- Category Filter – Click on the tags to filter the API entries.
- Search Filter – Enter a text string to filter the API entries by a specific search string
- History – Move back and forward through your API navigation history
- Entry List – Select the entry to display from this list
- Entry – The entry describing the syntax
User Guide

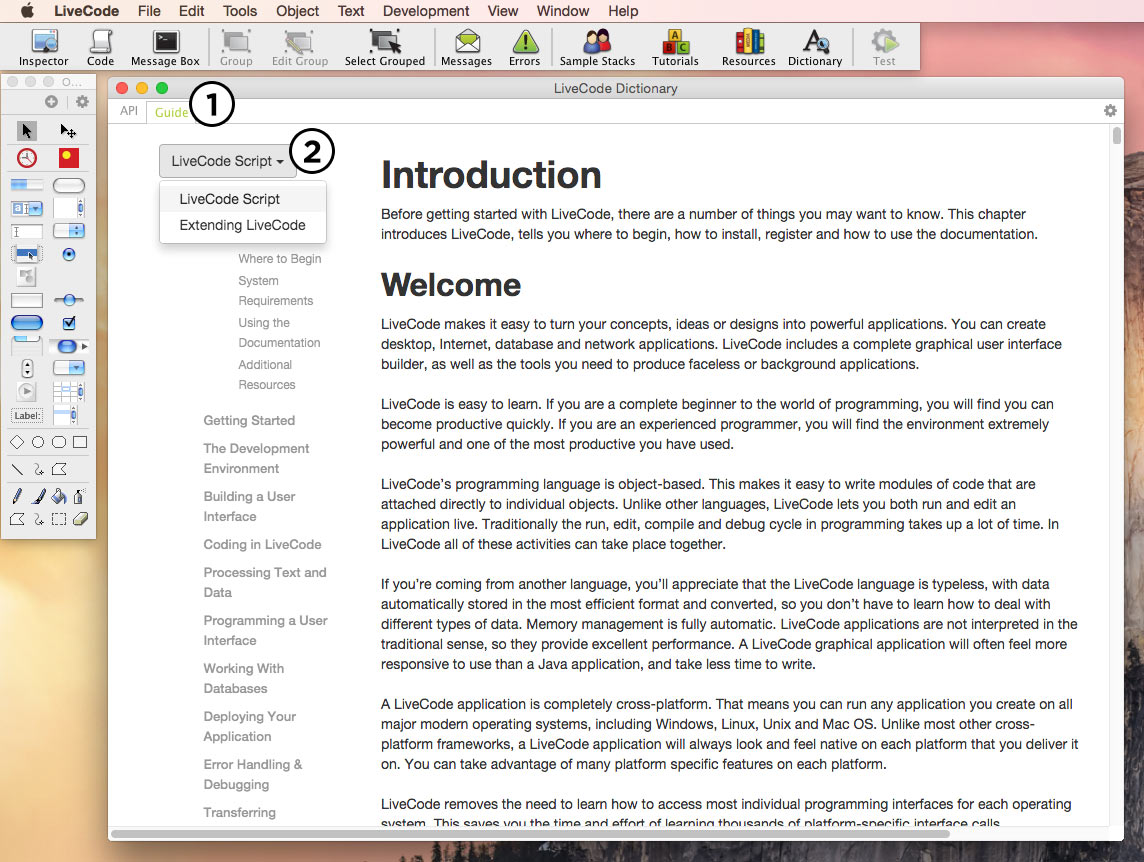
- Click on the “Guide” tab at the top of the documentation stack
- Select the guide you wish to view
Note: In LiveCode 8.0 we’ll be including an updated version of the LiveCode Script User Guide. The version currently included with LiveCode has not yet been updated.
Adding API Markup
Any extension can include an API. To do so, either add a file called api.lcdoc to your widget folder alongside the other widget files or markup your source code inline.
Marking up your scripts is simple and follows a similar model to other documentation formats.
Consider the following handler
To add an entry to the API for this handler, place a formatted comment above the handler definition:
Here is a full description in markdown for how this function works. Once again, any GitHub flavoured markdown is accepted. */ public handler myHandler(in pString as String, in pNumber as Number) end handler
The LiveCode API parser will combine the comment items with other data pulled directly from your handler definition such as name, type and some parameter details.
For a full list of acceptable documentation elements please see the LiveCode Documentation Format guide.
Important: Documentation is only added to the LiveCode dictionary when a full extension package is installed. Currently, this is only possible through the extension builder.
Adding a User Guide
Any extension can include a user guide. To do so, add a markdown file called guide.md to your widget folder alongside the other widget files.
All GitHub flavoured markdown is accepted.
Packaging Extensions
Packaging extensions is easy. Simply open the “Extension Builder” stack:
Load your .lcb file and click “Build Package”. A new file will appears in the same directory as your main file with the extension .lce. This is your final package file ready for upload to the extensions portal.
Package requirements
A valid package can be built from a minimum set of files:
Other ways to extend the Built-in Capabilities
There are many other ways to extend LiveCode. This section explains how to run shell commands, start other applications, read and write to processes, execute AppleScript, VBScript, send and respond to AppleEvents and communicate between multiple LiveCode-based processes. It also tells you where to get information to create external commands and functions (code written in lower level languages).
Communicating with other process and applications
Reading and writing to the command shell
Use the shell function to run shell commands and return the result. The following example displays a directory listing on Mac OS X:
And this example stores a directory listing in a variable on Windows:
On Windows systems you can prevent a terminal window from being displayed by setting the hideConsoleWindows global property to true.
You can choose a different shell program by setting the shellPath global property. By default this is set to “/bin/sh” on Mac OS X and Linux and “command.com” on Windows.
Tip: The shell function blocks LiveCode until it is completed. If you want to run a shell command in the background, write the shell script to a text file then execute it with the
launchcommand.
Launching other applications
Use the launch command to launch other applications, documents or URLs. To launch an application, supply the full path to the application. The following example opens a text document with TextEdit on OS X:
Tip: To get the path to an application, use the
answer filecommand to select the application then copy it into your script. Run this in the message box:answer file "Select an application"; put it
To open a document with the application it is associated with use the launch document command.
To open a URL in the default web browser, use the launch URL command.
launch URL "http://www.livecode.com/"
For more information on launching URLs and details on how to render web pages within LiveCode, see the Transferring Information guide.
Closing another application
Use the kill process command to send a signal to another application, to close it or to force it to exit. For more details, see the LiveCode Dictionary.
Communicating with other processes
Use the open process command to open an application or process you want to read and write data from. You can then read from the process with the read from process command and write to it with the write to process command. To close a process you have opened, use the close process command. The openProcesses returns a list of processes you have opened and the openProcessIDs returns the process IDs of each one. For more details see the LiveCode Dictionary.
Using AppleScript and VBScript (Open Scripting Architecture or Windows Scripting Host)
To execute commands using AppleScript on Mac OS or VBScript on Windows, use the do as command. do as also allows you to use any otherOpen Scripting Architecture languages on Mac OS or languages installed into the Windows Scripting Host on Windows. To retrieve a list of the available installed languages, use the alternateLanguages.
For example, to execute an AppleScript that brings the Finder on OS X to the front, enter the following into a field:
tell application “Finder”activateend tell
Then run:
To retrieve a result from commands executed using do as, use the result function. Any error message will also be returned in the result. The following example displays the result of an addition performed using VBScript:
For more information on the do as command, see the LiveCode Dictionary.
AppleEvents
To send an AppleEvent, use the send to program command.
If LiveCode receives an AppleEvent it will send an appleEvent message to the current card. Intercept this message to perform actions such as handling a request to quit your application or opening a document. The following example shows how you could handle a request to quit:
else exit appleEvent end if end appleEvent
To retrive additional information passed with the appleEvent use the request appleEvent data command. The following example shows how you could handle a request to open a stack:
repeat for each line l in tFilesList end appleEvent
For more details see the LiveCode Dictionary.
Using Local sockets
If you want to communicate between local applications a common technique that can be used without code changes on all the platforms LiveCode supports, is to open a local socket and communicate using that. You should choose a port number that is not used by a standard protocol – typically a high number.
This technique is commonly used when you want to create multiple programs that run independently but communicate with each other. It is a viable technique for running background tasks and provides a straightforward way to create an application that behaves as if threaded – i.e. with benefits of multiple threads. You can design your application such that additional instances can be launched to perform processing, data transfer or other intensive activities. Modern OSes will allocate each application to an appropriate processor core. By using socket messaging to communicate with each one you can keep your main application’s user interface responsive and display status information. The following example shows you how to open a socket to the local machine:
A detailed discussion of how to create a protocol using sockets can be found in the Transferring Information guide.
Tip: To simplify communication between multiple LiveCode programs, consider writing a simple library that sends and receives a handler name together with parameter data. To call a handler in the other LiveCode program, send the handler name and data to the library. The library will send the data over a socket. In the receiving program intercept the incoming data from the socket and use it to call the appropriate message with the parameter data received.
Externals – code written in lower level languages
LiveCode provides an external interface which allows you to extend it using a lower level language (often C). For example, if you have preexisting code that performs processing in a lower level language, you can write a user interface in LiveCode and then call this library by writing a simple wrapper around it using LiveCode’s externals interface. LiveCode supports transmitting data to and from externals, as well as drawing into image objects within LiveCode windows, manipulating the player object, and more.
Note: Some aspects of the built in functionality are supplied in the form of externals. These include the SSL library, the database library, the revBrowser library, zip library, video grabber and XML libraries. These libraries can be included in a standalone application, or excluded if they are not needed – saving disk space.
The Externals SDK
We provide a developer kit for writing externals which includes documentation and examples. You may download this kit from:
http://downloads.runrev.com/resources/externals/revexternalssdk.zip
The following newsletter articles will also help you get started: