
If you are intending to use Android on Windows, you need:
- Windows XP/Vista or Windows 7
- The Java SDK
- The Android SDK
If you are intending to use Android on Mac, you need:
- Mac OS 10.5.x or later
- The Java SDK
- The Android SDK
If you are intending to use Android on Linux, you need:
- The Java SDK
- The Android SDK
After you have installed the pre-requisites make sure you run the Android SDK Manager and have installed at least SDK Platform Android 2.2, API 8, revision 2 package.
Configuring LiveCode
After you have set up your system with the Java Development Kit and Android Development Kit, it is necessary to inform LiveCode where to find them. To configure the paths to your installed SDKs, use the Android section of the Mobile Support pane in Preferences.
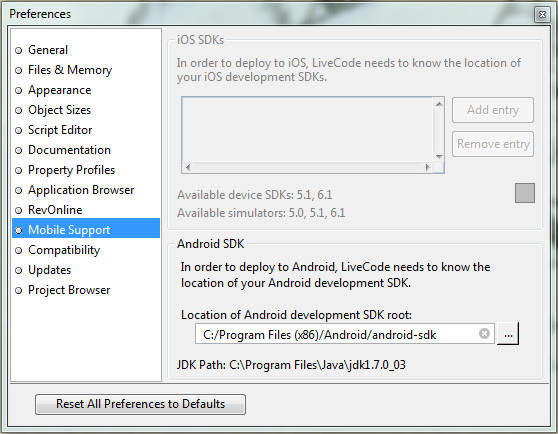
Use this pane to choose the correct SDK paths by clicking the "…" button after the Android development SDK location field.
After doing so, the JDK path should be automatically located. If a path fails to appear for the JDK it means you have not correctly installed or configured your JDK.
If you are developing on Linux you may have to manually set the path of the JDK.
Configuring an Android Standalone
To configure a stack for Android, you use the new Android deployment pane in the Standalone Application Settings dialog, available from the File menu.
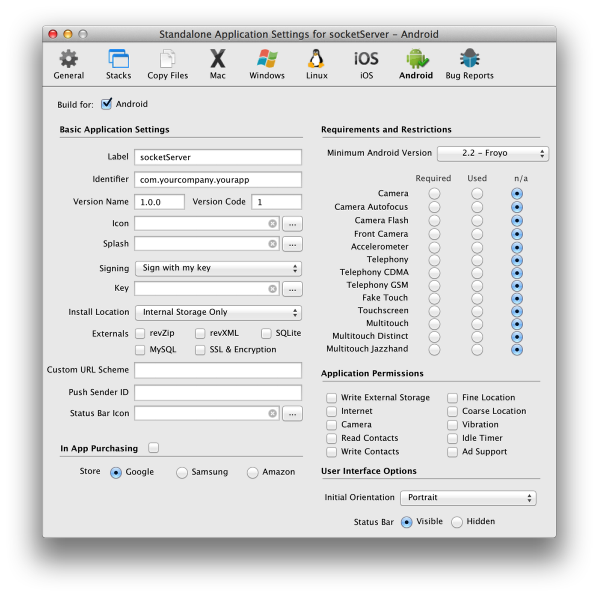
This pane allows you to set the Android-specific options for your application. You can also add files you wish to be included in the bundle using the Copy Files pane, and set the name of your application on the General pane.
To make a stack build for Android, simply check the Build for Android button and configure any options that you wish.
Note: Making a stack build for Android disables building for any other non-mobile platforms, however this is only true of the standaloneís mainstack. If you wish to share code and resources among platforms, simply factor your application into multiple stacks, using a different mainstack for mobile and desktop targets.
Note: The Inclusions, Copy Referenced Files, Bug Reports and Stacks features are not available when building for Android. If you wish to include multiple stackfiles in your application, use the Copy Files feature instead.
Configuring an Emulated Device
In order to run an Android project, you need either an emulated device running, or a real device configured for debugging connected.
Creating an emulated device is easily done using the Android SDK Manager that you will have previously installed:
- Make sure the SDK Manager is running.
- Select Tools from menu bar and then Manage AVDs
- Click New
- Choose a name for your device
- Set the Target to at least Android 2.2 API Level 8
- Fill in an SD Card size.
- Enable the Snapshot option (this isn’t essentially but significantly speeds up subsequent launches of the emulator!)
- Then click Create AVD
After you have performed these steps, your newly created device should appear in the list of existing Virtual Devices, from which you can click StartÖ to launch it.
Any running Virtual Devices will appear in the Android Pluginís device list (assuming you have correctly configured the SDK root).
Configuring a Real Device
Instead of using the emulator, you can also launch LiveCode Android projects on real Android devices after they have been appropriately configured for debugging.
If you are running on Windows then before you can connect to a real device, you need to ensure the appropriate device driver is installed on your development machine. For details of how to do this see here.
If you are running on Mac, there is no need to install any drivers as it ëjust worksí.
Once you have any necessary drivers installed, you must then put your device into debugging mode. To do this, go to the home screen, press MENU, select Applications > Development and enable USB debugging.
Finally, simply connect your device via USB to your machine and it should (after a few moments) be available in the Android Pluginís device list (assuming you have correctly configured the SDK root).
Testing an Android Application
Once you have your stack configured for Android, you can test it on either a real Android device or in the Android emulator by using the Test button on the menubar:
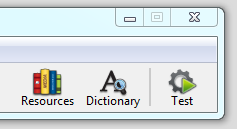
This button will be enabled for any stack that has been configured for Android deployment, and clicking it will launch the stack on the currently chosen Test Target, terminating any running app with the same id as necessary.
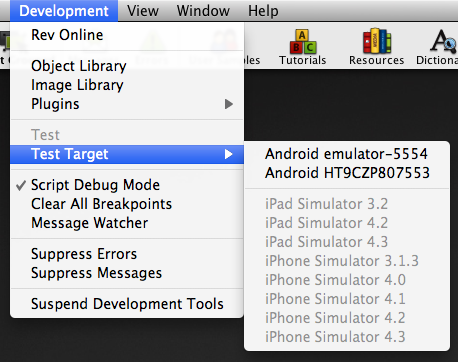
You can access the Test action from the Development menu. Additionally, this is where you can configure which target Android device to use: here you can choose which Android device to use for Android testing. Any setting you choose here will take effect the next time you use the Test button or menu-item.
Note: If the Test button or menu-item remains disabled, even if you have configured a stack for Android deployment, it probably means you havenít configured your SDKs correctly. In this case, check the appropriate settings on the Mobile Support pane of Preferences.
Further Information
Detailed step by step tutorials on setting up LiveCode for Android development can be found on the LiveCode Lessons portal.
- How do I become an Android Develeoper on Mac OS
- How do I become an Android Develeoper on Windows
- How do I become an Android Develeoper on Linux